This site is supported by our readers. We may earn a commission, at no cost to you, if you purchase through links.

Most people assume expensive binoculars work better simply because they cost more. The truth is, you might get enhanced depth perception and brightness from a budget-friendly porro prism design than from a pricier roof prism model—if your specific needs align with what porro optics deliver.
The difference between roof prism and porro prism binoculars isn’t about one being objectively better; it’s about how each manages light through distinct internal pathways that affect everything from size to image quality. Roof prisms fold light in a compact J-shape, creating sleek, aerodynamic bodies perfect for travelers. Porro prisms route light through a wider Z-pattern, producing that classic stepped shape you’ve probably seen on traditional binoculars.
Understanding these core optical differences helps you match the right design to your actual viewing situations, whether you’re scanning distant ridgelines or tracking birds through dense canopy.
Table Of Contents
- Key Takeaways
- Roof Prism Vs Porro Prism: Key Differences
- Design and Construction Features
- Optical Performance Comparison
- Prism Coatings and Optical Enhancements
- Cost and Value Considerations
- Durability and Weather Resistance
- Best Uses for Roof Prism Binoculars
- Best Uses for Porro Prism Binoculars
- Choosing The Right Prism Binoculars
- Popular Models: Roof Vs Porro Prism
- Frequently Asked Questions (FAQs)
- Conclusion
Key Takeaways
- Porro prism binoculars deliver superior depth perception and natural brightness through their wider Z-shaped light path, making them ideal for astronomy and budget-conscious buyers who prioritize image quality over portability.
- Roof prism binoculars sacrifice some depth perception for compact, weather-sealed designs that excel in rugged field conditions, though they require expensive phase-correction coatings to match porro prism clarity.
- Your actual viewing needs—whether you’re hiking trails, scanning stars, or tracking wildlife—matter more than price when choosing between these designs, since each prism type optimizes different optical trade-offs.
- Entry-level porro prisms often outperform similarly priced roof prisms in brightness and contrast, while premium roof prisms justify their cost through superior durability and lightweight construction for serious outdoor use.
Roof Prism Vs Porro Prism: Key Differences
The difference between roof prism and porro prism binoculars comes down to how light travels through the glass. This fundamental design choice affects everything from how they look in your hands to how well they perform in the field.
If you’re shopping on a budget, you’ll find plenty of quality options in both styles among the best birding binoculars under $300.
Let’s break down the core differences so you can see what makes each type tick.
Prism Arrangement and Light Path
The way light travels through your binoculars determines everything you see. Roof prisms guide light in a J-shaped path, keeping things compact, while Porro prisms create a distinctive Z-shaped route. These prism types handle optical path and image formation differently, affecting light transmission and refraction theory in ways you’ll notice instantly.
When choosing binoculars for astronomy, understanding how these prism designs affect your stargazing experience helps you pick the right tool for scanning nebulae or tracking constellations.
Light’s journey through your binoculars—whether roof prism’s compact J-path or Porro prism’s wide Z-route—determines everything you see
| Feature | Roof Prism | Porro Prism |
|---|---|---|
| Light path shape | Straight J-route | Offset Z-pattern |
| Prism alignment | Inline, compact | Offset objectives |
| Phase correction | Required coatings | Inherent clarity |
| Optical complexity | Higher precision | Simpler design |
| Light efficiency | Needs enhancement | Natural brightness |
Impact on Binocular Design
Prism geometry drives the entire shape of your optical instruments. Roof prism models fold the optical path into a straight barrel, creating slim, pocket-friendly designs. Porro prism binoculars spread objectives wider apart, giving you that classic offset look. This structural integrity difference affects lens alignment tolerances—roof designs demand tighter precision, while porro prism assemblies rely on simpler bridge geometry for ergonomic design and handling balance.
Performance-conscious users often choose compact roof prism models when selecting binoculars for concerts where portability and quick focusing matter more than maximum light transmission.
| Design Aspect | Roof Prism | Porro Prism |
|---|---|---|
| Housing shape | Compact, sleek | Wide, offset |
| Alignment tolerance | Very tight | More forgiving |
| Bridge geometry | Narrow, centered | Wide separation |
| Assembly complexity | Higher precision | Simpler build |
Applications in Modern Binoculars
Understanding these structural trade-offs helps you pick optical instruments that match real-world needs. Roof prism binoculars dominate compact designs favored by travelers who need weather-sealed housings and lightweight profiles. Modern coatings—phase correction and dielectric layers—preserve contrast in roof models. Porro prism binoculars leverage wider objectives for brighter views in budget ranges, offering ergonomic grip and expansive fields. Both prism designs now integrate image stabilization and optical enhancements like anti-fog technology for demanding field conditions.
Users who wear glasses should prioritize models with twist-up eyecups and extended eye relief for eyeglass wearers, ensuring full field-of-view without vignetting or discomfort during extended observation sessions.
| Feature | Roof Prism Models | Porro Prism Models |
|---|---|---|
| Primary market | Travel, wildlife pros | Budget buyers, astronomy |
| Coating priority | Phase + dielectric | Basic anti-reflective |
| Housing trend | Sealed, rugged | Open-bridge ergonomic |
| Field applications | Hiking, birding tours | Casual observation, stargazing |
| Prism materials | High-index glass | Standard BaK-4 glass |
Design and Construction Features
When you pick up a pair of binoculars, the first thing you notice isn’t the prisms inside—it’s how they feel in your hands. The physical design tells you a lot about what you’re holding, from the classic zigzag shape of porro prisms to the sleek, refined build of roof prisms.
Let’s look at how these construction differences play out in three key areas that matter when you’re actually using them.
Shape and Ergonomics

When you hold a pair of binoculars, the shape dictates how naturally they fit your hands. Roof Prism Binoculars feature a sleek, straight-line body that slips easily into one hand, while Porro Prism Binoculars sport a wider, stepped profile that encourages a more instinctive wrap-around grip.
Consider these ergonomic differences:
- Grip Comfort: Roof designs offer palm-friendly support; porro models allow fuller hand contact
- Hand Position: Straight barrels favor compact holding; offset bodies enable natural finger placement
- Binocular Balance: Roof prisms create forward weight distribution; porro prisms spread mass laterally
- Eye Relief: Hinge-to-lens spacing affects cheek and brow contact during extended viewing
- Ergodynamics: Slim profiles suit smaller hands; broader chassis accommodate larger grips
Your comfort during hours of birdwatching hinges on how the Ergonomic Design aligns with your hand anatomy and viewing style.
Size and Weight Comparison

When you compare binoculars side by side, you’ll notice roof prism models usually weigh 700–900 grams for an 8×42 configuration, while porro prism binoculars often tip the scales at 900–1,200 grams.
If you’re just getting started, checking out a guide to binoculars for beginners can help you decide whether lighter roof prisms or brighter porro designs suit your needs.
Compact models in roof designs leverage lightweight materials like magnesium alloy to trim mass without sacrificing durability.
Size variations emerge from prism arrangement: roof prisms create slimmer profiles, whereas porro prisms demand broader housing, affecting ergodynamics and portability.
Durability and Housing Materials

You’ll find roof prism binoculars often rely on aluminum or magnesium alloy housing materials with corrosion protection coatings, boosting frame durability and weather sealing. Porro prism binoculars usually use polycarbonate or aluminum bodies wrapped in rubber armor for shock resistance.
Both prism design types now integrate o-ring seals to deliver waterproof designs, though roof models generally offer tighter tolerances for rugged conditions.
Optical Performance Comparison

You’ve probably noticed that two binoculars can look completely different yet share the same specs on paper. The real magic happens in how each prism design manages light once it enters those tubes.
Let’s compare how roof and porro prisms stack up regarding what you actually see through the eyepiece.
Depth Perception and Field of View
When you’re scanning a landscape, your binoculars’ prism geometry shapes what you see. Porro prism binoculars deliver stronger depth cues because their wider baseline creates more pronounced depth perception—you’ll notice layers in terrain more easily. Roof prism binoculars often sacrifice some visual acuity in depth for compact design, though modern coatings boost image sharpness. Field width depends on magnification more than prism type, but edge clarity affects your field of view experience.
| Feature | Porro Prism | Roof Prism |
|---|---|---|
| Depth Perception | Enhanced by wider inter-lens distance | Reduced due to compact baseline |
| Field Width | Wider at lower magnifications | Comparable with proper design |
| Depth Cues | Stronger 3D effect across scenes | Subtler dimensional separation |
| Edge Sharpness | Good with basic coatings | Excellent with phase coatings |
Color Fidelity and Contrast
Your binoculars’ color accuracy depends more on prism coatings than prism design. High-end roof prisms use dielectric coatings to boost color fidelity, while porro prisms rely on longer light paths for contrast. Well-coated models deliver similar image sharpness in daylight, but optical clarity differs in low light—that’s where lens coatings and light transmission matter most for image quality.
| Feature | Roof Prism | Porro Prism |
|---|---|---|
| Color Accuracy | Excellent with dielectric coatings | Good with basic glass quality |
| Contrast | Requires phase-correcting coatings | Naturally high from optical path |
| Light Transmission | Coating-dependent performance | Simpler path, less light loss |
Prism Coatings and Optical Enhancements

The quality of your binoculars doesn’t just come down to prism type—it’s what happens to the light as it travels through those prisms that really matters.
Manufacturers use specialized coatings to fix optical issues and boost image quality, especially in roof prism designs where light takes a more complex path.
Let’s look at the two main coating technologies that can make or break your viewing experience.
Phase-Correcting Coatings in Roof Prisms
You’ll notice high-end roof prism binoculars pack phase-correcting coatings that tackle a quirky optical challenge: keeping wavefront alignment tight. These prism coatings work alongside dielectric mirror coatings to boost image sharpness across your entire field of view, especially at the edges where contrast can wash out.
The optical enhancement isn’t just marketing—it’s measurable coating durability meeting real-world phase correction needs in modern lens coatings and prism design.
Anti-Reflective Lens Coatings
Light bouncing off uncoated glass can steal up to 5% of your image brightness per surface—and with a dozen or more lens elements inside most binoculars, that loss adds up fast. Anti-reflective lens coating addresses this head-on by tweaking the reflective index at each glass-air boundary. Modern coating materials improve light transmission through layered optical technology that complements dielectric mirror coatings in sophisticated prism design.
Lens coating types you’ll encounter:
- Single-coated optics offer basic protection on select surfaces
- Fully-coated binoculars apply one layer to all air-to-glass interfaces
- Multi-coated versions stack several layers for enhanced optical clarity
- Fully multi-coated designs deliver peak performance across the entire light path
Cost and Value Considerations

Your budget plays a bigger role than you might think when choosing between these two prism types. The price gap isn’t just about the sticker—it reflects how each design is built and what you’re actually getting for your money.
Let’s break down why roof prisms generally cost more and whether that extra investment makes sense for your needs.
Manufacturing Complexity
You’ll notice roof prism technology demands far tighter manufacturing tolerances than Porro designs, driving up production costs through extra fabrication steps and phase-correction coating application. Assembly processes require precise alignment of high-precision prisms, while quality control rejects more units that fall outside strict specs.
This manufacturing cost difference explains why comparable Porro prism binoculars often deliver better value at entry-level price points.
Price Range Differences
That manufacturing cost difference shows up clearly when you’re shopping around. Basic Porro prism models start at about $60 to $150, while entry-level roof prisms begin closer to $100.
Mid-range options reveal an even wider gap—Porro binoculars usually run $150 to $500, whereas comparable roof prisms span $200 to $600.
Premium models for both types can exceed $1000, though roof prisms dominate this high-end segment.
Value for Entry-Level Vs. Advanced Users
Your priorities shape which prism design offers better value. If you’re just starting out, budget analysis favors Porro prism binoculars—you’ll get solid optical performance without breaking the bank.
Experienced users weighing performance metrics and long-term value often find roof prism binoculars worth the premium, since enhanced weather sealing and durability justify the cost balance over years of demanding field use.
Durability and Weather Resistance

When you’re spending good money on binoculars, you want them to survive more than a gentle stroll through the park. Roof prism models usually take the lead in weather sealing and rugged construction, but porro prism designs have their own strengths worth considering.
Let’s look at how these two types handle the elements and daily wear.
Waterproofing and Fog Proofing
If you’ve ever watched your view turn into a foggy mess mid-hike, you know that water and temperature swings can ruin even the best optics.
Roof prism binoculars typically feature tighter weather sealing and sophisticated moisture control through O-ring seal materials and nitrogen purging.
Porro prism binoculars can offer waterproofing too, but their offset design sometimes makes complete fog proofing trickier to achieve across all internal surfaces.
Shock Resistance
When you’re scrambling over rocks or tossing your pack around, drop durability matters. Roof prism binoculars rely on single-body construction and tight alignment for enhanced shock resistance during impact testing.
Porro designs often have offset stress points and looser prism mounts, reducing shock absorption in rugged designs.
Modern units in both camps add O-ring sealing and cushioning to handle bumps, but roof prisms generally win on impact protection.
Maintenance Needs
You don’t want your binoculars turning into a high-maintenance relationship, so let’s talk upkeep. Roof prisms with weather sealing require minimal fuss—just routine lens cleaning and proper storage tips.
Porro designs need more attention to prism alignment and fog prevention since their offset construction can shift over time.
Eyepiece maintenance stays simple for both, but roof prisms’ tighter tolerances mean less frequent realignment in the field.
Best Uses for Roof Prism Binoculars

Roof prism binoculars shine when you need something compact that won’t let you down in tough conditions. Their efficient design and weather-resistant build make them the go-to choice for people who spend serious time outdoors.
Let’s look at where these binoculars really prove their worth.
Birdwatching and Wildlife Observation
Roof prism binoculars shine when bird watching demands quick target acquisition and steady handheld tracking. Their compact build and sophisticated coatings deliver crisp Species Identification even in shadowed habitats, making them ideal for Wildlife Tracking and Habitat Observation. Here’s why birders prefer roof designs:
- Moderate 8x–10x magnification captures flitting passerines without motion blur
- 42–50 mm objectives balance brightness at dawn and dusk
- Close focus around 2–3 meters reveals near-perch Bird Behavior
- Lightweight 700–900 gram construction prevents fatigue during extended sessions
- Weather sealing aids Conservation Efforts in demanding field conditions
Outdoor Travel and Hiking
Traversing Hiking Trails demands Travel Gear that won’t slow you down—that’s where Roof Prism Binoculars excel as essential Outdoor Optics. Their 500–900 gram weight and compact profile slip into your pack without hassle, while waterproofing ensures Durability when Terrain Navigation meets sudden weather.
For Outdoor Safety and Wilderness Survival scouting, their efficient design outperforms bulkier Porro Prism Binoculars every time.
Professional and Rugged Applications
When durability and weather resistance matter most, roof prism binoculars deliver Professional Gear you can trust. Military and surveillance teams rely on their Rugged Design—nitrogen-purged seals prevent fogging, rubberized armor absorbs impacts, and phase-coated optics maintain clarity in downpours.
For Tactical Use demanding Field Durability and Outdoor Performance, their sealed construction and ergo dynamics outclass Porro Prism Binoculars in extreme conditions. The high image quality is due to the use of optical roof prisms in these devices.
Best Uses for Porro Prism Binoculars

Porro prism binoculars shine in situations where you value image quality and brightness over portability. Their wider light path and simpler optical design make them ideal for activities that don’t require hiking long distances or dealing with harsh weather.
Let’s look at three scenarios where porro prisms really come into their own.
Casual Birdwatching
Porro prism binoculars shine for casual birding because they deliver bright, clear views without the premium price tag. Their wide field of view makes scanning branches easy when identifying bird species with field guides or tracking migration patterns through suburban parks.
The enhanced depth perception helps spot nesting habits and distinguish bird calls by location, giving beginners solid binoculars for birding without breaking the bank.
Astronomy and Stargazing
Clear, dark skies reward celestial observation with porro prism binoculars that gather more light for cosmic viewing. Their wider light path brightens deep-sky objects during night vision sessions, making galactic exploration smoother than most roof prism models at similar prices.
The larger objective lenses pull in faint starlight for astronomy and stargazing, while tripod mounting helps steady your view during extended astral photography prep sessions.
Budget-Friendly Options
Beyond stargazing, you’ll find porro prism binoculars shine for frugal buyers seeking affordable gear without sacrificing essential features. Budget models often deliver bright images and solid bird watching equipment below $100, making them perfect discount binoculars for newcomers. You won’t get premium roof prism performance, but the cost savings let you explore nature without breaking the bank.
- Porro designs provide better brightness than cheap optics in comparable roof prism binoculars
- Entry-level magnifications like 8×42 balance portability with viewing power
- Simple construction means fewer repairs and straightforward maintenance over time
Choosing The Right Prism Binoculars

Picking the right binoculars isn’t just about roof versus porro—it’s about matching the design to what you actually need. You’ll want to think through a few practical factors before you commit to one style over the other.
Let’s break down the key decision points that’ll help you choose with confidence.
Key Decision Factors
When weighing your options, start with a decision framework that considers your user needs first—whether you’re tracking birds daily or scanning horizons occasionally.
Budget analysis matters, since porro prism binoculars offer excellent optical performance at lower prices, while roof prism binoculars deliver premium optical quality and durability.
Performance metrics like coating technology and prism design directly impact your binocular comparison results.
Intended Use and User Preferences
Once you’ve weighed budget and performance metrics, think about your actual activity types and usage scenarios. Your user needs shape everything—are you birding from a blind, hiking rugged trails, or stargazing from your backyard? Here’s how buyer profiles usually break down:
- Compact roof prism design for backpackers prioritizing ergonomics
- Wide-field porro models for astronomy enthusiasts on fixed budgets
- Weather-sealed roof binoculars for marine and wildlife professionals
- Lightweight porro prism for kids learning bird identification
- Premium roof designs for serious birders demanding optical superiority
Match your preference factors to real-world scenarios, and the right prism design becomes obvious.
Magnification and Objective Size Choices
Your magnification options generally span 6x to 12x, with 8x offering a solid default for wildlife and 10x delivering sharper distant detail.
Objective sizes from 25 mm to 42 mm balance light gathering against weight—larger lenses brighten low-light images but add bulk.
Exit pupil, calculated by dividing objective diameter by magnification, directly affects image quality and comfort across varying conditions.
Popular Models: Roof Vs Porro Prism

Now that you understand the core differences between these two prism types, let’s look at some real-world examples that show how these designs perform in the field.
I’ve picked two popular models that represent each prism style well—one roof prism and one porro prism—so you can see how the features we’ve discussed actually translate into finished binoculars.
We’ll compare their strengths and trade-offs to help you decide which design fits your needs.
Celestron Nature Binoculars (Roof Prism)
You’ll find the Celestron Nature series delivers solid roof prism binoculars without breaking the bank. These models feature phase-corrected lens coating and reliable prism alignment in a slim, rubberized housing. The central focus mechanism provides smooth lens calibration, while the compact prism design keeps weight manageable for extended use. Optical clarity remains consistent across most lighting conditions, making them dependable companions for field observation.
| Feature | Specification | Performance Notes |
|---|---|---|
| Prism Type | Roof Prism Design | Compact, straight-through light path |
| Coating | Multi-coated Optics | Enhanced light transmission |
| Housing | Rubber Armor | Shock-resistant, improved grip |
| Sealing | Nitrogen-Purged | Fog-proof and weather-sealed |
| Weight | 40-50mm Objective | Balanced for one-handed operation |
Vortex Raptor Porro Prism Binoculars
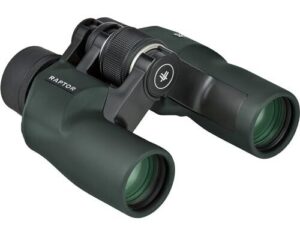
You’ll appreciate how the Vortex Raptor’s porro prism geometry delivers outstanding optical clarity through its offset lens arrangement. That distinctive binocular design produces enhanced depth perception and high-quality field visibility compared to many roof prism alternatives.
The 8.5x32mm configuration provides comfortable eye relief during extended observation sessions, while multi-coated optics maintain sharp image quality across varied lighting.
Though this porro prism model lacks true image stabilization, its sturdy rubber armor and nitrogen-purged housing guarantee reliable performance when you’re tracking wildlife or scanning distant landscapes.
- The porro prism design gives you a wider field of view and better depth perception than most roof prism binoculars in this price range.
- Rubber armor and nitrogen purging make these tough enough for camping, hunting, and all-weather use.
- Fully multi-coated lenses deliver bright, crisp images even in lower light conditions.
- Some users report quality control issues like faulty optics or alignment problems.
- You’ll notice barrel distortion and chromatic aberration at the edges of the field of view.
- The bulkier porro prism shape makes them less compact than similar roof prism models.
Pros and Cons of Each Model
When comparing these two prism systems, each binocular design reveals distinct optical tradeoffs that shape your viewing experience. The Celestron Nature DX ED roof prism binoculars offer compact durability and crisp ED glass optics, though they feature a narrower field of view and limited eye relief. Meanwhile, the Vortex Raptor porro prism binoculars provide outstanding image quality and wide-angle views at a budget-friendly price, but field curvature reduces edge sharpness during scanning. Understanding the prism system functions is vital for making an informed decision.
| Feature | Celestron Nature (Roof) | Vortex Raptor (Porro) |
|---|---|---|
| Optical Performance | Bright ED glass, sharp center | Wide field, strong depth perception |
| Binocular Durability | Compact, waterproof sealing | Rubber-armored, fog-proof |
| Portability | Efficient, travel-friendly | Bulkier, offset design |
| Image Quality | High contrast, narrow field | Color-accurate, edge softness |
| User Preferences | Professionals, hikers | Budget buyers, astronomers |
Frequently Asked Questions (FAQs)
Can I replace prisms in my binoculars myself?
Replacing your own prisms sounds simple until you realize precision alignment demands specialized tools. DIY risks include optical misalignment, double images, and warranty voidance—professional repair usually proves more cost-effective than attempting prism replacement yourself.
Do roof prisms lose brightness over time?
Roof prism binoculars maintain brightness retention when you care for them properly. Coating durability determines light transmission quality—environmental wear can cause optical degradation over decades, but phase coatings in modern prism design preserve image quality remarkably well.
Which prism type works better at night?
Your night vision depends more on objective size and coatings than prism geometry.
Porro prism designs offer slightly better depth perception in darkness, while roof prism models with phase-coating deliver enhanced image clarity and optical brightness.
Are porro prism binoculars heavier than roof?
Weight comparison isn’t straightforward—it depends more on objective size and build materials than prism design alone. Both types can be light or heavy, though roof models often add mass through extra coatings and ruggedization.
Do theaters prefer one prism type over another?
Most venues don’t have a fixed prism preference. Stage optics and cinema equipment choices depend on specific projects, rental availability, and cost rather than theater lighting standards favoring porro prism binoculars or roof prism binoculars.
Conclusion
Think of binoculars as windows into two distinct philosophies: roof prisms favor sleek portability, while porro prisms prioritize depth and brightness.
Understanding the difference between roof prism and porro prism binoculars means you’re no longer guessing—you’re choosing based on what your eyes actually need.
Match the design to your viewing style, and you’ll stop chasing specs that don’t serve you. The right optics feel invisible; they simply reveal what you came to see.
- https://github.com/vinhphunguyen/how-to-write-a-paper/blob/master/how-to-write-paper.out
- https://mcluhan.unk.edu/lawson/?page_id=187
- https://www.sciencedirect.com/science/article/pii/S0749208123000268
- https://www.bestbinocularsreviews.com/blog/cheap-binoculars-roof-or-porro-prism-best-02/?amp=1
- https://www.scribd.com/document/356795007/Research-Methods-Knowledge-Base