This site is supported by our readers. We may earn a commission, at no cost to you, if you purchase through links.

Most store-bought hummingbird nectar contains red dye #40, a petroleum-based additive that can damage bird liver function over time. You don’t need it. The best hummingbird nectar recipe homemade requires just two ingredients you already have in your pantry: white sugar and water.
Mix them in a 1:4 ratio, and you’ve created a solution that mirrors the natural sucrose concentration found in trumpet vine and bee balm flowers. This simple formula costs pennies per batch, stores for up to a week in your fridge, and keeps ruby-throats coming back to your feeders without exposing them to unnecessary chemicals.
Here’s exactly how to make it, store it, and maintain clean feeders that protect bird health.
Table Of Contents
- Key Takeaways
- Best Hummingbird Nectar Recipe at Home
- Choosing Safe Sugar and Water for Nectar
- Nectar Preparation Tips and Common Mistakes
- Scaling and Storing Homemade Nectar
- Maintaining Hummingbird Feeders for Health
- Attracting Hummingbirds to Your Garden
- Benefits of Homemade Hummingbird Nectar
- Top Products for Homemade Nectar Success
- Frequently Asked Questions (FAQs)
- What is the best homemade nectar for hummingbirds?
- What DIY hummingbird nectar mistakes to avoid?
- Is cane sugar or granulated sugar better for hummingbirds?
- Why wrap foil around hummingbird feeder?
- What nectar attracts the most hummingbirds?
- What is the best hummingbird nectar recipe?
- How to make homemade hummingbird food?
- Can You DIY hummingbird nectar?
- Can hummingbirds eat homemade nectar?
- Can I use tap water to make hummingbird nectar?
- Conclusion
Key Takeaways
- Mix one part white granulated sugar with four parts water to create nectar that mirrors natural flower concentrations—skip red dye, honey, and all substitutes since they damage hummingbird liver function and digestion.
- Clean your feeders every 1-3 days depending on temperature (daily above 80°F) because mold and fermentation kill birds faster than you’d expect, and homemade nectar costs pennies compared to store-bought options that run 15-37 cents per ounce.
- Boil water to dissolve sugar completely, then cool to room temperature before filling feeders since hot nectar stresses their metabolism and warps plastic parts.
- Hang feeders 4-6 feet high in partial shade at least 10 feet from windows, and pair them with native nectar plants like bee balm to create a reliable food source that supports hummingbirds during their 500-mile nonstop migrations.
Best Hummingbird Nectar Recipe at Home
Making your own hummingbird nectar is easier than you think, and you don’t need fancy ingredients or equipment.
All you need is white sugar and water in a 1:4 ratio—no dyes, honey, or substitutes that could harm your visitors (check out these proven hummingbird feeding techniques for more tips).
The Smithsonian’s National Zoo backs a simple recipe that’s been feeding these tiny speedsters for years.
Here’s everything you need to mix up a batch that’ll keep hummingbirds coming back to your yard.
Smithsonian-Approved Sugar Water Ratio

The Smithsonian’s hummingbird nectar recipe uses a simple 1:4 sugar water ratio—one part white granulated sugar to four parts water. This sugar concentration mirrors natural flower nectar, giving your tiny visitors the energy they need without risking dehydration or kidney stress.
The Smithsonian’s 1:4 sugar-to-water ratio perfectly mimics natural flower nectar, fueling hummingbirds without harming their delicate systems
Mix one cup of sugar with four cups of water, and you’ve nailed the sweet spot for hummingbird nutrition and bird safety. For additional guidance on calculating sugar and water quantities, explore resources from Smithsonian’s National Zoo.
Ingredient List and Measurements

Now that you know the right ratio, let’s break down what you’ll actually need. Your hummingbird nectar recipe calls for just two ingredients: plain white granulated sugar and clean water. Measure them carefully:
- ¼ cup sugar + 1 cup water – fills one small feeder
- ½ cup sugar + 2 cups water – medium batch for refills
- 1 cup sugar + 4 cups water – large batch (1 quart)
- 2 cups sugar + 8 cups water – extra-large for multiple feeders
Avoid honey, brown sugar, or artificial sweeteners—they’re unsafe for hummingbirds. For best results, learn about the recommended.
Step-by-Step Mixing Instructions

Making sugar water for hummingbirds is simple once you’ve got your measurements ready. Combine white granulated sugar with hot or boiling water in a pot, then stir continuously for 1–2 minutes until every crystal dissolves.
Let the nectar cool completely to room temperature before filling feeders—rushing this step can burn delicate hummingbird tongues and ruin your careful sugar concentration.
Choosing Safe Sugar and Water for Nectar

You can’t just toss any sweetener into water and call it hummingbird nectar. The sugar you choose matters as much as the ratio, and using the wrong type can actually harm the tiny birds you’re trying to help.
Let’s break down which sugars work, what kind of water to use, and which ingredients you need to skip entirely.
White Granulated Vs. Cane Sugar
You might wonder if all white sugar is the same for hummingbird nectar. Both cane and beet sugar deliver 99.9 percent sucrose, so the sugar concentration stays consistent.
However, cane benefits include a cleaner taste and no detectable smell, while beet sugar can carry a faint aftertaste. The refining process strips molasses from both, but cane sugar often wins for flavor neutrality in your feeders.
Water Purity and Boiling Guidelines
For hummingbird nectar preparation and mixing, stick with cold tap water that’s safe for you to drink—it’s already fine for your feeder.
Boiling kills microbes but won’t remove heavy metals or most contaminants, so a brief rolling boil is enough if you want extra peace of mind.
Let boiled water cool completely before dissolving sugar to keep the water ratio accurate and protect visiting birds.
Sugar Types to Avoid
Skip brown sugar and raw sugars—their molasses adds iron that builds up to toxic levels in hummingbirds over time. Honey risks bacterial growth and doesn’t match natural flower nectar, while artificial sweeteners offer zero calories these high-energy birds desperately need.
Unrefined sugars and sugar substitutes introduce minerals and additives that can harm digestion and hide mold as the mixture darkens, speeding up dangerous sugar crystallization inside your feeder.
Nectar Preparation Tips and Common Mistakes

Mixing sugar water sounds simple, but a few key techniques make all the difference between healthy nectar and a feeder full of problems. You’ll want to know how to dissolve sugar completely, when your mixture is safe to use, and what ingredients can actually harm the birds you’re trying to help.
Here’s what to focus on when you’re preparing nectar at home.
Proper Dissolving Techniques
You want your sugar water nectar recipe crystal-clear, so start with warm water between 120 and 190 degrees—it helps granulated table sugar dissolve fast without caramelization. Stir continuously for one to two minutes until the liquid looks completely transparent.
If you spot any grains at the bottom, add warm water and mix again. Shake in a sealed jar if you’re skipping heat altogether.
Cooling Before Filling Feeders
Let your sugar water cool to room temperature before filling any hummingbird feeder—hot nectar above 100 degrees can stress their fast metabolism and warp plastic parts. Set the pot in a sink of cold water to speed things up, or refrigerate a big batch so you’re ready to refill quickly.
Cooled nectar slows bacteria growth and keeps birds coming back safely.
Avoiding Dyes and Preservatives
Red dye in commercial nectar can expose hummingbirds to petroleum-based additives at concentrations fifteen times higher than safe human levels—completely unnecessary when your feeder itself attracts birds. Stick to plain white sugar and water for true nectar safety.
Preservatives, flavors, and colored additives speed up mold growth and risk fungal infections, so keep sugar water simple and change it every one to three days in warm weather.
Scaling and Storing Homemade Nectar

You don’t need to make a gallon of nectar if you’ve only got one feeder. The beauty of the 1:4 ratio is that you can scale it to any size—one cup, one quart, or whatever fits your setup.
Here’s how to make the right amount and keep it fresh until your hummingbirds come back for more.
Adjusting Batch Size for Your Needs
You don’t need a one-size-fits-all approach to your hummingbird nectar recipe. Scaling the sugar water ratio to match your unique setup keeps birds healthy and your feeder fresh.
- Match your feeder capacity – A 16-ounce hummingbird feeder needs about 1/2 cup sugar and 2 cups water, while tiny 4-ounce models work great with 1/8 cup sugar batches.
- Watch bird traffic patterns – Busy yards with dozens of visitors can handle larger nectar yields, but quiet spots need smaller batches to prevent waste.
- Adjust for weather conditions – Hot summer days spoil nectar faster, so mix smaller amounts you’ll use within two days.
- Scale the recipe freely – The 1:4 ratio stays constant whether you’re making 4 ounces or 64 ounces of sugar water.
Refrigeration and Shelf Life
Fresh hummingbird nectar stored in a sealed container in your refrigerator stays good for seven to ten days—your personal insurance against spoilage. Label each batch with the mix date so you’ll know when that two-week window closes. Cloudiness, sour smells, or color shifts? Toss it immediately.
For longer nectar storage, freeze portions in airtight containers for up to thirty days, then thaw completely before filling feeders.
Handling Leftover Nectar Safely
Once you’ve mixed your nectar recipe, proper nectar storage starts with the right container. Choose a clean glass jar with a tight lid—food-grade plastic also works if it seals completely. Never reuse your hummingbird feeder as a storage vessel, since residue clings to seams and ports even after rinsing.
Watch for these spoilage signs before refilling:
- Cloudy liquid or stringy film means fermentation has started—dump it immediately.
- Sour or yeasty odors signal microbial growth that can harm hummingbirds.
- Visible mold, even tiny specks, requires discarding the entire batch.
- Nectar older than your storage window should be tossed regardless of appearance.
Container sanitizing matters as much as the nectar itself. Wash every jar in hot soapy water, rinse thoroughly, and let it air-dry before storing homemade nectar. Label each batch with the mix date so you’ll rotate older portions first.
For safe disposal, pour old nectar down your indoor sink—not outdoors where it attracts ants and wasps. Rinse the empty container right away to prevent sticky buildup. Proper hummingbird feeder maintenance and fermentation prevention keep your backyard visitors healthy all season long.
Maintaining Hummingbird Feeders for Health

You’ve made the perfect nectar, but your job isn’t done yet. A dirty feeder can make hummingbirds sick faster than you can say “sugar water.”
Here’s how to keep your feeders clean, safe, and ready for these tiny visitors.
Cleaning Frequency and Best Practices
Hot weather demands daily cleaning to prevent nectar spoilage and fatal mold—above 80 degrees, empty and scrub your feeder every day or two.
In mild spring or fall conditions, hummingbird feeder maintenance stretches to every three days. Cooler temps under 60 degrees allow twice-weekly feeder sanitizing.
These feeder maintenance tips protect hummingbird health and sugar water safety year-round.
Mold and Spoilage Prevention
Regular feeder cleaning stops mold growth before it starts, but you also need to watch for Spoilage Signs between sanitizing sessions. Check your sugar water daily for cloudiness, dark swirls, or sour smells that signal Bacterial Growth and Nectar Fermentation. These red flags mean trouble:
- Cloudy nectar instead of crystal-clear liquid
- Stringy or thick texture clogging feeding ports
- Fermented odor near the reservoir
- Black spots indicating active mold growth
- Bees and ants swarming more than usual
Toss spoiled batches immediately—wrong Sugar Ratios or heat accelerate contamination, putting your hummingbirds at risk.
Safe Placement for Feeder Accessibility
Beyond feeder maintenance and cleaning, ideal feeder placement keeps hummingbirds safe and you efficient. Hang your bird feeder at the right height—about 4 to 6 feet off the ground—for predator control while ensuring easy access for refills. Consider window safety by positioning hummingbird feeders at least 15 feet from glass, and design your yard layout so feeder visibility from windows lets you monitor nectar levels without trekking across the garden.
| Placement Factor | Recommended Distance/Height |
|---|---|
| Feeder Height | 4 to 6 feet above ground |
| Window Safety | 15+ feet from large windows |
| Nearby Cover | 10 to 15 feet from trees/shrubs |
| Sun Exposure | Partial shade preferred |
| Human Access | Easy reach from walkway/patio |
Attracting Hummingbirds to Your Garden

You’ve mastered the nectar recipe, now it’s time to bring those hummingbirds straight to your backyard. Getting these tiny acrobats to visit isn’t just about hanging a feeder and hoping for the best.
Let’s look at three proven ways to transform your garden into a hummingbird haven they can’t resist.
Strategic Feeder Placement
Where you hang your hummingbird feeders matters more than you might think. Aim for a feeder height of 4 to 6 feet—high enough for predator safety but within easy reach for feeder maintenance and cleaning. Balance sun and shade by placing bird feeders where they get morning light and afternoon cover.
Keep feeders at least 10 feet from windows to prevent collisions, and try clustering feeders in separate zones so territorial birds can’t dominate every station.
Complementary Nectar-Rich Plants
Feeders alone won’t satisfy nectar-loving birds year-round. Pair your homemade hummingbird nectar recipe with nectar-bearing native plants like bee balm and cardinal flower for a reliable buffet.
Tropical flowers such as hibiscus and heliconia thrive in warm zones, while desert plants like red yucca handle arid heat.
Garden standards from pollinator gardens—think salvia and penstemon—extend the feast from spring through fall, keeping hummingbirds coming back.
Creating a Safe Feeding Environment
Predator Control begins where your hummingbird nectar meets the yard. Hang feeders 4 to 6 feet high and at least 10 feet from dense shrubs to cut ambush risks. Position them within three feet of windows or farther to prevent collisions.
Partial shade slows Nectar Spoilage, while water-filled ant moats block crawling pests.
Clean weekly, replace nectar every 2 to 4 days, and space multiple feeders apart to reduce territorial stress.
Benefits of Homemade Hummingbird Nectar

Making your own hummingbird nectar isn’t just about getting the recipe right. It’s about taking control of what these fascinating birds consume while saving money and protecting their health.
Here’s why homemade nectar beats store-bought options every time.
Cost Savings Over Store-Bought
Making your own hummingbird nectar slashes costs dramatically. A simple budget analysis shows homemade sugar water costs about 1 cent per ounce, while commercial nectar runs 15 to 37 cents per ounce.
That price evaluation reveals real savings—switching to a DIY hummingbird nectar recipe can cut your expense by 30 times. For a busy feeder using 2,400 ounces per season, you’ll save over $800 compared to store-bought options.
Healthier, Additive-Free Feeding
When you control sugar sources and skip artificial dyes, your homemade hummingbird food delivers premium bird nutrition without hidden risks. Commercial nectar often contains red dye that can concentrate to unsafe levels, while your simple sugar water matches natural ingredients hummingbirds evolved to digest.
Careful nectar preparation and mixing plus regular feeder sanitation give you pure nectar quality that protects tiny systems from fungal threats and digestive stress.
Supporting Backyard Wildlife
Your homemade hummingbird nectar starts a chain reaction across backyard habitats that aids wildlife conservation far beyond one bird. When hummingbirds thrive at your feeders, they:
- Pollinate native plantings while feeding, strengthening eco systems
- Signal habitat quality to other bird friendly species
- Attract beneficial insects that balance your garden
- Encourage you to reduce pesticides for safer backyard birding
- Build diverse food webs through consistent hummingbird care
Top Products for Homemade Nectar Success
Making your own nectar is simple, but having the right tools makes it even easier. You don’t need fancy equipment, just a few reliable basics that’ll serve you well season after season.
Here are the essentials that’ll set you up for success.
1. eWonLife Hummingbird Feeder
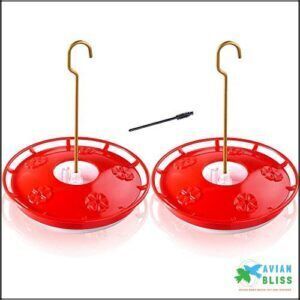
You’ll want a feeder that won’t leave sticky puddles on your deck, and this two-pack from eWonLife delivers. Each 16-ounce saucer holds enough nectar for multiple birds without creating mess.
The bright red lid lifts off in one piece for quick refills, while the wide mouth lets you rinse thoroughly every few days. Five bee-proof ports let hummingbirds feed from different angles, and the built-in ant moat keeps crawlers away.
At 7.5 ounces empty, it won’t strain your shepherd’s hook.
| Best For | Bird lovers who want a mess-free feeder that’s easy to clean and keeps ants and bees away from the nectar. |
|---|---|
| Material | Plastic |
| Weight | 7.5 ounces |
| Dishwasher Safe | Yes |
| Color | Red |
| Brand | HF201 Model |
| Primary Use | Hummingbird feeding |
| Additional Features |
|
- Leak-proof design prevents sticky messes on your deck or patio
- Wide-mouth saucer makes cleaning and refilling quick and simple
- Built-in ant moat and bee-proof ports keep pests out while hummingbirds feed freely
- May not hold up well in strong winds or harsh weather
- Small feeding holes can sometimes let tiny bugs or flies through
- The bowl may yellow after a season, though it stays functional
2. T Fal Nonstick Sauce Pot

A 2-quart nonstick pot turns nectar-making into a breeze. The T-Fal model heats evenly across its aluminum base, so sugar dissolves without scorching, and the smooth interior lets you pour syrup cleanly into feeders.
Its tempered glass lid shows you when the mix reaches a gentle boil, while riveted grips stay cool enough to hold safely.
Hand-wash with mild soap to protect the coating, and you’ll get years of quick batches—eight cups at a time.
| Best For | Home cooks who make hummingbird nectar or small batches of sauces and soups and want hassle-free cleanup. |
|---|---|
| Material | Specialty Nonstick |
| Weight | 3.1 pounds |
| Dishwasher Safe | Yes |
| Color | Black |
| Brand | T-Fal |
| Primary Use | Cooking |
| Additional Features |
|
- Even heating prevents sugar from burning when you’re making nectar or syrup
- Nonstick surface makes pouring and cleaning incredibly easy
- Glass lid lets you monitor boiling without lifting the cover
- Nonstick coating can wear down with heavy use over time
- Not compatible with induction stovetops
- Dishwasher use may trap water in the lid handle
3. Cineyo Stainless Steel Measuring Cups
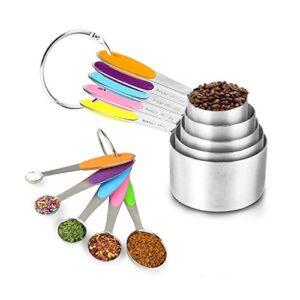
Precision starts with a 10-piece stainless steel set that won’t warp or stain. Cineyo cups feature colored silicone grips that help you grab the right size quickly—essential when you’re mixing the 4-to-1 ratio—and engraved markings that never fade.
They nest tightly for drawer storage, and the flat bases rest stable on your counter while you scoop sugar. Toss them in the dishwasher after each batch without worrying about rust, and you’ll measure nectar ingredients accurately for years.
| Best For | Home bakers who need reliable measuring tools that won’t fade or warp, especially when precision matters for recipes like hummingbird nectar. |
|---|---|
| Material | Stainless Steel |
| Weight | 1.94 pounds |
| Dishwasher Safe | Yes |
| Color | Multi-colored handles |
| Brand | CINEYO |
| Primary Use | Measuring ingredients |
| Additional Features |
|
- Engraved measurements stay readable forever, even after hundreds of washes
- Colored silicone handles make it easy to grab the right size quickly
- Nested design saves drawer space and includes a ring for hanging storage
- A few users reported rust spots appearing after dishwasher use
- Metal construction feels thin and less sturdy than expected
- Some sets had mislabeled cups that didn’t match the engraved measurements
4. Domino Granulated Sugar
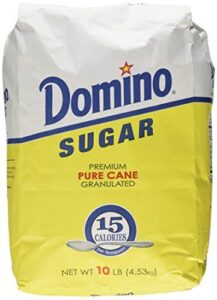
Pure cane sugar dissolves fast and matches the sucrose birds find in flowers. Domino Granulated Pure Cane Sugar—not the Golden or brown varieties—gives you extra-fine crystals that mix clear in hot water every time.
A 4-pound bag yields roughly 9 cups of sugar, enough to make 36 cups of nectar at the proven 1-to-4 ratio. You’ll find it on every grocery shelf, so you can grab a fresh bag whenever your feeder runs dry.
| Best For | Home bakers and hummingbird enthusiasts who need a reliable, large-quantity sugar that dissolves quickly and consistently. |
|---|---|
| Material | Sugar |
| Weight | 10 pounds |
| Dishwasher Safe | N/A |
| Color | White |
| Brand | Domino |
| Primary Use | Sweetening/Baking |
| Additional Features |
|
- Extra-fine crystals dissolve fast and completely in hot water, perfect for making clear hummingbird nectar
- 10-pound bag provides excellent value and reduces shopping trips—one bag makes dozens of batches
- Pure cane sugar with no additives, so it’s safe for birds and works for all your baking and cooking needs
- Packaging quality can be inconsistent, with some users reporting torn bags or leaks during shipping
- The large 10-pound size may be awkward to store or handle in smaller kitchens
- Price fluctuates between sellers, so you might pay more depending on where you buy
Frequently Asked Questions (FAQs)
What is the best homemade nectar for hummingbirds?
Store-bought nectar is basically sugar water with a fancy label and inflated price tag.
Mix one part white granulated sugar with four parts boiled, cooled water—no dyes, no preservatives, just pure simplicity.
What DIY hummingbird nectar mistakes to avoid?
Skip red dyes—your feeder’s color attracts birds, not the liquid. Stick to the 1:4 ratio, use only white sugar, and scrub feeders regularly to prevent deadly mold.
Is cane sugar or granulated sugar better for hummingbirds?
Both work perfectly—refined cane and beet sugars deliver the same 9 percent sucrose hummingbirds crave. Plain white granulated sugar matters more than its source, so grab whichever’s on your shelf.
Why wrap foil around hummingbird feeder?
Aluminum foil reflects sunlight away from your feeder, keeping the nectar cooler on scorching days.
Cooler sugar water ferments slower, so bacteria take longer to build up and spoil your hummingbirds’ meal.
What nectar attracts the most hummingbirds?
What wins hummingbirds over? Simple sugar water at a 1:4 ratio—one part white sugar, four parts water—matches natural flower nectar and reliably draws more birds than commercial mixes with dyes or additives.
What is the best hummingbird nectar recipe?
Mix one part plain white sugar with four parts water, then boil and cool completely.
This ratio mirrors natural flower nectar and gives hummingbirds the energy they need without harming their health.
How to make homemade hummingbird food?
Stir one cup of refined white sugar into four cups of boiling water until dissolved.
Let it cool completely, then pour the nectar into your feeder and watch hummingbirds flock to your yard.
Can You DIY hummingbird nectar?
Yes, you can easily make hummingbird nectar at home using just two ingredients: white granulated sugar and water.
Mix one part sugar with four parts water, dissolve completely, and you’re done.
Can hummingbirds eat homemade nectar?
Hummingbirds thrive on homemade nectar when you mix one part white sugar with four parts water. This simple recipe mirrors natural flower nectar, giving them safe energy without harmful additives or preservatives.
Can I use tap water to make hummingbird nectar?
Regular tap water works fine for hummingbird nectar in most homes. If your water smells strongly of chlorine or runs through a softener, switch to filtered or bottled spring water instead.
Conclusion
Your feeder becomes a lifeline when migration drains their reserves. The best hummingbird nectar recipe homemade—one part sugar, four parts water—gives them clean fuel without risking their liver function. Skip the red dye. Boil your water. Clean your feeders every three days.
These small acts protect birds that fly 500 miles nonstop across the Gulf of Mexico. You’re not just feeding hummingbirds. You’re keeping them alive for the journey home.
- https://www.hummingbirdsplus.org/nature-blog-network/easy-hummingbird-nectar-recipe-with-just-two-ingredients/
- https://slimpickinskitchen.com/hummingbird-nectar-recipe/
- https://usbirdguide.com/hummingbird/the-ultimate-guide-to-homemade-hummingbird-nectar-and-what-to-avoid/
- https://fawkesfocus.com/blog/hummingbird-nectar/
- https://profile.google.com/cp/Cg0vZy8xMXliMDN4d2Ni