This site is supported by our readers. We may earn a commission, at no cost to you, if you purchase through links.

The first birdhouse I built leaned like it had opinions about gravity. The entrance hole was wrong for the species; the wood swelled after one rainstorm, and no bird touched it for two seasons.
Turns out birds are particular—and they should be. A bluebird needs a 1.5-inch entrance hole and a 5×5 floor. Give it the wrong dimensions and you’ve built a sparrow trap.
Getting birdhouses for beginners right comes down to three things: species-matched plans, safe untreated wood, and smart placement. Nail those, and you’ll have tenants by spring.
Table Of Contents
- Key Takeaways
- Pick Your First Birdhouse Plan
- Choose Safe Wood and Tools
- Build a Birdhouse Step by Step
- Place, Protect, and Maintain It
- Top 10 Beginner Birdhouse Products
- 1. Kettle Moraine Cedar Bluebird Predator Guard
- 2. Woodlink Bluebird House BB1
- 3. Stovall Western Mountain Bluebird House
- 4. PLESIU Cedar Bird Nesting Box
- 5. Birds Choice Cedar Nesting Platform
- 6. Woodlink Cedar Wren Chickadee Birdhouse
- 7. Woodlink Audubon Wren Birdhouse
- 8. Stokes Purple Martin Guide
- 9. FMS Ravenox Purple Martin Gourd Rack
- 10. BestNest Purple Martin House Gourds Kit
- Frequently Asked Questions (FAQs)
- What do birds like most in birdhouses?
- What not to do when building a birdhouse?
- What time of year should you put up a bird box?
- How high off the ground should a birdhouse be placed?
- Can I paint my birdhouse bright colors?
- How do I attract birds to a new box?
- What time of year should I put up birdhouses?
- How long before birds move in?
- Can two species share the same birdhouse?
- Conclusion
Key Takeaways
- Species-specific dimensions—like a 1.5-inch entrance hole and 5×5-inch floor for bluebirds—are non-negotiable, because the wrong size means the wrong bird (or no bird) moves in.
- Untreated wood, like western red cedar, is the only safe choice, since pressure-treated boards leach chemicals directly into the nest where chicks breathe and sleep.
- Smart placement beats a perfect build every time—face the entrance east, mount it 5–10 feet up, and keep it at least 30 feet from feeders to cut predator traffic and nest disturbance.
- A removable clean-out panel isn’t optional; skipping it means moldy nests and lost seasons, but adding one lets you reset the box every fall in minutes.
Pick Your First Birdhouse Plan

Before you cut a single board, it helps to know which bird you’re actually building for. The species you choose shapes everything — floor size, hole diameter, even how high you mount the finished box.
A quick read on preventing common bird accidents can also steer your design choices before you ever pick up a saw.
Here’s a look at the plans that make the most sense for a first build.
Best Beginner Species to Build For
Start with the right bird and you’re halfway there. These five cavity nesters are forgiving for first-time builders:
- Eastern Bluebird – Open Bluebird Habitat, simple Bluebird House Plans
- Black-capped Chickadee – A compact Chickadee Box works perfectly
- House Wren – Wren Preference leans tiny; Wren House Plans are dead simple
- Tree Swallow – Tree Swallow Size mirrors bluebird specs
- Purple Martin – A starter Purple Martin Colony needs multiple cavities
Single-board Birdhouse Plans Under $20
Once you’ve picked your bird, grab a single pine board — that’s genuinely all you need. Budget material sourcing doesn’t get simpler than one 1×6, five feet long, under $20 total.
These DIY birdhouse plans use recycled scrap utilization for the roof or perch. Make sure to install ventilation holes for proper airflow.
| Species | Approx. Cost |
|---|---|
| Wren | ~$8 |
| Bluebird | ~$10 |
Matching Floor Size to Target Birds
Floor size matters more than you’d think. Most cavity nesters — wrens, chickadees, bluebirds, finches, sparrows — do best with a 4×4 to 4×5‑inch floor.
Bluebird floor size and Tree Swallow boxes bump to 5×5‑inch. Wren floor size and chickadee floor size stay snug at 4×4. Designing species-specific nest boxes around floor dimensions is the real foundation of smart nesting box design.
For bluebirds, the bluebird entrance hole size is 1.5 inches, which helps keep out larger birds.
Choosing The Right Entrance Hole Size
Once you’ve nailed the floor size, the entrance hole size makes or breaks everything. Species-specific diameters aren’t suggestions — wrens need 1⅛ inches, bluebirds need 1½ inches, and a wrong entrance aperture size means the wrong tenant moves in.
Always smooth the edge; edge smoothness is important — splinters injure fledglings.
Skip oval holes. Rounded vs oval isn’t a debate — round wins for predator-proof sizing every time.
Why Decorative Birdhouses Often Fail
Those charming cottage-style birdhouses at garden centers? They’re basically predator welcome mats. Decorative builds routinely fail because looks beat function in their design. High wood moisture content accelerates wood warping fast.
- Balance Issues from ornate roofs shift weight, stressing failed joints over time
- Ventilation Gaps are often sealed by decorative trim, trapping dangerous heat
- Predator Access increases when smooth surfaces lack grip-resistant textures
- Cleaning Challenges multiply when removable clean-out panels are skipped entirely
Nest Boxes Vs. Nesting Shelves
Think of it this way — nest boxes are enclosed shelters with a small entry hole, built for cavity nesters like wrens and bluebirds.
Nesting shelves stay open, providing nesting shelves for open-nesting birds like robins.
Open vs closed design affects rain shedding efficiency, thermal insulation, and cost comparison too.
Shelves mount under eaves; nest box placement guidelines suggest poles or walls. Installation versatility differs, so match the structure to your bird.
Choose Safe Wood and Tools

Getting the wood and tools right makes everything else easier — trust me, I’ve ruined more than one piece by grabbing whatever was lying around. Before you cut a single board, it’s worth knowing which materials are safe for birds and which ones can actually harm them.
Here’s what beginners should reach for first.
Best Wood Types for Beginner Birdhouses
Not all wood holds up the same way outside — and your birds will notice before you do.
- Western Red Cedar offers natural rot resistance through natural oils; no sealant needed
- Red Cypress brings durability in humid climates with minimal warping
- Redwood weathers beautifully and stays solid season after season
- Low-Moisture Pine works great when kiln-dried — choose Light-Colored Boards to keep nests cooler
Why Untreated Wood is Essential
Pressure-treated boards might look sturdy, but they’re quietly dangerous inside a nest box. The chemicals leach into the cavity where chicks breathe and sleep — and that’s a problem you can’t undo.
Pressure-treated boards look sturdy, but their chemicals silently leach into the nest where chicks breathe and sleep
Untreated cedar brings natural breathability, micro-texture grip for fledglings, and a chemical-free habitat that promotes sustainable and eco-friendly practices in birdhouse construction. Plus, low-maintenance repair is simple — just swap a panel.
Pine Vs. Cedar for First Builds
Both are solid picks — but they’re not the same. Start with pine if budget’s tight; upgrade to cedar when you’re ready.
- Cost comparison: Pine runs ~$0.50/ft³; cedar costs roughly double
- Durability differences: Cedar is naturally rot-resistant wood, lasting 8–10 years outdoors with minimal fuss
- Workability contrast: Pine cuts smoother and accepts paint easily — great for decorating
- Environmental impact: Cedar needs no chemical treatment to survive seasons
- Regional availability: Pine wins at most big-box stores
Checking Wood Moisture Before Assembly
wet lumber is a silent build-killer — your joints gap, your paint peels, and the whole box warps by spring. Check wood moisture content before cutting anything. Target moisture range: 6–12% for outdoor builds. Anything at 15%+ needs acclimation storage — stack boards on raised racks in a shaded, airy spot for 24–72 hours, then recheck.
| Meter Type | Best Use |
|---|---|
| Pin | Rough-cut edges, raw lumber |
| Pinless | Quick scans, finished surfaces |
Moisture meter calibration matters — a bad reading costs you the whole project. Take multiple spots per board for reading consistency checks.
Beginner Tools for a Simple Project
Once your lumber is dry, you don’t need a full workshop to get started.
Hand Tool Basics, like a handsaw (~$10) and tape measure, handle most cuts. Power Tool Essentials — a cordless power drill (~$40) — covers the rest. Add clamps (~$15), sandpaper (80–220 grit), and you’ve got a solid Beginner-friendly woodworking tools list.
Safety Gear, a proper Workbench Setup, and basic Finishing Aids round everything out cheaply.
Safe Screws, Nails, and Wood Glue
Now that your tools are sorted, fasteners matter more than you’d think.
Use 1-5/8 in galvanized deck screws and galvanized finishing nails — corrosion-resistant fasteners won’t rust and stain your wood. Predrill to control pilot hole depth and prevent splitting. Keep screw thread protrusion flush — exposed threads snag nest material and hurt birds.
For glue, PVA glue like Titebond III is your best friend — non-toxic glue that holds tight outdoors.
Non-toxic Finishes for Outdoor Use
Your finish choice matters as much as your wood choice. Nestlings breathe whatever you put on that box. Stick to these safe options:
- Natural Oil Finishes – Tung or linseed oil penetrates deep, offering UV protection without heavy metals.
- Zero VOC Sealants – Breathable Water Sealants let wood release moisture naturally, preventing warping.
- Plant-based Stains – Low VOC finishes cure cleanly, keeping chemicals away from baby birds.
Build a Birdhouse Step by Step
Now comes the satisfying part — actually putting it together. Each step builds on the last, so if you take your time here, everything fits cleanly and holds up for years.
Here’s exactly how to go from raw lumber to a finished nest box, start to finish.
Measuring and Cutting Six Simple Panels

Before you cut a single inch, get your cut list right — that’s where most first-timers lose a whole board.
Grab a pencil, straightedge, and your pine board. You’re cutting six panels total. Here’s your layout:
| Panel | Dimensions | Notes |
|---|---|---|
| Front/Back | 9 in × 5.5 in | 45° roof angle |
| Sides (×2) | 6.25 in × 5.5 in | Grain runs vertical |
| Base | 8.5 in × 5.5 in | Corners trimmed later |
| Roof | 8 in × 6 in | Overhang ≥2 in |
Panel layout planning matters because saw kerf — that 2–3 mm the blade eats — adds up fast. Mark everything before cutting. A hand saw works fine; just cut out the pieces slowly, keeping grain orientation consistent. Measure twice, cut once. Label every piece immediately so assembly stays clean.
Drilling Entrance, Ventilation, and Drainage Holes
Drill your holes before assembly — trust me on this one. For entrance hole size, a 1½-inch spade bit hits the sweet spot for bluebirds; chickadees need 1⅛-inch. Hole placement guidelines say 6–8 inches above the floor.
Vent hole sizing runs ¼–⅜ inch near the top rear.
Add two drainage holes at the floor corners. Sand every edge burr-free.
Predrilling to Prevent Wood Splitting
Skip predrilling and pine splits like it’s personal. Set your drill to low speed — that alone prevents most tear-out.
For 1⅝-inch deck screws in soft pine, pilot hole depth should match the screw’s full length. Stay at least an inch from edges, and follow wood grain orientation when spacing screws.
A drop of bit lubrication keeps things clean.
Clamping Pieces for Tight Joints

Gaps in your joints invite ants, drafts, and predators — so clamping matters more than beginners expect.
Three clamps (~$15) handle this whole build easily.
- Use Bar Clamp Techniques to hold side panels flush before screws go in
- Try Pipe Clamp Adjustments for awkward angles
- Apply Rubber Pad Protection to avoid denting soft pine
- Use Caul Pressure Distribution boards for even glue joint strength
Assembling The Floor, Sides, and Roof

Think of it like stacking building blocks — order matters.
Start with Floor Panel Alignment: butt your side panels flush against the floor edges, checking Square Corner Verification with a carpenter’s square.
Apply glue for glue joint strength, then drive your 1-5/8 in. screws.
Next, Joint Reinforcement locks everything solid.
Adding a Removable Clean-out Panel

One skipped clean-out panel ruined my first box — moldy nest, whole season wasted.
Build yours with Hinge Positioning on one side wall so it swings fully open. Use a simple hook as your Secure Latch Design to keep it shut in wind. A snug fit creates a Weatherproof Seal. Nail it right, and you can clean it out each fall in minutes.
Sanding Edges Without Overfinishing Interiors

Sand outside edges only — never touch the interior. Birds need that rough surface to grip.
Grab a narrow sanding block and run a 120-to-180 grit progression along exterior corners. Wipe dust between passes — edge dust management matters more than you’d think.
Finish with a gentle hand pass, then apply your sealant after edge work dries. Use Low-VOC, nontoxic finishes only. Keep the interior raw and dry.
Place, Protect, and Maintain It

Building the box is honestly the easy part.
Where you put it — and how you care for it — decides whether birds actually move in. Here’s what you need to know to get that right.
Best Mounting Height for Backyard Birdhouses
Height isn’t one-size-fits-all — species-specific height matters more than most beginners realize. Mount your finished box between 5 and 10 feet for wrens and chickadees, or drop to 4–6 feet for bluebirds on open poles.
Microclimate considerations apply too: tree mounting in shaded spots may need slightly higher placement for airflow.
A simple tape measure covers all your height measurement tool needs.
Where to Face The Entrance Hole
Once you’ve nailed mounting birdhouses at proper height and orientation, the next question is: which way should the entrance hole face? Face east. That East-facing Orientation gives birds warm Sunlit Entrance mornings without brutal afternoon heat.
Four orientation rules worth following:
- Point the entrance east for Seasonal Light Exposure and gentle morning warmth
- Use a slight forward tilt for Rain Deflection Tilt
- Position behind a fence line for Wind Shielding
- Keep the entrance hole clear of mounting hardware
Spacing Birdhouses for Different Species
Orientation sorted — now think about territory distance guidelines.
Bluebirds need 10–15 meters between boxes; crowd them and they’ll fight constantly. Wrens tolerate 1–3 meters, but watch for egg-damage from neighbors.
In open fields, habitat spacing rules push multi-species clusters 10–20 meters apart.
Seasonal spacing shifts matter too — if a box sits empty two straight seasons, nudge it a few meters over.
Keeping Birdhouses Away From Feeders
Spacing sorted — now think about where feeders fit in. Keep your birdhouse at least 30 feet away from any feeding station.
Feeder distance benefits go beyond tidiness: it cuts predator path reduction risks, since raccoons already patrol feeder zones, lowers disease transmission prevention concerns from seed-crowd bacteria, and promotes microhabitat separation — noise scent reduction alone helps shy nesters settle in faster.
Using Predator Guards and Pole Baffles
A predator guard is your nest box’s first real line of defense.
Wrap galvanized steel or aluminum baffles around the pole — stovepipe styles install without disassembly. Position your predator baffle at least four feet up, with 18–24 inches of coverage, following Guard Height Guidelines for solid predator deterrent effectiveness. Use stainless hardware for Installation Safety Tips compliance.
Check annually — your Maintenance Inspection Checklist should include dents, loose screws, and coating wear.
Seasonal Cleaning and Nest Box Hygiene
Once nesting season wraps — usually September through November — it’s time for your Autumn Disinfection Routine.
Pull on gloves, grab a stiff brush, and use the Glove Brush Method to clear out old debris.
Pour boiling water inside for Boiling Water Sanitization — no chemicals needed.
Then let it fully air-dry before closing up:
- Clear drainage holes for next season
- Check ventilation gaps for pest or mold buildup
- Inspect joints during your Pest Prevention Inspection
Common Beginner Mistakes to Avoid
Even experienced woodworkers mess this up.
Wrong screw length splits panels or leaves gaps — stick to 1-5/8 inch galvanized. Mixed wood types create seams that split with seasonal movement. Insufficient roof overhang lets rain soak the cavity. Excessive paint layers can seal ventilation gaps.
And please — no safety gear is how workshops get bloody.
Learn from other people’s mistakes, not your own.
Top 10 Beginner Birdhouse Products
Not every beginner wants to start with a saw and a pile of pine boards — and that’s completely fine. There are solid ready-made options that save you time without cutting corners on what birds actually need.
ten worth your attention.
1. Kettle Moraine Cedar Bluebird Predator Guard
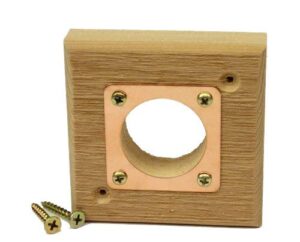
One upgrade that quietly saves your bluebird house is a good predator guard. The Kettle Moraine Cedar Bluebird Predator Guard is built from 7/8-inch cedar with a copper-clad portal — squirrels and raccoons can’t chew through that combo. It holds the entry at exactly 1½ inches, which is the sweet spot for Eastern Bluebirds.
Two included screws make installation fast. Just note: it won’t stop House Sparrows.
A small limitation, but this guard extends your box’s life by years.
| Best For | Backyard birders who want to protect existing bluebird houses from squirrels, raccoons, and woodpeckers without replacing the whole box. |
|---|---|
| Material | Cedar wood |
| Target Species | Eastern Bluebird |
| Country of Origin | USA |
| Hardware Included | Two 1.25in wood screws |
| Price (USD) | Not listed |
| Maintenance Access | Removable/reusable panel |
| Additional Features |
|
- Copper-clad portal holds up against chewing — squirrels and raccoons can’t gnaw through it
- Keeps the entry at exactly 1½ inches, which Eastern Bluebirds prefer
- Comes with screws and installs fast — no extra tools needed
- Won’t block House Sparrows since they fit through the 1½-inch opening
- Copper edges can get a little rough after install and may need light sanding
- The panel is fairly thin, so it might not hold up as well in harsh weather over time
2. Woodlink Bluebird House BB1
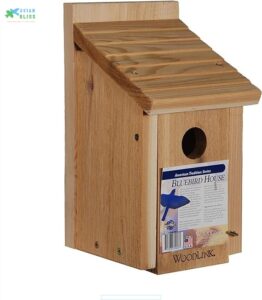
The Woodlink BB1 is about as plug-and-play as birdhouses get. It ships fully assembled from kiln-dried inland red cedar — no cutting, no guessing.
The 1½-inch entrance hole is sized right for Eastern, Western, and Mountain Bluebirds, and the 5×5-inch floor matches what they actually need. A sliding front panel makes seasonal cleanouts genuinely easy.
Ventilation gap at the top, drain hole at the base — moisture stays out. Just mount it securely; at one pound, wind is your real enemy.
| Best For | Backyard birders who want a no-fuss, ready-to-hang home that actually attracts bluebirds. |
|---|---|
| Material | Inland red cedar |
| Target Species | Eastern/Western/Mountain Bluebird |
| Country of Origin | USA |
| Hardware Included | Rust-resistant zinc screws |
| Price (USD) | Not listed |
| Maintenance Access | Sliding front panel |
| Additional Features |
|
- Ships fully assembled from real cedar — just mount it and you’re done
- Sliding front panel makes cleaning and nest checks quick and painless
- Built-in ventilation and drainage keep the interior dry and healthy for nesting birds
- The door latch can leave a small gap, which may let unwanted birds in — or trap them
- The internal screw placement can make post-mounting awkward without extra hardware
- At just one pound, it needs a solid mount or wind will knock it around
3. Stovall Western Mountain Bluebird House
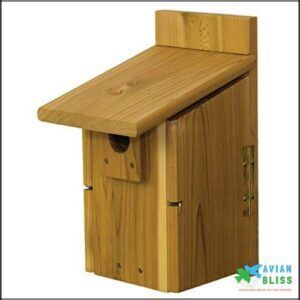
Stovall’s Western Mountain Bluebird House costs $84.65 — more than most beginner builds, but you’re paying for something real.
Hand-sanded Michigan cedar, stainless dichromate-plated screws, and dual side doors with plastic viewing windows. That last part is genuinely useful — you can check on nestlings without opening anything.
The 5×5½-inch interior gives chicks room to grow.
Only catch: no mounting hardware included, so budget for a pipe and flange. Heavier than it looks at 5 pounds — plan accordingly.
| Best For | Serious backyard birders who want a durable, well-crafted home specifically sized for Mountain and Western Bluebirds. |
|---|---|
| Material | Cedar wood |
| Target Species | Mountain/Western Bluebird |
| Country of Origin | USA (Michigan) |
| Hardware Included | Stainless steel screws |
| Price (USD) | $84.65 |
| Maintenance Access | Dual side doors |
| Additional Features |
|
- Hand-sanded cedar with stainless steel hardware means this thing will hold up through years of rain, sun, and cold
- Dual side doors with viewing windows make nest checks quick and easy — no guessing, no disturbing the birds
- The 5×5½-inch interior gives chicks real room to grow, which matters when a clutch starts filling out
- No mounting hardware included, so you’ll need to buy a pipe and flange separately before you can set it up
- At $84.65, it’s a real investment compared to basic options on the market
- Weighs a solid 5 pounds, so a flimsy mount won’t cut it — you’ll need something sturdy
4. PLESIU Cedar Bird Nesting Box
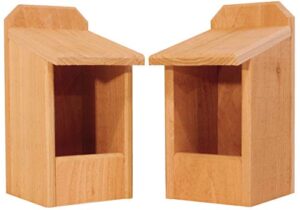
If the Stovall feels like a splurge, the PLESIU Cedar Nesting Box brings you back to earth. It is budget-friendly — often under $20 per unit — and comes in value packs.
The 1.5-inch entrance suits small cavity nesters like bluebirds. Cedar construction means no toxic finishes near your birds.
The front panel tilts open for easy cleaning, drainage holes are pre-drilled, and a predator guard is included. Assembly is straightforward. No mounting hardware, though — grab a few screws before you head outside.
| Best For | Gardeners and backyard wildlife fans who want a simple, natural birdhouse without spending a lot. |
|---|---|
| Material | Western red cedar |
| Target Species | Multiple songbirds |
| Country of Origin | USA |
| Hardware Included | None included |
| Price (USD) | $58.99 |
| Maintenance Access | No access panel |
| Additional Features |
|
- Hand-crafted from natural western red cedar — durable, insulating, and chemical-free
- Comes as a two-box set, giving you better odds of attracting nesting birds
- Versatile mounting options make it easy to place just about anywhere in your yard
- No mounting hardware included, so you’ll need to grab screws or brackets separately
- Rough, unfinished surface may need sanding and sealing to hold up long-term
- Bird adoption can be hit or miss depending on your location and local species
5. Birds Choice Cedar Nesting Platform
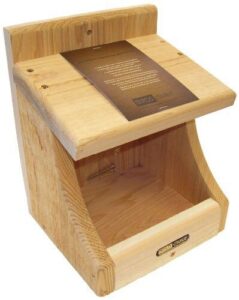
Not every backyard bird wants a box. Robins, phoebes, and barn swallows prefer an open shelf — and that’s exactly what the Birds Choice Cedar Nesting Platform delivers.
At 10 × 9 × 11 inches, it gives tree-nesting birds real room to work. The sloped roof protects against rain, cedar protects against rot, and pre-drilled holes make mounting to a post or fence straightforward.
Face it away from afternoon sun, keep it clear of feeders, and you’re set.
| Best For | Backyard birders who want to attract open-nesting species like robins, phoebes, and barn swallows to their yard. |
|---|---|
| Material | Inland red cedar |
| Target Species | Doves/robins/swallows |
| Country of Origin | USA |
| Hardware Included | Mounting screws |
| Price (USD) | Not listed |
| Maintenance Access | Open platform design |
| Additional Features |
|
- Cedar construction naturally resists rot and harsh weather, so it holds up season after season.
- The sloped roof keeps rain and predators off the nest — a simple but smart design detail.
- Easy to mount on a post or fence with the included screws, no fuss.
- The roof overhang on some units runs short, which can let rain sneak into the nest cavity.
- It’s an open platform, so predation risk is real — placement matters a lot.
- Build quality isn’t totally consistent; some buyers noticed differences in wood hardness and finish.
6. Woodlink Cedar Wren Chickadee Birdhouse
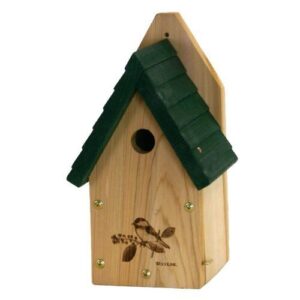
If you’re building for wrens or chickadees, this Woodlink cedar house does the heavy lifting for you. The 1⅛-inch entrance hole is exactly right — small enough to keep starlings out, roomy enough for both species.
Kiln-dried inland red cedar means it won’t warp on you after the first rainy season. The side panel tilts open for cleaning, which you’ll actually use.
At $54, it costs more than a DIY build — but the pre-drilled holes and included hardware make setup genuinely quick.
| Best For | Backyard birders who want a low-maintenance, ready-to-hang home specifically sized for wrens and chickadees. |
|---|---|
| Material | Inland red cedar |
| Target Species | Wrens/chickadees |
| Country of Origin | USA |
| Hardware Included | Screws & instructions |
| Price (USD) | $54.18 |
| Maintenance Access | Tilting side panel |
| Additional Features |
|
- Cedar construction holds up well through wet seasons without warping or rotting out
- The side panel swings open so cleaning takes seconds — no tools, no fuss
- Comes with pre-drilled holes and hardware, so setup is quick right out of the box
- A few buyers have reported the roof cracking or splitting over time
- The included screws can feel a little flimsy — you may want to grab sturdier fasteners
- At $54, it’s pricier than a basic DIY build if you’re watching your budget
7. Woodlink Audubon Wren Birdhouse
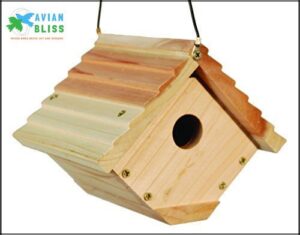
Step down in price and you’ve got the Audubon Wren Birdhouse from Woodlink — $26.95, white-painted cedar, and a 1⅛-inch entrance hole sized right for house wrens. It hangs via a heavy brass-screwed cable, and the roof unscrews for end-of-season cleaning.
Honestly, the surface drinks paint like it’s thirsty, so budget extra time if you want a custom finish.
A few buyers reported no wren activity, but placement matters more than the house itself.
| Best For | Backyard birders who want a simple, affordable wren house they can hang up and maintain without a lot of fuss. |
|---|---|
| Material | Cedar/pine wood |
| Target Species | House wrens |
| Country of Origin | Not specified |
| Hardware Included | Hanging cable & screws |
| Price (USD) | $26.95 |
| Maintenance Access | Removable roof/side |
| Additional Features |
|
- Screwed together (not stapled), so it holds up better outdoors over time
- Roof comes off for easy cleaning at the end of the season
- Brass hardware resists rust, and the wood takes paint well if you want to customize it
- The wood surface is coarse and super absorbent — painting it takes more effort than you’d expect
- Some units have loose knots or small joint gaps that could affect how long it lasts
- Despite the "Audubon" branding, it’s not officially endorsed by the Audubon Society
8. Stokes Purple Martin Guide
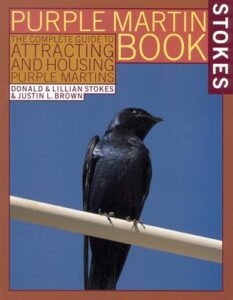
Purple Martins are a whole different game — and the Stokes Purple Martin Guide ($17.96) is the cheat sheet you didn’t know you needed. Written by Lillian and Donald Stokes, with Justin L. Brown, this 96-page paperback covers arrival timing, site selection, predator control, and housing specs.
Over 100 full-color photos make it easy to identify birds by age and sex. It’s a bit dated (1997), but the core guidance holds up well for anyone just starting a colony.
| Best For | Backyard birders who are new to hosting Purple Martins and want a friendly, visual guide to get their first colony up and running. |
|---|---|
| Material | Paperback (book) |
| Target Species | Purple Martin |
| Country of Origin | USA |
| Hardware Included | N/A |
| Price (USD) | $17.96 |
| Maintenance Access | N/A (book) |
| Additional Features |
|
- Over 100 full-color photos make it easy to ID birds by age and sex at a glance
- Covers the essentials — timing, site selection, housing, and predator control — all in one slim book
- Affordable and portable at under $18 for a paperback you can toss in a bag
- Published in 1997, so some housing recommendations may not reflect current best practices
- Only 96 pages, so don’t expect deep dives into advanced colony management
- No detailed construction plans if you’re hoping to build your own martin house from scratch
9. FMS Ravenox Purple Martin Gourd Rack

If you’re serious about hosting a Purple Martin colony, the FMS Ravenox Deluxe Gourd Rack is worth every penny. You get 12 aluminum-armed gourds, a Troyer-Haskell tunnel trap, a pole guard, and a winch-and-pulley system — all on a 14-ft two-piece pole.
The pulley alone is a real advantage; lowering gourds for weekly nest checks takes seconds instead of minutes.
It’s heavy at 225 lbs, so rope in a helper for setup.
Made in the USA, backed by a one-year guarantee.
| Best For | Dedicated Purple Martin enthusiasts who want a complete, ready-to-install colony housing system without hunting down extra parts. |
|---|---|
| Material | Aluminum & steel |
| Target Species | Purple Martin |
| Country of Origin | USA |
| Hardware Included | Full hardware kit |
| Price (USD) | Not listed |
| Maintenance Access | Winch/winder assembly |
| Additional Features |
|
- Everything’s included — gourds, trap, pole guard, winch, and all hardware — no extra shopping required.
- The pulley system makes weekly nest checks quick and easy, which martins (and their landlords) appreciate.
- Built in the USA with metal construction that’s meant to hold up season after season.
- The upfront cost is steep, which can be a real barrier for casual backyard birders.
- At 225 lbs, getting the pole in the ground isn’t a one-person job.
- You’ll need a decent chunk of space to accommodate the full 14-ft horizontal rack setup.
10. BestNest Purple Martin House Gourds Kit
The BestNest AH-12D is your all-in-one colony starter — a 12-room aluminum house with gourds, decoys, and a mounting pole included. The powder-coated purple finish resists rust, and the modular design lets you expand as your colony grows.
Fair warning: assembly takes patience. The pole is triangular, but the house needs a round one, so budget for an adapter. Wear gloves — edges can be sharp.
Once it’s up, though, martins notice it fast.
| Best For | Backyard birders who want to attract a Purple Martin colony and don’t mind putting in some elbow grease during setup. |
|---|---|
| Material | Aluminum alloy |
| Target Species | Purple Martin |
| Country of Origin | Not specified |
| Hardware Included | Screws, nuts & rivets |
| Price (USD) | Not listed |
| Maintenance Access | Modular room design |
| Additional Features |
|
- Comes with everything to get started — house, pole, gourds, and decoys all in one kit
- Aluminum build with powder-coated finish holds up well against rust and weather
- Modular design means you can expand the setup as your colony grows
- The included pole is triangular, but the house needs a round one — you’ll need to buy an adapter separately
- Assembly is tedious and instructions aren’t great; having a second person helps a lot
- Small hardware pieces are fiddly, and edges can be sharp, so gloves are a must
Frequently Asked Questions (FAQs)
What do birds like most in birdhouses?
Birds want what feels safe and snug — the right-sized entrance hole, a dry floor with drainage, fresh airflow near the top, and clean, untreated wood that won’t off-gas chemicals near their eggs.
What not to do when building a birdhouse?
Skip pressure-treated wood, wrong hole sizes, and missing cleanout panels. These three mistakes alone will cost you nesting birds every season.
What time of year should you put up a bird box?
Late winter is your window — think February to April. Put your box up before the birds start scouting, or you’ll miss the season entirely.
How high off the ground should a birdhouse be placed?
Most backyard birds do best with boxes mounted 5 to 12 feet up. Wrens are happy at 5 or 6 feet; bluebirds and chickadees prefer 5 to 9 feet.
Can I paint my birdhouse bright colors?
Yes, but keep it muted. Earth tones help the box blend in and won’t attract predators. Stick to water-based, low-VOC exterior paint — and never paint the interior or entrance hole.
How do I attract birds to a new box?
Patience is your best tool here.
Keep the entrance hole sized right, mount it in open habitat near native plants, and stay away from feeders.
Birds will find it — usually within a few weeks.
What time of year should I put up birdhouses?
Aim for late winter — February is your sweet spot in most regions.
Birds start scouting nesting sites well before you notice them. Get the box up early, and it’ll be ready when they’re ready.
How long before birds move in?
The wait feels endless—until suddenly it isn’t. Most birds move in within 2 to 6 weeks. Bluebirds and chickadees often show up sooner if your box is clean, well-placed, and predator-protected.
Can two species share the same birdhouse?
Rarely, and it’s usually not pretty.
Most species are territorial and will fight over the same box.
Save yourself the drama — build separate boxes matched to each species’ hole size and dimensions.
Conclusion
As sunset falls on your first birdhouse, shadows hint at seasons to come. You’ve not just built a shelter, but a sanctuary. With every detail—species-matched plans, safe wood, smart placement—you’ve shown care for your feathered friends.
Now, as you hang your birdhouse, imagine the songs that will fill the air. Your effort will attract tenants by spring, and with birdhouses for beginners, you’ve taken the first step into a lifelong hobby that brings joy and connection to nature.