This site is supported by our readers. We may earn a commission, at no cost to you, if you purchase through links.

That first chickadee landing on a birdhouse you built yourself? It’s a moment that turns a simple woodworking project into something special. Building a birdhouse doesn’t require expert carpentry skills or a workshop full of expensive equipment—just a few basic tools, some untreated wood, and an afternoon.
The real secret isn’t in complicated joinery or fancy designs. It’s understanding what your local birds actually need: the right entrance hole size, proper ventilation, and a safe spot to raise their young. Once you’ve matched your design to the species in your area, construction becomes straightforward. You’ll be cutting, assembling, and mounting your first birdhouse before you know it.
Table Of Contents
- Key Takeaways
- Choosing The Best Birdhouse Design
- Step-by-Step Birdhouse Construction Guide
- Top 5 Essential Tools for Building Birdhouses
- Installing and Maintaining Your Birdhouse
- Frequently Asked Questions (FAQs)
- Do birds prefer unpainted birdhouses?
- Why won’t birds use my birdhouse?
- What is the proper size hole for a birdhouse?
- What kind of wood should I use for a birdhouse?
- How often should birdhouses be cleaned annually?
- Which direction should the entrance hole face?
- When is the best season to install birdhouses?
- How far apart should multiple birdhouses be placed?
- What predators target birdhouses and how to deter them?
- When is the best time to install birdhouses?
- Conclusion
Key Takeaways
- You’ll need to match your birdhouse design to local species by getting the entrance hole size exactly right—bluebirds need 1.5 inches while chickadees prefer 1.125 inches, and this single measurement determines which birds will actually use your house.
- Cedar and pine are your best wood choices because they naturally resist rot and insulate nests well, but skip any paint or stains with toxic chemicals since birds are sensitive to fumes that won’t bother humans.
- Install your finished birdhouse 5 to 12 feet high with the entrance facing east or northeast, spacing multiple houses 15 to 30 feet apart so birds don’t compete for territory in your yard.
- Clean out old nests once a year in late winter using a mild bleach solution (one part bleach to nine parts water) to prevent mold and parasites before new birds move in for spring nesting season.
Choosing The Best Birdhouse Design
The first step in building a successful birdhouse is choosing a design that works for the birds you want to attract. Not all birdhouses are created equal, and the right choice depends on your local species, their nesting habits, and the materials you have on hand.
For beginners or those short on time, easy-to-build birdhouse kits offer pre-cut materials and species-specific designs that take the guesswork out of construction.
Let’s break down the key decisions you’ll need to make before picking up your saw.
Selecting Plans for Local Bird Species
Choosing the right birdhouse plans starts with species research. Your backyard birds have specific nesting preferences, so match your build to local habitats.
Bluebirds favor 1.5-inch holes, while chickadees need drainage features for rainy seasons. Regional planning means understanding what feathered friends visit your area.
This approach transforms simple birdhouse plans into a bird watching and conservation tool that truly works! Understanding the importance of ecological roles of birds helps guide better birdhouse design for local environments.
Determining Proper Entrance Hole Size
Once you’ve matched plans to bird species, Hole Size Calculations become your next focus. Entrance Design directly impacts which birds visit and nesting preferences they’ll follow. For bluebirds, aim for 1.5 inches—it welcomes the right guests while supporting Predator Deterrence. Chickadees prefer 1.125 inches.
Measure twice with calipers to nail birdhouse construction accuracy! Proper nesting habits depend on getting this detail right. The entrance hole size you choose plays a vital role in birdhouse success, as explained in this.
Picking Birdhouse Dimensions and Shape
Beyond entrance sizes, you’ll shape the entire nesting box around your bird species. Bluebirds thrive in 5×5-inch floors with 10-inch birdhouse depth, while chickadees fit snugly in 4×4-inch spaces.
Simple birdhouse designs balance comfort and safety:
- Floor space that prevents crowding yet conserves warmth
- Roof styles with 1-2 inch overhangs blocking rain
- Overall height between 8-12 inches for proper ventilation
These birdhouse construction basics turn DIY birdhouse plans into welcoming homes!
Material Options: Wood, Gourds, and More
Once you’ve settled on dimensions, select your building material. Cedar and pine dominate DIY birdhouse plans because they’re affordable and naturally insulate nests.
For eco-friendly woodworking projects, try recycled plastics for predator guards or dried gourds—gourd crafting creates charming, organic birdhouse designs!
Wood finishing with non-toxic stains protects outdoor structures while keeping your sustainable materials safe for feathered families.
Step-by-Step Birdhouse Construction Guide
Now that you’ve chosen your design, it’s time to grab your tools and start building! This section walks you through each step of construction, from cutting your first piece of wood to adding those final creative touches.
If you’re building a home specifically for chickadees, proper placement techniques for hanging birdhouses will help ensure these friendly birds feel safe and return year after year.
Follow along and you’ll have a finished birdhouse ready for its new residents in no time.
Cutting and Preparing Wood Pieces

A sharp crosscut blade is your best friend when cutting cedar picket pieces—it gives you clean ends and prevents splintering! Measure twice, cut once, then dry fit everything before reaching for the wood glue or nail gun.
Always wear safety glasses during woodworking, use a push stick near the blade, and clamp your material to keep it steady while cutting.
Assembling The Birdhouse Structure

You’ve got your pieces ready, so now it’s time to bring your birdhouse plan to life! Start with wall assembly by applying a thin bead of wood glue along the edges, then press the front and back panels against the side pieces.
Use a brad nailer for quick nail placement, spacing fasteners about two inches apart for solid birdhouse frames. This DIY woodworking step sets up everything for sturdy birdhouse construction.
Attaching Roof Panels and Floor

With your walls standing tall, secure the roof and floor to seal up your birdhouse building project! Roof panel alignment starts at the peak, making sure edges meet flush before driving screws through predrilled holes. Floor installation follows by laying the base flat and fastening every 12 inches along the edges.
Here’s your weatherproofing tips checklist for lasting DIY woodworking:
- Apply sealant at all panel joints to block moisture
- Choose fastener selection that matches your panel material
- Overlap roof sections slightly for rain runoff
- Countersink screw heads to prevent snagging
- Test stability by gently pressing each corner
Your birdhouse frame is now weather-ready!
Customizing With Paint or Decorative Elements

Now comes the fun part—adding your personal touch to this DIY birdhouse! Paint color options like soft earth tones blend naturally with outdoor decor while reflecting sunlight to keep nests cooler.
Choose bird-friendly finishes such as non-toxic exterior sealants that protect wood without harming visitors. Decorative accents like simple carved symbols or weather-resistant trim complete your design themes beautifully!
Top 5 Essential Tools for Building Birdhouses
Having the right tools makes all the difference when you’re building a birdhouse. You don’t need a massive workshop, but a few quality pieces of equipment will speed up your work and help you create something you’re proud of.
Let’s look at five tools that’ll take your birdhouse project from frustrating to fun.
1. Metabo Hpt Compound Miter Saw Tool
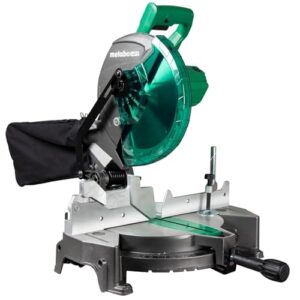
You’ll need a reliable saw to make clean, precise cuts for your birdhouse project. The Metabo HPT compound miter saw is perfect for the job, with its 15-amp motor spinning at 5,000 RPM.
It manages both miter and bevel cuts up to 45 degrees, so you won’t need to flip your wood around. The positive stops click right into place at common angles like 22.5 and 30 degrees, making quick work of gable ends and roof pieces.
Plus, it’s lightweight at just 25 pounds!
| Best For | DIYers and woodworkers tackling trim work, framing projects, and small furniture builds who need a portable saw that handles angled cuts without breaking the bank. |
|---|---|
| Weight | 25 lbs |
| Material | Plastic |
| Brand | Metabo HPT |
| Color | Green |
| Primary Use | Cutting wood |
| Skill Level | DIY/Professional |
| Additional Features |
|
- Powerful 15-amp motor hits 5,000 RPM for smooth cuts through most materials
- Quick-adjust positive stops at common angles save time on repetitive cuts
- Light enough at 25 pounds to move around the shop or take to job sites
- Sawdust bag and blade lock have reliability issues according to some users
- Cutting width tops out around 6 inches, so larger stock won’t work
- Stock blade quality is hit-or-miss—many people swap it out right away
2. DeWalt Pneumatic Brad Nailer Kit
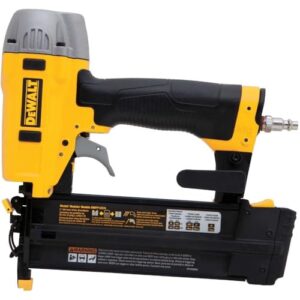
Once your pieces are cut, you’ll want to join them securely without splitting the wood. The DeWalt pneumatic brad nailer drives 18-gauge nails from 5/8 to 2 inches, perfect for assembling trim and delicate birdhouse panels.
You can adjust the depth without any tools, and the jam release mechanism saves you time when things get stuck.
At $107.99, this kit includes a carrying case and operates smoothly at 70 to 120 psi with your air compressor.
| Best For | DIYers and professionals working on trim, molding, and delicate woodworking projects who already own an air compressor. |
|---|---|
| Weight | Not specified |
| Material | Metal/Plastic |
| Brand | Not specified |
| Color | Not specified |
| Primary Use | Fastening trim |
| Skill Level | DIY/Professional |
| Additional Features |
|
- Tool-free depth adjustment and jam release make operation quick and hassle-free
- Drives a versatile range of nail lengths (5/8″ to 2″) for different project needs
- Affordable at $107.99 with a carrying case included
- Requires an air compressor, which isn’t included and adds to the overall cost
- Some users report the plastic nose tip can fall off during use
- Performance depends on proper air pressure settings and keeping the nailer loaded
3. DeWalt Cordless Impact Driver Kit
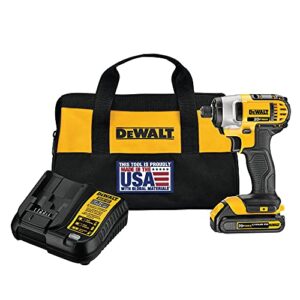
For driving screws into your birdhouse frame, you’ll appreciate the DeWalt cordless impact driver’s compact design and brushless motor. It delivers around 1,500 to 1,700 inch-pounds of torque at speeds up to 3,000 RPM, making quick work of fasteners in tight corners.
The 1/4-inch hex chuck accepts standard bits, and three built-in LEDs light up your workspace. This kit runs on a 20V Max lithium-ion battery and comes with a charger and storage bag, backed by DeWalt’s three-year warranty.
| Best For | DIYers and homeowners tackling projects in tight spaces who need a lightweight, reliable driver for screws and bolts. |
|---|---|
| Weight | 2.8 lbs |
| Material | Metal/Plastic |
| Brand | DEWALT |
| Color | Black/Clear |
| Primary Use | Driving screws |
| Skill Level | DIY/Home repairs |
| Additional Features |
|
- Compact 9-inch design with brushless motor delivers up to 1,700 inch-pounds of torque at 3,000 RPM
- Three built-in LEDs with 20-second delay illuminate work areas without casting shadows
- Backed by DeWalt’s 3-year limited warranty and includes charger plus storage bag
- Kit only includes one 1.5Ah battery, which may not last through longer projects
- No torque control settings, making it harder to avoid overdriving screws in softer materials
- Requires extra pressure to prevent bit from bouncing out of screws during heavy-duty use
4. Bosch Bi Metal Hole Saw
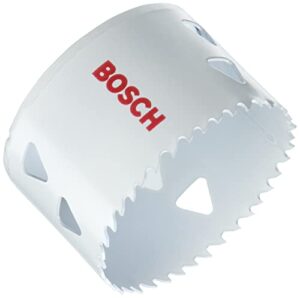
Drilling the entrance hole is where the Bosch Bi Metal Hole Saw really shines! Its cobalt-hardened teeth cut clean, accurate openings in wood without splintering edges.
You’ll love the two-metal design—it flexes to prevent breakage while maintaining a sharp cutting edge through dozens of projects. The varied tooth pattern clears chips fast and manages those surprise nails in reclaimed lumber.
It fits standard drill arbors, so you won’t need special adapters. Just remember to lubricate when cutting and remove plugs after each hole.
| Best For | DIYers and contractors who need clean, precise holes in wood, metal, drywall, and plastic for projects like installing recessed lights or building custom displays. |
|---|---|
| Weight | 4.54 g |
| Material | Metal |
| Brand | Bosch |
| Color | Black |
| Primary Use | Drilling holes |
| Skill Level | DIY projects |
| Additional Features |
|
- Cobalt-hardened M42 teeth last 20% longer and handle high-heat applications without dulling quickly
- Triangle slot design makes plug removal easier and reduces heat buildup during drilling
- Progressor tooth pattern cuts through materials fast while delivering clean, splinter-free holes
- Struggles with tougher materials like stainless steel or thick metal plates
- Plugs can be stubborn to remove and sometimes require a screwdriver to push out
- Not heavy-duty enough for demanding industrial or professional-grade applications
5. Channellock Lineman Pliers Tool
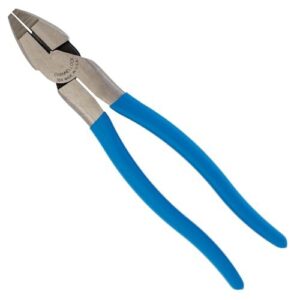
After drilling that entrance hole, you’ll reach for the Channellock Lineman Pliers to twist and secure wire hangers or mounting hardware. These 9.5-inch pliers feature XLT technology that requires 20 percent less hand force, so your grip stays comfortable through multiple birdhouses.
The laser-treated cutting edges slice through wire cleanly, while the crosshatched teeth grip firmly without slipping. Made in Pennsylvania with forged high carbon steel, they’ll handle years of backyard projects with ease!
| Best For | Professional electricians and DIYers who need reliable pliers for cutting, gripping, and twisting wires during electrical work and construction projects. |
|---|---|
| Weight | 1.08 pounds |
| Material | Metal |
| Brand | Not specified |
| Color | Not specified |
| Primary Use | Cutting wire |
| Skill Level | DIY/Professional |
| Additional Features |
|
- Extreme leverage design reduces hand force by 20%, making repetitive tasks less tiring on your grip
- Laser heat-treated cutting edges stay sharp and cut through wire cleanly for years
- Made in the USA with forged high carbon steel for lasting durability and strength
- Won’t cut through steel or harder materials, so you’ll need dedicated tools for heavy-duty jobs
- Cuts can leave a slightly serrated edge on materials instead of a perfectly smooth finish
- Needs regular lubrication and maintenance to keep the joint operating smoothly
Installing and Maintaining Your Birdhouse

You’ve built a great birdhouse, and now it’s time to put it to work! Getting it mounted properly and keeping it in good shape doesn’t take much effort, but it makes all the difference in attracting birds year after year.
Let’s walk through the key steps to position, secure, and maintain your birdhouse so your feathered friends feel right at home.
Choosing The Ideal Location
Finding the right spot for your birdhouse makes all the difference in attracting backyard birds and supporting wildlife conservation. Place it 5 to 12 feet high near food sources and water within 300 meters to create ideal nesting sites.
Face the entrance away from prevailing winds, and position it near safe perches like shrubs to encourage bird watching while protecting these bird-friendly habitats during migration.
Mounting for Stability and Safety
You’ll want to lock your birdhouse construction in place with secure fasteners like lag screws into solid backing. Use exterior-grade hardware and a reinforced mounting plate to handle wind loads, supporting three times the weight for safety features.
Add predator guards around poles and keep roof designs overhanging by 2 inches to shield mounting points while protecting backyard birds and supporting wildlife conservation in bird-friendly habitats.
Cleaning and Seasonal Maintenance
After each nesting season, you’ll want to remove old nests and debris wearing gloves. Wipe down the interior with a mild bleach solution—one part bleach to nine parts water—then rinse and dry completely. Regular nest box cleaning prevents mold and keeps your birdhouse repair needs minimal!
Schedule a seasonal inspection each spring to check for cracks, tighten hardware, and maintain bird-friendly conditions that support wildlife gardening and backyard birding efforts.
Tips for Attracting Desired Bird Species
You’ll attract specific bird species by matching your birdhouse placement and entrance hole size to their nesting preferences. Understanding bird behavior and nesting habits helps you design species diversity into your yard, turning simple bird habitat creation into a thriving ecosystem!
Stock nearby feeders with black oil sunflower seeds and suet to support diverse feeding habits, while native plants create a bird-friendly habitat.
Frequently Asked Questions (FAQs)
Do birds prefer unpainted birdhouses?
Surprisingly, while birds show no universal color preference for nesting sites, most accept unpainted boxes readily.
Neutral tones blend naturally, minimize heat absorption, and avoid potential chemical exposure, making unpainted birdhouses genuinely bird-friendly choices.
Why won’t birds use my birdhouse?
Your entrance hole might be too large, inviting predators, or the birdhouse placement faces harsh winds.
Birds avoid boxes near heavy foot traffic, plus poor ventilation and lack of predator deterrents reduce nesting bird support.
What is the proper size hole for a birdhouse?
Your hole size depends entirely on which bird species you want to welcome. Bluebirds need 1 1/2 inches, while chickadees prefer 1 1/8 to 1 1/4 inches—get it right with a quality hole saw!
What kind of wood should I use for a birdhouse?
Cedar offers the best all-around performance for your wooden birdhouses, resisting decay naturally. Pine provides an affordable alternative, while redwood and cypress deliver outstanding rot resistance.
Secure joints with quality wood glue for lasting durability!
How often should birdhouses be cleaned annually?
You’ll want to clean your birdhouse once a year—ideally in late winter or early spring.
This seasonal timing promotes bird health by removing old nests and controlling parasites before new occupants arrive.
Which direction should the entrance hole face?
Point your entrance hole east or northeast for morning sun warmth and nesting safety. This orientation shields nesting birds from harsh winds while supporting predator deterrence and proper sun exposure in your bird-friendly birdhouse plan.
When is the best season to install birdhouses?
Install birdhouses in late winter to early spring—usually February through April—to align with bird migration and nesting seasons.
Regional timing varies, so place yours before spring arrives for the best backyard birding success!
How far apart should multiple birdhouses be placed?
Think of birdhouse spacing like old-fashioned phone booths—birds need personal space! Place boxes 15 to 30 feet apart for bluebirds and sparrows, promoting bird species diversity while reducing nesting competition in your backyard wildlife habitat.
What predators target birdhouses and how to deter them?
Raccoons, cats, snakes, and squirrels raid nests frequently.
You’ll need metal predator guards around entrance holes, anti-climb baffles on poles, and proper mounting height—6 to 10 feet works best for nest protection.
When is the best time to install birdhouses?
Like catching the early worm, timing matters! Install your birdhouse in late winter to early spring—February through April works best—so migratory species can discover these bird-friendly nesting sites before breeding cycles begin in your region.
Conclusion
Your workshop will soon echo with the satisfied chirping of new tenants—proof that your effort paid off. When you build a bird house with attention to detail and the right tools, you’re creating more than shelter.
You’re joining a tradition of craftsmanship that nurtures wildlife right in your backyard. That first family moving in makes every cut, every nail, and every adjustment worthwhile. Your feathered neighbors are already on their way.
- http://www.birdsandblooms.com/backyard-projects/diy-birdhouse/build-one-board-diy-birdhouse/
- https://www.familyhandyman.com/project/build-a-backyard-birdhouse/?trkid=soc-fhm-pinterest
- http://www.ana-white.com/2013/04/plans/kids-kit-project-1-modern-birdhouse
- http://www.nabluebirdsociety.org/affiliates/
- http://www.nestboxbuilder.com/pdf/XBox8.pdf