This site is supported by our readers. We may earn a commission, at no cost to you, if you purchase through links.

A chickadee weighs less than five nickels, yet she’ll reject a birdhouse with a floor that’s half an inch too small. Birds are picky tenants—and rightfully so.
Get the entrance hole wrong by a quarter inch and you’ve built a sparrow trap instead of a bluebird home.
The good news: once you understand each species actually needs, building a proper birdhouse becomes straightforward woodworking.
Cedar, a hole saw, and a free afternoon are enough to put up something that will host families for a decade.
Table Of Contents
- Key Takeaways
- Choose a Birdhouse Design
- Cut and Assemble The House
- Top 5 Birdhouse Building Tools
- Mount and Maintain The Birdhouse
- Frequently Asked Questions (FAQs)
- Do birds prefer unpainted birdhouses?
- Why won’t birds use my birdhouse?
- What is the proper size hole for a birdhouse?
- What kind of wood should I use for a birdhouse?
- How often should birdhouses be cleaned annually?
- Which direction should the entrance hole face?
- When is the best season to install birdhouses?
- How far apart should multiple birdhouses be placed?
- What predators target birdhouses and how to deter them?
- When is the best time to install birdhouses?
- Conclusion
Key Takeaways
- The entrance hole size is your most critical measurement — miss it by just ⅛ inch and you’ll attract the wrong bird or lock out the right one.
- Cedar is the best wood choice for birdhouses because its natural oils resist rot and moisture without any chemical treatment.
- Skip the perch — it doesn’t help your target birds, but it does give raccoons and jays an easy foothold into the nest.
- Location and height matter as much as the build itself — face the entrance east, mount it at the species-correct height, and add a pole baffle to keep predators out.
Choose a Birdhouse Design

The design you pick will make or break your birdhouse before you even swing a hammer. Different birds have very specific needs — and getting them right is easier than you think.
Thankfully, beginner birdhouse building guides show you exactly how to match the right design to the right bird — no advanced skills required.
Here’s what to think about as you plan your build.
Selecting Plans for Local Bird Species
Before you cut a single board, check your regional species list — the birds in your backyard shape every decision you make. A plan built for Eastern Bluebirds won’t suit a chickadee.
Match your local nesting habitat, whether open field or woodland edge, and factor in seasonal climate and predator pressure.
Free downloadable PDF plans from nestboxbuilder.com make habitat compatibility easy to get right.
Consider adding dense native shrub groups to provide protective thickets for small birds.
Matching Entrance Hole Size to Target Birds
Once your plan matches your local species, the entrance hole becomes your most important measurement. Get it wrong by even ⅛ inch, and you’ve either locked out your target bird or rolled out the welcome mat for unwanted guests.
The entrance hole is your most critical measurement — miss it by ⅛ inch and you’ve invited the wrong bird in
Here’s a quick Species Hole Guidelines cheat sheet for common cavity nesters:
- House wrens and chickadees — 1⅛ in
- Titmice and nuthatches — 1¼ in
- Eastern Bluebirds — 1½ in
- Western/Mountain Bluebirds — 1-9/16 in
- Purple Martins — 1¾–2¼ in
Regional Variations matter too — local body size can shift which diameter actually fits. Always use a caliper for Precision Measurement. Shape Impact is real: oval and slot entrances change access differently than round holes. Size Calibration isn’t optional — it’s the whole game.
Choosing Floor Size and Interior Height
The entrance hole gets birds in — but floor size and interior height keep them there. Think of it like a studio apartment: too roomy, and bigger birds move in uninvited.
Species Floor Guidelines — Quick Reference
| Species | Floor Area | Interior Depth |
|---|---|---|
| Chickadee/Wren | 4×4 in | 8–10 in |
| Eastern Bluebird | 5×5 in | 8–10 in |
| Screech Owl | 8×8 in | 12–15 in |
Match your birdhouse dimensions to your target bird’s cavity nesting requirements, and you’re halfway home.
Picking Safe Materials for Outdoor Use
Once you’ve nailed your dimensions, material choice makes or breaks durability. Cedar is your best friend here — cedar durability comes from natural oils that fight rot and moisture without chemicals. Skip pressure-treated lumber entirely.
- Use untreated wood like cedar or pine for safe nesting
- Choose marine plywood if building larger houses
- Seal exteriors with low-VOC finishes and UV-resistant sealants; stainless steel fasteners prevent rust staining
Adding Ventilation and Drainage
Even a well-built nest box fails without proper moisture control.
Drill two 5/8-inch ventilation holes just below the roofline — that’s your airflow path, letting heat escape naturally. Add four drainage holes (3/8 to 1/2 inch) in the floor corners.
A good roof overhang shields those top vents from rain. Cavity nesters thrive in dry homes, so smart birdhouse ventilation and drainage holes aren’t optional extras.
Avoiding Perches and Predator-friendly Features
Skip the perch — it’s practically a welcome mat for raccoons and jays. Your target birds don’t need it; they’ll hop straight through a clean No Perch Entrance just fine.
For an even tighter defense, wrap the entrance with a Noel guard — a trick you’ll find detailed alongside other smart setups in this guide to unique bluebird house designs.
Keep the Flat Front Wall smooth, use Narrow Entrance Trim, and add a Secure Roof Overhang that doesn’t extend too far. A predator guard around the entrance hole, Clear Ground Space below, and a pole baffle complete your predator protection for nest boxes.
Cut and Assemble The House
Now comes the part where your birdhouse actually starts to look like a birdhouse. Each step builds on the last, so the order matters more than you’d think.
Here’s how to work through the cuts and assembly from start to finish.
Measuring and Cutting Wood Pieces

Good cuts start before you even touch the saw — your cut list is everything. Map out all six pieces (two sides, front, back, floor, roof) on a 1×6 cedar board first.
- Mark lines with a sharp pencil and a combination square
- Use Story Stick Replication for matching parts
- Practice Grain Orientation Awareness before ripping boards
- Match Blade Tooth Count to your cut type
- Nail your Miter Angle Setup before committing
Measure twice, cut once — seriously.
Drilling The Entrance Hole Accurately

The entrance hole makes or breaks your birdhouse. One wrong size, and the wrong bird moves in.
Mark your center point clearly — Center Marking prevents bit drift.
Clamp the board, use a hole saw bit with Bit Stabilization, and keep Drill Speed Control steady.
Sand those edges smooth afterward. Sixty seconds of Edge Sanding saves a bird from splinters every time.
Preparing The Floor for Drainage

A wet floor kills a nest fast. Before you attach anything, prep your floor right.
- Drill four ¼–½ in drainage holes in the bottom board
- Recess the floor ¼ in up from the wall edges
- Add a subtle Floor Slope Angle toward the holes
- Apply Waterproof Sealant Application along every joint
- Clear holes of glue, paint, and sawdust completely
Good Drainage Path Routing keeps nestlings dry all season.
Building The Walls and Floor

Think of your four wall panels as puzzle pieces — they only work if they fit together square.
Start with Wall Slope Angling on your front and back pieces so the roof sits flush later. Use cedar or softwoods like pine or spruce; skip MDF outdoors.
Apply Corner Bracing Techniques and Panel Joint Sealing at every seam. Finish with Recessed Floor Installation — drop it ¼ in up, aligning Wood Grain Orientation for strength.
Attaching The Roof for Water Runoff

Once your walls are square, the roof goes on — and this part matters more than you’d think.
Aim for a Roof Pitch Angle of at least 15 degrees, sloping front to back. That Weather-Facing Orientation pushes rain away from the entrance. Keep your Overhang Length 2–4 inches up front. Add a shallow Drip Cut Placement underneath each edge so water drops cleanly off, not back into the wood.
Sealing Joints and Weatherproofing

With the roof locked in, don’t skip the final step — sealing every joint.
Good Sealant Selection starts with a flexible polyurethane or silicone product. It manages Movement Accommodation as wood swells through seasons. Surface Preparation matters: wipe joints clean before applying your waterproofing sealant.
- Use construction adhesive at every seam before screwing
- Apply clear coat sealing for UV Resistance on exposed surfaces
- Check Drainage Integration — keep floor holes open
- Add a protective door seal to keep moisture out
Top 5 Birdhouse Building Tools
The right tools make this project so much easier — and honestly more fun. You don’t need a full workshop; just a small set of reliable gear that manages the cuts, holes, and fastening cleanly.
Here are the five tools worth having on your workbench.
1. Metabo HPT 10 Inch Compound Miter Saw
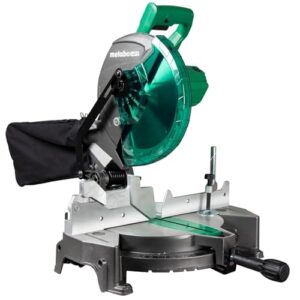
If you’re cutting birdhouse pieces all afternoon, clean repeatable cuts matter — and this saw delivers. The 15-amp motor hits 5,000 RPM, slicing through 2×4s and trim boards without breaking a sweat.
At just 24 pounds, you can move it around your garage easily.
The miter range goes 0–52° left and right, so angled roof cuts are no problem.
At $139, it’s genuinely hard to beat for weekend builders.
| Best For | DIYers, weekend builders, and hobbyists who need a reliable, portable miter saw without spending a fortune. |
|---|---|
| Price | $139.00 |
| Weight | 24.2 lb |
| Material | Tungsten carbide |
| Warranty | 5-year Metabo HPT |
| Color | Not specified |
| Included Accessories | Blade, dust bag, wrench |
| Additional Features |
|
- Powerful 15-amp motor at 5,000 RPM handles framing lumber and trim cuts with ease
- Wide 0–52° miter range makes angled cuts like roof peaks and crown molding straightforward
- Lightweight at 24 lbs and affordable at $139 — easy to move, easy to justify
- The dust bag is pretty underwhelming; you’ll likely want a shop vac running alongside it
- No sliding rail means your cross-cut capacity is limited compared to pricier saws
- No extension wings included, which makes handling longer boards a bit awkward
2. DeWalt Pneumatic Brad Nailer
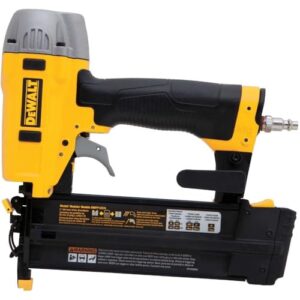
Once your cuts are clean, you need to fasten everything together fast and flush.
That’s where the DeWalt DWFP12231 earns its keep.
At just 2.65 pounds, it won’t wear out your wrist after an hour of assembly.
It drives 18-gauge brad nails from 5/8 in. to 2 in. — perfect for thin birdhouse walls.
The tool-free depth adjustment keeps nail heads consistent every time.
No oiling required, no fuss.
Hook it to a standard 90-psi compressor and you’re ready to go.
| Best For | DIYers and trim carpenters who want a lightweight, low-maintenance nailer for baseboards, crown molding, and finish work without the hassle of battery charging or oiling. |
|---|---|
| Price | Not specified |
| Weight | 2.65 lb |
| Material | Polymer blend |
| Warranty | Not specified |
| Color | Yellow |
| Included Accessories | Carrying case, manual |
| Additional Features |
|
- At 2.65 lb with a built-in belt hook, it’s easy to carry and use for long stretches without your arm giving out.
- Tool-free depth adjustment and jam clearing keep things moving — no stopping to dig out a wrench or fight a misfire.
- Works with any standard 90-psi shop compressor, so no special equipment needed.
- The plastic nail-guide tip can pop off under heavy use, which is an annoying mid-job fix.
- It’s air-powered only — no compressor on hand means no nailer.
- Depth control is locked to preset detents, so if you need something in between, you’re out of luck.
3. DeWalt 20V Cordless Impact Driver Kit

When you’re driving screws into tight birdhouse corners, a bulky drill just gets in the way. The DeWalt DCF885 solves that.
At 5.55 inches and 2.8 pounds, it slips into spaces your hand can barely reach.
The 20V brushed motor delivers serious torque for long screws in cedar or pine.
Three built-in LEDs light your work area automatically — no fumbling in dim workshops.
The quick-change 1/4-inch hex chuck swaps bits one-handed.
Clean, fast, and reliable.
| Best For | DIYers and hobbyists who work in tight spaces and need a lightweight, reliable driver for everyday fastening tasks like furniture assembly, shelving, and woodworking projects. |
|---|---|
| Price | Not specified |
| Weight | 2.8 lb |
| Material | Metal and plastic |
| Warranty | 3-year DeWalt |
| Color | Black/Clear |
| Included Accessories | Battery, charger, case |
| Additional Features |
|
- Compact and light — at 5.55 inches and 2.8 lbs, it fits where bigger drills won’t
- Built-in triple LEDs keep your work area visible without needing a separate light
- Strong 20V torque handles long screws in hardwood and framing lumber without breaking a sweat
- No torque adjustment means you risk over-driving screws, especially in softer materials
- Only comes with one small 1.5 Ah battery — heavier jobs will drain it fast
- Brushed motor is less efficient than brushless alternatives and may wear out sooner under regular heavy use
4. Bosch Bi Metal M42 Hole Saw
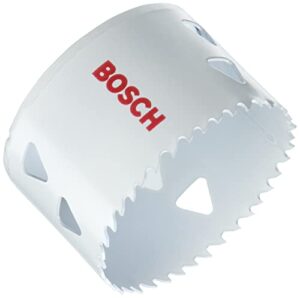
Getting that entrance hole just right is everything — and the Bosch M42 makes it easy. The M42 bi-metal construction with 8% cobalt manages heat better than standard saws, giving you about 20% more tool life.
The Progressor tooth design alternates tooth sizes for faster, cleaner cuts through cedar, pine, or even drywall. Need a 1½-inch bluebird opening? It’s in the lineup.
The triangle slot design pops the plug out fast, too.
| Best For | Hobbyists and pros who drill repetitive holes in wood, metal, or drywall and want a long-lasting saw that won’t quit halfway through a job. |
|---|---|
| Price | $14.99 |
| Weight | 0.01 lb |
| Material | Bi-metal M42 |
| Warranty | Not specified |
| Color | Black |
| Included Accessories | None included |
| Additional Features |
|
- M42 bi-metal with 8% cobalt runs cooler and lasts about 20% longer than standard hole saws
- Progressor tooth geometry cuts faster and cleaner across a wide range of materials
- Triangle slot design pops the plug out quickly, saving real time on repetitive tasks
- Requires a 1/2-in. arbor, so smaller drill chucks need an adapter
- Arbor is sold separately, which bumps up the total cost
- Pricier than basic carbon-steel options, which may be overkill for occasional light-duty use
5. Channellock Lineman Pliers Extreme Leverage
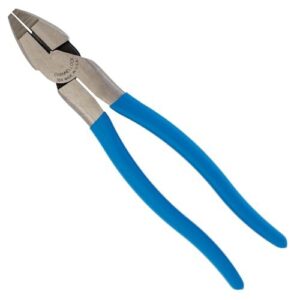
When you’re bending wire, shaping mesh, or wrestling chicken wire into place, the Channellock 369 is the tool you’ll reach for every time.
The Xtreme Leverage Technology moves the rivet closer to the cutting edge — so your hand works less.
At 9.5 inches with laser heat-treated blades and crosshatch jaws, it grips and cuts cleanly through 12-gauge wire without chewing up your hands.
Light enough at 8 oz, tough enough for a full afternoon of work.
| Best For | Electricians, HVAC techs, and construction workers who spend long stretches cutting and bending heavy-gauge wire and want to save their hands in the process. |
|---|---|
| Price | $32.95 |
| Weight | 8 oz |
| Material | High-carbon steel |
| Warranty | Not specified |
| Color | Blue |
| Included Accessories | None included |
| Additional Features |
|
- XLT design puts less strain on your grip, so you can work longer without fatigue
- Laser heat-treated cutting edges stay sharp through heavy daily use
- Versatile enough to handle bending, gripping, light prying, and occasional hammering
- The leverage advantage may not feel dramatically different from other high-leverage pliers on the market
- Can leave a slightly rough edge on thin metals like washers or sheet metal
- Pivot needs regular cleaning and oiling — skip that and it’ll start to feel stiff and sluggish
Mount and Maintain The Birdhouse

Building the birdhouse is only half the job. Where you put it — and how you care for it — determines whether birds actually move in.
Here’s what you need to know to get it right.
Choosing The Best Yard Location
Location makes or breaks a birdhouse. open grassland placement with 40–60% sunlight percentage and east-facing entrances for proper wind orientation. 5–8 ft predator buffer from dense brush. Match habitat vegetation to your target species, and always choose a chemical-free zone away from pesticide-treated lawns.
| Species | Ideal Spot |
|---|---|
| Bluebird | Open field, sparse cover |
| Chickadee | Woodland edge, partial shade |
| Purple Martin | Open sky, 40 ft from trees |
Mounting at The Proper Height
Height isn’t a guess — it’s a species decision. Follow these Species Height Guidelines to get it right:
- Eastern bluebirds: 4–6 ft on a pole mount in grassland placement
- Purple martins: 15–20 ft for open aerial approach
- Wrens and chickadees: 5–15 ft at woodland edges
- Mountain bluebirds: 4–10 ft on stable mounting posts
- All species: balance Inspection Height Balance — high enough for predator access prevention, low enough for easy cleaning
Using Predator Guards and Pole Baffles
A raccoon can empty a nest box in minutes — don’t let it happen to yours.
Stovepipe Baffle Design uses a 24‑inch galvanized pipe (8 inches wide) around your mounting post, blocking climbers, cold.
Conical Guard Installation is cheaper and nearly as effective. Add a Noel Guard at the entrance for backup.
Keep surfaces smooth — rough rust actually helps snakes climb.
Spacing Houses for Different Species
Think of your yard like real estate — every bird wants its own turf.
Bluebirds need about 300 feet of territory spacing between boxes, while house wrens demand 100‑foot buffer zones minimum.
Species pairing works great, though: set Bluebird and Tree Swallow boxes 5–15 feet apart. They’ll coexist peacefully.
Smart habitat segmentation and yard layout prevent conflict before it starts.
Cleaning After Each Nesting Cycle
Once the chicks fly away, clean it out after — don’t wait. Seasonal birdhouse cleaning matters more than most people realize.
Open the hinged panel, pull out all old nesting material, and scrub inside with mild detergent and water.
Spot fecal matter?
Mix one part bleach to ten parts water.
Let it dry completely — proper drying procedures prevent mold and support parasite prevention next season.
Checking for Damage and Loose Fasteners
While the box is still open from birdhouse cleaning, run through a quick repair checklist.
Press each joint — any joint wobble means fasteners have backed out. Check for wood cracks near screw holes, common after freeze-thaw cycles. Look for fastener corrosion: pitting or rust; inspection reveals hardware that needs swapping. Replace corroded screws with galvanized ones, and reapply construction adhesive at any separated seam.
Monitoring Activity Without Disturbing Birds
Once your nest box is secure and repaired, resist the urge to peek inside constantly. Check every 3–4 days — afternoons work best.
Binocular Observation keeps you at a respectful distance.
For tech-savvy birders, Camera Surveillance and Low-Light Cameras handle dark interiors beautifully, while Acoustic Monitoring and Passive Sensors capture activity without a single footstep near the box.
Frequently Asked Questions (FAQs)
Do birds prefer unpainted birdhouses?
Honestly, it’s a bit of a toss-up.
Most cavity nesting birds care far more about natural wood, entrance size, and placement than color. Unpainted works great — paint toxicity risk, better camouflage.
Why won’t birds use my birdhouse?
Usually, it comes down to the wrong entrance hole size, poor birdhouse placement guidelines, or seasonal timing.
Sparrow competition, excessive shade, human traffic, and invasive species competition also drive cavity nesters away fast.
What is the proper size hole for a birdhouse?
The right entrance hole depends on the species. A 1⅛-inch hole suits chickadees; bluebirds need 1½ inches. Matching cavity nesters to the correct size keeps larger, unwanted birds out.
What kind of wood should I use for a birdhouse?
Cedar is best bet. Its natural oils make it rot resistant and weather‑tough.
Pine wins on affordability.
Cypress and redwood last longer outdoors.
Stick with ¾‑inch softwood lumber — thicker walls mean better insulation.
How often should birdhouses be cleaned annually?
Think of your birdhouse like a kitchen — it needs regular cleaning. Clean it at least once a year, ideally after each brood fledges, to prevent mold and parasites.
Which direction should the entrance hole face?
Face the entrance east. Morning sun exposure warms the nest, afternoon heat avoidance protects chicks, and prevailing wind orientation keeps cold gusts out. Southeast works great in northern climates.
When is the best season to install birdhouses?
Beat the rush — get your birdhouse up in early spring, ideally March to April. Fall setup works too.
Birds scout sites early, so don’t wait until they’ve already moved in elsewhere.
How far apart should multiple birdhouses be placed?
Space bluebird boxes at least 300 feet apart. Wrens need 100 feet. Colony nesters like Purple Martins cluster together, 10 feet apart. Match spacing to your most territorial species.
What predators target birdhouses and how to deter them?
Raccoons, cats, snakes, squirrels, house sparrows, and starlings all target nest boxes. A pole-mounted baffle, proper entrance size, and smart placement are your best predator-proof defense.
When is the best time to install birdhouses?
Early spring is your best window — aim for March or April. But fall works too. Winter roosting birds will thank you for a box that’s already up and waiting.
Conclusion
That first empty box won’t stay empty long.
Once you build a bird house sized right for the species you want, hang it at the proper height, and clean it each fall, you’ve done something quietly powerful—you’ve made a small corner of the world genuinely livable.
Birds don’t need much. Just the right hole, a safe floor, and someone who paid attention.
Turns out, that that someone is you.