
This site is supported by our readers. We may earn a commission, at no cost to you, if you purchase through links.

A hollowed-out gourd hanging from a garden hook doesn’t look like much, but purple martins have nested in them for centuries, long before plastic birdhouses existed. Native growers dried and drilled bottle gourds for these birds, and the tradition still works because gourds breathe, insulate, and mimic natural cavities better than most store-bought boxes ever could.
Grab the right seeds, though, and you’re growing your own supplies for next to nothing.
These diy bird house gourd instructions walk you through picking a sturdy Lagenaria siceraria, curing it until it rattles with dried seeds, and drilling holes sized for your target species. From there, you’ll clean, weatherproof, and mount a home your feathered friends will actually choose.
Table Of Contents
- Key Takeaways
- Choose and Cure The Right Birdhouse Gourd
- Clean and Prepare The Gourd Shell
- Drill Entrance, Drainage, and Ventilation Holes
- Weatherproof and Decorate The Gourd Birdhouse
- Add Hardware, Mount, and Maintain It
- Frequently Asked Questions (FAQs)
- How to make a bird nest out of a gourd?
- How do you prepare a gourd for a birdhouse?
- Do birds actually use gourd birdhouses?
- How long will a gourd birdhouse last?
- What size hole do you drill in a gourd for a birdhouse?
- How do you plant gourds for birdhouses?
- What is the best finish for a birdhouse gourd?
- How long do gourd birdhouses last outdoors?
- What birds prefer gourd birdhouses over wooden ones?
- When is the best season to hang gourds?
- Conclusion
Key Takeaways
- Only Lagenaria siceraria (bottle gourd) cures hard enough for birdhouses, and you’ll need to match its diameter and entrance hole size to your target species, from 6-8 inches for wrens to 9-12 inches for purple martins.
- Proper curing takes 2-3 months of rotating and drying at 70-85°F, and you’ll know it’s done when the gourd rattles with loose seeds and feels solid, not spongy.
- Cleaning requires a 1:10 bleach solution to kill mold, thorough pulp removal, and progressive sanding from 60-grit up to 400-grit for a smooth, paint-ready surface.
- After drilling precisely sized entrance, drainage, and ventilation holes, seal every cut edge and apply two coats of marine varnish or exterior-grade polyurethane to protect the gourd for years outdoors.
Choose and Cure The Right Birdhouse Gourd

Every good gourd birdhouse starts long before the drill comes out, back when the gourd’s still curing on the vine or drying in your shed. Getting this stage right means picking the correct variety and size for your feathered friends, then giving it months to harden properly. Here’s what you need to know before you cut a single hole.
Once your gourd’s ready, it helps to know which birds actually prefer gourd-style homes so you can size that entrance hole just right.
Best Gourd Varieties
Five gourd types grow on the vine, but only one earns a spot on your birdhouse pole. Lagenaria siceraria—the bottle gourd—cures rock-hard, unlike edible or ornamental cousins grown purely for looks.
Skip warty, turban-shaped, or luffa varieties entirely; they’re built for crafts and sponges, not shelter.
Understanding different gourd varieties helps you select the best specimen for your project.
- Thick, durable shells that withstand weather
- Smooth surfaces perfect for carving entrance holes
- Reliable curing for lasting hardshell gourds
Bird-Safe Gourd Sizes
Once you’ve settled on a bottle gourd, think like a bird house-hunting for elbow room. Match diameter to species—undersized cavities cramp nesting, oversized ones waste heat.
| Species | Gourd Diameter |
|---|---|
| Wrens | 6–8 inches |
| Bluebirds | 7–9 inches |
| Purple Martins | 9–12 inches |
Keep entrance holes proportional, roughly 1/4 to 1/3 of gourd diameter, so cavity-nesting birds move in safely without inviting predators.
Harvesting at The Right Time
Timing makes or breaks your DIY birdhouse project. Watch for these maturity indicators before cutting anything.
- Stem turns brown and corky
- Rind shifts from green to tan
- Skin resists a fingernail dent
- Tapping produces a hollow sound
Harvest during dry weather, leaving 2-3 inches of stem to prevent rot. Rain and humidity invite mold, so timing protects your gourd preservation efforts before curing even begins.
Air-Drying Gourds Properly
Now comes the waiting game, and it matters as much as harvesting tips ever did. Find a well-ventilated spot, out of direct sun, with temps between 70-85°F.
- Space gourds apart—airflow beats crowding
- Rotate weekly for even drying
- Watch humidity to prevent mold growth
- Expect 2-3 months for full cure
- Check often; this is gourd preservation in action
Drying time varies by thickness. Patience is your best tool here.
Signs Curing is Complete
How do you know your gourd’s done curing? Grab it and give it a good shake—the seed rattle test is your best clue, and a loose, audible rattle means moisture’s gone.
Once your gourds are cured and rattling, a good scrub with diluted bleach knocks out mold spores before you move on to fall projects like creating a bird-friendly autumn feeder setup.
Check the shell hardness, too: it should feel solid, not spongy, with noticeable weight change from when you started. A quick mold inspection rules out white patches or musty smells. These proper drying indicators confirm you’re ready to move forward with your DIY project—because ornamental gourds deserve a home built to last.
Clean and Prepare The Gourd Shell

Once your gourd passes the rattle test, it’s time to turn that rough, dusty shell into something birds will actually want to move into.
This stage gets messy before it gets satisfying, so grab your gloves and clear some workspace.
Here’s exactly how to scrub, disinfect, hollow out, and smooth your gourd until it’s ready for the next step.
Scrubbing Mold and Skin
That fuzzy gourd mold isn’t harmless—it can trigger real skin irritation. Scrub gently in warm soapy water; hard scrubbing spreads spores and worsens rashes. Always wear gloves.
If contact occurs:
- Rinse with cool water immediately
- Wash using mild, fragrance-free soap
- Watch for redness or swelling
Persistent symptoms mean seek medical advice before continuing your birdhouse gourd cleaning.
Disinfecting With Bleach Solution
Soap alone won’t kill what’s lurking in that shell. Mix a 1:10 bleach-to-water solution and wipe every surface, keeping it visibly wet for a full minute—that’s real contact time.
Work in ventilated space wearing gloves and a mask, since mold dust irritates lungs fast.
Never combine bleach with ammonia; toxic gas forms instantly. Mix fresh batches only, store concentrate away from heat, and dispose of leftover solution within 24 hours—not down storm drains.
Removing Seeds and Pulp
Reach through the entrance hole and scrape flesh loose by hand, rinsing with cool water as seeds drift free.
A mesh sieve separates seeds from pulp, protecting seed viability for planting.
Effective pulp removal steps:
- Loosen fibers gently
- Rinse repeatedly
- Avoid scraping walls—avoiding shell damage matters
- Dry seeds 24-48 hours
Proper seed storage methods and mold prevention techniques now set up successful curing.
Sanding The Outer Surface
Grit is everything here: work 60-80 for shaping, glide through 120-220 for smoothing the gourd’s surface, then finish at 400-grit for that glass-like glow.
Follow the curve, not against it—curvature sanding means slow, overlapping strokes with a flexible pad. Wipe dust often to check your progress.
That texture goal? Matte-smooth, ready for paint to grip evenly, just like any solid woodworking project demands.
Safety Mask and Gloves
Bleach fumes and fine gourd dust don’t belong in your lungs. Wear a face mask or respirator—N95 filtration blocks 95% of particles, far outperforming loose surgical masks. Fit matters most: snug across your nose and cheeks, no gaps.
Choose nitrile gloves over latex; they resist bleach and chemicals while protecting sensitive skin. Glove up before touching solutions, then wash hands after doffing—simple habits that keep this rewarding project genuinely safe.
Drill Entrance, Drainage, and Ventilation Holes
With your gourd clean and smooth, it’s time to give it purpose. Grab your hole saw, drill, and a bit of patience, because precision matters here. Here’s exactly where and how big to cut, so your gourd fits the birds you want to welcome home.
Entrance Hole Size Chart

Half an inch too wide, and you’ve traded songbirds for squirrels raiding the nest.
Drill the entrance hole just half an inch too wide, and you’ll host squirrels instead of songbirds
Species diameter comparison guides every drill choice:
- Wrens: 1 inch
- Cavity-nesting birds like chickadees: 1⅜ inch drill bit
- Bluebirds: 1½ inch
Precise sizing helps with nesting species matching and predator access control, protecting nesting space in bird-friendly houses. Hole integrity maintenance matters too—undersized holes shrink with paint buildup. Entrance height placement comes next.
Using a Hole Saw

Once you’ve got your entrance size picked, it’s time to drill the entrance. Center your mark and seat the pilot bit firmly before starting the arbor—this keeps your 1 ⅜ inch drill bit from wandering off course.
Run the drill perpendicular to the shell at low speed, clearing chips often. Brace a backing board underneath to stop tear-out, and always wear safety goggles and gloves.
Bottom Drainage Holes

Flip the gourd over and find the lowest point on the base—this is where water wants to collect.
Drill two to four holes at an ideal hole diameter of 6 to 12 millimeters, spaced toward center to avoid rim cracking. This drilling placement strategy prevents waterlogging, protects structural integrity, and boosts nesting success by keeping the cavity dry.
Check holes seasonally for clogs to maintain drainage integrity and prevent shell cracking down the road.
Upper Ventilation Holes

Drainage keeps water out, but trapped humidity is its own threat, so your gourd needs a place for warm air to escape.
Drill 2 to 4 upper vents, 1/4 to 1/2 inch wide, near the roof peak on one gable. Stagger them off-center for cross-flow, leaving an inch of solid shell between each for structural integrity and weather resistance—keeping nesting success high all season.
Smoothing Cut Edges

Every cut edge hides sharp burrs, ready to snag delicate feathers, so grab a needle file for precision deburring before your feathered friends move in.
- Sand 220-grit, then 400-grit sandpaper
- Maintain a consistent 0.5–1.5mm radius
- Check both sides for missed burrs
- Clamp the gourd to prevent cracks
Smoothing curved edges takes patience, but it’s what separates rushed woodworking projects from ones that truly last outdoors.
Weatherproof and Decorate The Gourd Birdhouse

Once your holes are drilled and edges are smooth, it’s time to protect your gourd from sun, rain, and every season in between. A little paint and varnish go a long way, but only if you use the right products in the right places. Here’s what you need to know before you pick up a brush.
Bird-Safe Paint Choices
Not just any paint belongs on a gourd that’ll shelter your feathered friends. Choose water-based acrylics or latex for low VOC emissions and quick drying, or try nontoxic milk paint as a breathable wood sealer.
Look for Greenguard Gold or ASTM D4236 eco-labels when shopping. Whatever you pick, let it cure fully—14 to 21 days—before mounting, protecting delicate lungs from lingering fumes.
Light Colors for Cooling
Think of your gourd birdhouse as wearing sunscreen—light hue selection matters. White reflects up to 95% of sunlight, slashing heat absorption inside.
- Cooler nests mean healthier hatchlings
- Less midday stress on nesting parents
- Vibrant curb appeal for years
- Reduced fading from UV exposure
- Peace of mind through summer heat
Choose matte finishes; they outperform gloss for solar reflectance and longevity when you paint the birdhouse.
Sealing Cut Edges
Raw, hole-sawed edges act like tiny sponges, pulling in moisture and inviting surface checking over time. Sand smooth, wipe clean, then brush on an epoxy or acrylic sealant in thin coats—no pooling. Let it cure fully before handling. This moisture barrier stops cracks before they start.
Check edges yearly, especially after sanding, and recoat to keep your gourd birdhouse weatherworthy for seasons ahead.
Applying Outdoor Varnish
A protective finish is what stands between your gourd and years of rain. Pick marine varnish or exterior-grade polyurethane over a weatherproof stain—stain soaks in, but varnish builds a true shield with better UV protection.
Brush thin coats with the grain. Sand lightly between coats at 220-grit, wipe clean, and let dry per label time before recoating; humidity slows curing. Two coats seal the birdhouse against fading, warping, and rot.
Avoiding Interior Paint
That gourd cavity is a sealed little world, and nontoxic wood sealer stays outside it. Fumes offgas inside enclosed spaces, irritating lungs far smaller than yours.
Skip the urge to Paint the Birdhouse indoors—let bare wood breathe instead. For a light protective finish, rub beeswax sparingly on exterior surfaces only, never near the entrance hole.
This natural interior finish approach controls moisture, deters mold, and helps you seal the birdhouse responsibly while keeping birdfriendly houses genuinely safe for nesting season.
Add Hardware, Mount, and Maintain It
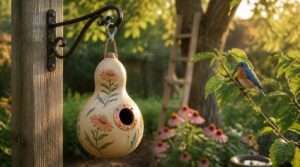
Your gourd is cured, cleaned, and ready for the world outside. Now it’s time to give it the hardware and home it needs to actually attract feathered friends. Here’s what you need to know to hang it right and keep it in good shape for years to come.
Installing Eye Screws
Mark your spot, then drill a shallow pilot hole slightly smaller than the screw shank—this keeps the gourd from splitting. Mounting the eye screw in a drill chuck speeds installation; hand-tighten first, then drive slow.
- Pick galvanized or stainless steel for corrosion resistance
- Rate hardware for 10–20 lbs
- Use two screws for balanced suspension
Seal the screw head with outdoor sealant before you insert the wire.
Hanging Height by Species
Height makes or breaks your gourd’s success as nesting space—too low invites cats, too high risks toppling.
| Species | Height | Habitat Zone |
|---|---|---|
| Bluebirds | 4–6 ft | Open fields |
| Chickadees | 5–15 ft | Wooded edges |
| Wrens | 6–10 ft | Shrubs, low trees |
Match height to species and surroundings for real predator avoidance elevation. Raise boxes slightly in late summer—seasonal tweaks protect your bird sanctuary year-round.
Choosing a Protected Location
Once you’ve nailed the height, think about what surrounds the gourd. Tuck it near a wall or dense hedge for wind protection, 6 to 18 inches out, so gusts don’t send it swaying.
Give it morning sun with afternoon shade to prevent overheating, and skip low brush where predators lurk—open sightlines mean better predator defense for your bird sanctuary.
Checking Stability Outdoors
Give the post a firm push side to side—any sway means loose hardware. Check Ground Leveling with a spirit level, since tilt over 5 degrees invites trouble.
- Inspect anchors for rust or stripped screws
- Confirm Foundation Materials haven’t shifted after rain
- Verify Wind Resistance by checking bracing after gusts
Recheck monthly during storm season to protect Anchor Integrity.
Seasonal Cleaning Routine
Once autumn leaves start dropping, empty your gourd and scrub inside with a diluted bleach solution to clear old nesting material and prevent mite buildup.
| Season | Task |
|---|---|
| Fall | Deep cleaning, pest prevention |
| Winter | Hardware inspection |
| Spring | Ventilation checks |
| Summer | Stability checks |
This seasonal maintenance rhythm curbs allergens, controls dust reservoirs, and keeps your feathered tenants returning safely.
Frequently Asked Questions (FAQs)
How to make a bird nest out of a gourd?
You’re not building the nest, just the frame. Focus on hollowing out the shell completely, checking material safety, and skipping paint indoors. Nesting comfort comes from birds themselves, they’ll haul in twigs, grass, and feathers once your cavity’s ready.
How do you prepare a gourd for a birdhouse?
Treat prep like a full spa cycle: scrub and disinfect with a 1:10 bleach solution, scoop out pulp, sand the shell smooth, drill entrance, drainage, and ventilation holes, then seal everything with a weatherproof exterior coating.
Do birds actually use gourd birdhouses?
Like tree hollows carved by nature itself, gourd birdhouses genuinely work. Cavity-nesting birds—wrens, chickadees, Purple Martins—readily accept them, boosting species occupancy rates through proper sizing, snug natural insulation benefits, and smart predator deterrence strategies that support real bird conservation.
How long will a gourd birdhouse last?
A well-cured gourd usually lasts 2 to 10 years, sometimes longer with marine varnish or exterior-grade polyurethane. Sun and rain speed weathering, while shaded placement, winter storage, and seasonal recoating add several extra protected years outdoors.
What size hole do you drill in a gourd for a birdhouse?
Match the hole saw to your target species: 1 inch for wrens, 1⅛ for chickadees, up to 2⅛ inches for bluebirds. A centered, symmetrical entrance hole keeps raccoons and squirrels from raiding the nest.
How do you plant gourds for birdhouses?
Think of your garden as a nursery for future birdhouses. Sow seeds after frost in well-drained, organic-rich soil, pH 0– Space plants 6–8 feet along a trellis, water weekly, and plant pollinator-friendly flowers nearby for vigorous growth.
What is the best finish for a birdhouse gourd?
Marine varnish holds up best, but two thin coats of exterior-grade polyurethane rival its weather resistance. Sand lightly between coats, smoothen the gourd’s surface, skip paint on interiors, and let UV protection guard against fading and cracking outdoors.
How long do gourd birdhouses last outdoors?
Sturdy shells and seasonal storage yield 3 to 5 years of reliable service. Exterior-grade polyurethane fights sunlight damage and outdoor elements, while pest protection and consistent seasonal maintenance push gourd birdhouses toward the higher end of that range.
What birds prefer gourd birdhouses over wooden ones?
Wrens, chickadees, and bluebirds favor gourd birdhouses thanks to smooth interior walls, natural temperature regulation, and curved shapes that deter climbing predators.
These cavity-nesting birds settle into gourds’ rounded contours more readily than they do flat, harsh-edged wooden boxes.
When is the best season to hang gourds?
Old-timers hung gourds by the almanac; you should hang them after first frost, mid-to-late October, once rinds harden and color matures — avoiding humidity risks that invite rot before your birdhouse gourds settle into their new wildlife habitat.
Conclusion
Good things come to those who wait, and a curing gourd proves it every single season.
Follow these diy bird house gourd instructions patiently, and a lumpy garden vine becomes a cavity birds actually choose over plastic.
Drill clean, seal every edge, and mount it where wind can’t rock it loose.
Come spring, chattering martins will thank you the only way they know how: by moving in.
- https://www.linenbeauty.com/blog/how-to-seal-fabric-edges-without-sewing
- https://elliotts.uk/ideas-and-advice/how-to-seal-plywood-edges
- https://www.dopag.com/en-in/applications/composite-processing/edge-sealing/
- https://birdsinthetree.com/how-to-grow-bird-house-gourds/
- https://www.finegardening.com/article/grow-birdhouse-gourds