This site is supported by our readers. We may earn a commission, at no cost to you, if you purchase through links.
 You’ll discover that a wooden bird house with roof provides essential protection for nesting birds while adding natural charm to your yard.
Cedar and pine are top wood choices because they resist weather damage and won’t harm birds.
The roof design matters most – slanted angles shed rain effectively while overhangs protect the entrance hole from driving storms.
Look for houses with removable panels for easy cleaning and proper ventilation holes near the top.
Size the entrance hole correctly for your target bird species since different birds need different openings.
Smart builders know that choosing the right roof style can make or break your feathered tenants’ comfort.
Table Of Contents
- Key Takeaways
- Wooden Bird House Designs
- Top 9 Wooden Bird Houses
- 1. Hanging Wild Bird Feeder House
- 2. Cedar Bird House Two Pack
- 3. White Distressed Wooden Cottage Birdhouse
- 4. Green White Wooden Outdoor Birdhouse
- 5. Glitzhome Blue Leaves Bird House
- 6. XL Wooden Birdhouse Metal Roof
- 7. Hanging Wooden Bird House Garden
- 8. Glitzhome Green Distressed Wood Birdhouse
- 9. Rustic Wooden Outdoor Bird House
- Bird House Roof Options
- Building Wooden Bird Houses
- Maintaining Wooden Bird Houses
- Frequently Asked Questions (FAQs)
- What kind of bird house do birds like the best?
- Is it cheaper to buy or build a birdhouse?
- Do birds use wooden bird houses?
- Will birds sleep in a birdhouse?
- What is the best birdhouse to attract birds?
- What color birdhouse attracts birds the most?
- Do birds prefer unpainted birdhouses?
- What type of birds will use this?
- How to attract birds to a birdhouse?
- Is ventilation important in birdhouses?
- Conclusion
Key Takeaways
- You’ll get the best results with cedar or redwood construction since these woods naturally resist weather damage and won’t harm nesting birds with toxic chemicals.
- Your roof design matters most – choose slanted angles with overhangs to shed rain effectively and protect the entrance hole from driving storms.
- You should size the entrance hole correctly for your target bird species, add ventilation holes near the top, and include removable panels for easy seasonal cleaning.
- You’ll need to maintain your wooden bird house by cleaning it twice yearly, checking for damage regularly, and applying animal-safe sealant every 2-3 years to ensure long-lasting protection.
Wooden Bird House Designs
You’ll find wooden bird house designs that combine natural materials with decorative details to attract various bird species.
These designs feature rot-resistant redwood construction and embossed floral patterns that create both functional nesting spaces and attractive garden decorations, making them a great addition with natural materials.
Natural Redwood Construction

American redwood stands as the gold standard for wooden birdhouse construction.
Redwood reigns supreme for birdhouse builders seeking natural beauty and lasting durability.
You’ll find this naturally rot-resistant material creates safe havens that last decades without chemical treatments.
Here’s why redwood excels for bird houses:
- Redwood Rot Resistance – Natural oils repel moisture and insects without toxic preservatives
- Redwood Bird Safety – Chemical-free wood protects nesting birds from harmful substances
- Redwood Weathering – Ages gracefully to beautiful silver-gray patina over time
- Redwood Longevity – Your birdhouse roof and walls withstand harsh weather for years
Embossed Floral Patterns

Several wooden birdhouse manufacturers add embossed floral patterns to enhance visual appeal. These decorative elements transform basic structures into garden art pieces.
You’ll find intricate rose designs pressed into redwood surfaces and delicate leaf patterns carved along roof edges. Many kits offer easy assembly options for enthusiasts of all skill levels.
| Pattern Type | Common Locations | Design Benefits |
|---|---|---|
| Rose motifs | Side panels, roof edges | Creates romantic garden feel |
| Leaf patterns | Corners, hanging loops | Adds natural woodland charm |
| Vine designs | Front facades, borders | Provides elegant flowing lines |
The use of these patterns can significantly enhance the overall aesthetic of the birdhouse, making it a beautiful addition to any garden.
Top 9 Wooden Bird Houses
You’ll find these nine wooden bird houses offer different roof styles and construction materials to suit various bird species and garden settings.
Each design features unique roofing options from copper accents to shingled tops that provide excellent weather protection for your feathered visitors, with copper accents being a notable feature.
1. Hanging Wild Bird Feeder House
 View On Amazon
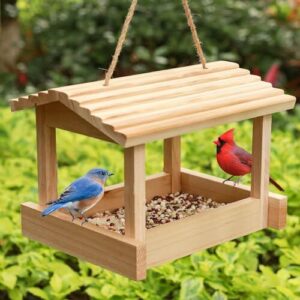
You’ll love this versatile hanging feeder that doubles as a bird house.
The wooden design measures 10.5" x 7.5" x 7.5" and attracts finches, cardinals, and chickadees to your yard.
Its sloping roof keeps seeds dry during rain and snow while providing ample perching space.
The sturdy hemp rope guarantees stable hanging from tree branches or hooks.
Made from untreated wood, it offers that rustic charm birds prefer.
The platform design gives multiple birds room to feed simultaneously, creating a busy feeding station.
Best For: Enthusiasts who enjoy bird-watching and creating a backyard haven for wild birds.
- Attracts various bird species like finches, cardinals, and chickadees.
- Sloping roof design keeps seeds dry in rain or snow.
- Rustic untreated wood provides natural charm.
- Untreated wood may develop mold or black spots.
- Hemp rope hanger can fray and weaken with time.
- Asymmetrical roof may cause unlevel hanging.
2. Cedar Bird House Two Pack
 View On Amazon
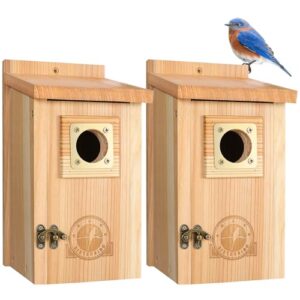
This cedar duo brings serious value to your backyard birding setup.
You’ll get two untreated cedar houses with 1.5-inch entrance holes that perfectly fit bluebirds, wrens, and chickadees.
The copper predator guards around each entrance keep unwanted visitors out while birds feel safe inside.
Assembly takes under five minutes with the included screwdriver and pre-drilled holes.
The front doors swing open for easy cleaning between seasons.
Cedar naturally resists weather damage, so these houses will serve your feathered friends for years, providing a safe space for bluebirds and other birds, and they are made of cedar.
Best For: Backyard bird enthusiasts looking for durable, easy-to-assemble birdhouses for bluebirds, wrens, and chickadees.
- Quick and easy assembly with included tools.
- Made from weather-resistant, untreated cedar for durability.
- Copper predator guard protects birds from predators.
- Needs airing out due to potential insecticide treatment odor.
- Price has increased since April 2023.
- Limited to species that fit the 1.5-inch entrance hole size.
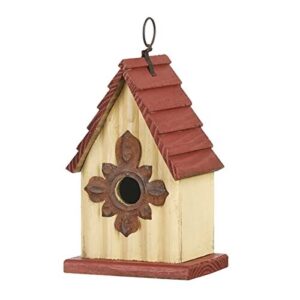
3. White Distressed Wooden Cottage Birdhouse
The White Distressed Wooden Cottage Birdhouse brings farmhouse charm straight to your backyard.
You’ll love its weathered white paint and hand-distressed wooden planks that create authentic vintage appeal.
This 12-inch tall beauty features a metal roof for weather protection and six miniature openings that serve as feeding stations.
The removable cleanout panel makes seasonal maintenance simple.
Bluebirds, wrens, and tree swallows find this cottage irresistible, and to attract these birds, consider their species-specific requirements.
At $25.97, it’s perfect for tabletops or hanging displays, adding rustic character wherever you place it.
Best For: Bird or gardening enthusiasts looking for a functional, rustic birdhouse with vintage charm.
- Minor issues with trim pieces reported by some users.
- Temperature sensitivity – requires shaded placement.
- Limited to small bird species due to size constraints.
- Handmade design with a distressed, weathered look.
- Metal roof and removable cleanout panel for durability and easy maintenance.
- Attracts desirable bird species like bluebirds and wrens.
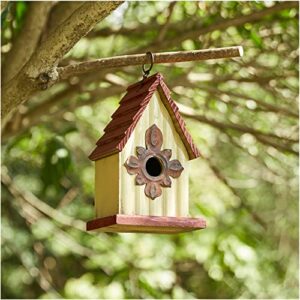
4. Green White Wooden Outdoor Birdhouse
 View On Amazon
This charming cottage-style birdhouse brings garden elegance with its green and white color scheme.
You’ll appreciate the solid wood construction that withstands outdoor conditions year-round. The distressed details add vintage character while the 1.18-inch entrance hole welcomes small songbirds like wrens and chickadees.
At 10.75 inches tall, it fits perfectly in compact spaces. The removable back panel makes cleaning effortless after nesting season.
The included jute rope lets you hang it anywhere. No assembly required means you can start attracting feathered friends immediately, and enjoy the company of these small songbirds.
Best For: Homeowners and garden enthusiasts looking for a stylish, functional birdhouse to attract small songbirds like wrens and chickadees.
- Limited to small bird species due to the 1.18-inch entrance hole diameter.
- Compact size may not be ideal for larger gardens or open spaces.
- Requires regular maintenance to preserve distressed wood details.
- Durable solid wood construction withstands outdoor conditions.
- Removable back panel for easy cleaning.
- Comes fully assembled with a jute rope for convenient hanging.
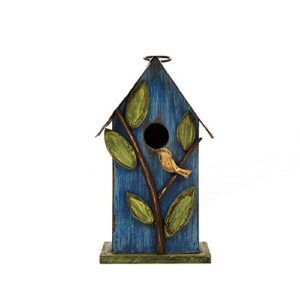
5. Glitzhome Blue Leaves Bird House
 View On Amazon
The Glitzhome Blue Leaves Bird House brings rustic charm to your outdoor space with its distressed finish and weathered paint details.
This sturdy wooden house measures 5.12"L x 4.33"W x 9.84"H and features a convenient hanging ring for easy installation.
The 1.1" entry hole attracts finches, sparrows, and wrens perfectly, and you’ll appreciate its natural wood construction combined with rusted metal accents that create an authentic vintage look.
Built to withstand harsh weather conditions, this durable birdhouse requires minimal seasonal cleaning to keep feathered friends happy.
Best For: Nature lovers and bird enthusiasts looking to add a rustic, decorative but functional birdhouse to their garden or patio.
- Entry hole may need monitoring to prevent larger birds from occupying.
- Requires seasonal cleaning for proper maintenance.
- Mixed reviews on bird occupancy, with some users noting sparrow dominance.
- Durable and weather-resistant design.
- Attracts small birds like finches, sparrows, and wrens.
- Features an easy-to-install hanging ring.
6. XL Wooden Birdhouse Metal Roof
 View On Amazon
When you’re ready to go big, this XL wooden birdhouse delivers serious space for your feathered friends.
The metal roof shields birds from harsh weather while the 54cm overall height creates an impressive garden focal point.
You’ll love the spacious 26x26cm feeding area that welcomes multiple species at once.
The solid wood construction weighs 4.56 pounds, so it stays put during storms, and the birdhouse is weather-resistant.
Mount it on walls or fences easily, and watch as sparrows, finches, and chickadees make themselves at home in this sanctuary.
Best For: Bird enthusiasts who want a durable, spacious, and weather-resistant birdhouse to attract multiple species year-round.
- Limited availability as the product is no longer sold after February 26.
- Relatively heavy at 4.56 pounds, which may require sturdy mounting.
- Custom or handmade personalization options may add to the cost.
- Spacious 26x26cm feeding area accommodates various bird species.
- Weather-resistant metal roof protects from rain and snow.
- Easy to mount on walls or fences and stays stable during storms.
7. Hanging Wooden Bird House Garden
 View On Amazon
Versatile hanging wooden bird houses bring nature closer to your doorstep.
You can mount this design on poles, brick walls, fence posts, or trees for maximum flexibility.
The opening should face south or east to avoid harsh winds.
Use a baffled pole to keep predators away from nesting birds.
Make sure the entrance hole stays under 1.5 inches to prevent unwanted visitors.
The hinged lid makes cleaning simple while drainage holes keep interiors dry.
This practical design works perfectly in any garden setting.
Best For: Gardeners and nature lovers looking for a charming, rustic birdhouse that can function as both decor and a nesting spot for smaller birds.
- Stylish distressed finish adds rustic charm to garden settings.
- Easy maintenance with a hinged cleanout lid and drainage holes.
- Lightweight and includes hanging loop for effortless installation.
- Entrance hole may be too small for larger bird species.
- Minor assembly or repairs like securing parts may be needed.
- Handcrafted design may lead to slight variations in appearance.
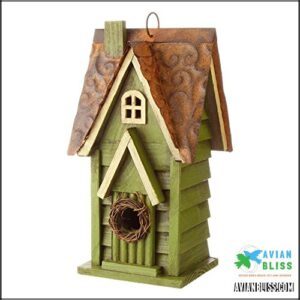
8. Glitzhome Green Distressed Wood Birdhouse
 View On Amazon
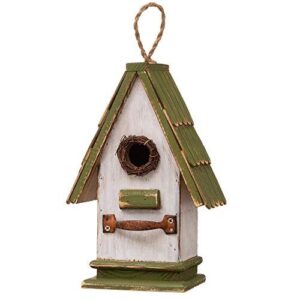
This vintage-inspired bird house brings old-world charm to your outdoor space.
You’ll love its distressed green finish and weathered details that blend naturally with garden settings.
The sturdy metal roof protects against harsh weather while the 1.18-inch entry hole welcomes small songbirds.
You can easily clean it through the removable back panel.
At 6.5 inches long and 12 inches tall, it’s perfectly sized for wrens and chickadees.
The included hanging ring makes installation simple on trees or posts, with a design that adds to the bird house’s old-world charm.
Best For: Gardeners or bird enthusiasts looking for a charming, easy-to-install decorative birdhouse suitable for small songbirds like wrens and chickadees.
- Durable construction with weather-resistant metal roof and materials.
- Easy to install with included hanging loop and lightweight design.
- Distressed, vintage aesthetic enhances outdoor and garden decor.
- Small entry hole limits suitability for larger bird species.
- Cleaning access through the back panel is somewhat awkward.
- Primarily serves as decoration if birds do not occupy it.
9. Rustic Wooden Outdoor Bird House
 View On Amazon
Warmth radiates from this handcrafted cedar and pine birdhouse that brings countryside charm to your backyard.
You’ll love how the rustic design attracts various bird species while complementing your garden’s natural beauty.
The easy-to-clean construction means you won’t struggle with maintenance tasks, and cedar’s natural weather resistance keeps this $49 investment looking great season after season.
With only two left in stock, this functional red-finished birdhouse offers contemporary appeal that makes your outdoor space feel like home for both you and your feathered friends.
Best For: Homeowners looking to decorate their outdoor spaces with a functional and rustic birdhouse that attracts various bird species.
- Limited stock availability with only two left.
- Higher price compared to basic alternatives.
- Small size may not accommodate larger bird species.
- Made from durable cedar and pine with natural weather resistance.
- Easy-to-clean design simplifies maintenance.
- Red finish adds vibrant, contemporary charm to outdoor decor.
Bird House Roof Options
You’ll find two main roof types when selecting wooden bird houses for your yard.
Slat-style roofs use overlapping wooden strips that create natural drainage channels while wooden shingled roofs provide traditional weatherproofing with layered wood pieces that shed rain effectively, utilizing natural drainage principles.
Slat-Style Roofs

Slat roofs offer superior ventilation through their spaced design, keeping your feathered friends comfortable year-round.
You’ll find slat spacing design essential for proper airflow without letting rain inside.
Cedar and redwood provide excellent slat material options for durability.
These wooden bird house roofs combine slat roof aesthetics with function, creating birdhouse designs that weather beautifully while maintaining slat roof durability through natural wood protection.
Wooden Shingled Roofs

Traditional wooden shingled roofs create that classic log cabin charm you’ll love.
Cedar shingles offer the longest shingle lifespan, lasting 15-20 years outdoors.
Install shingles with a 30-degree roof angle for proper water runoff.
Leave a 1-inch shingle overhang to protect walls from moisture, and choose quality shingle material like cedar or redwood.
Small gaps between shingles provide natural roof ventilation for your feathered friends.
Building Wooden Bird Houses

Building your own wooden bird house requires the right materials and proper planning to create a safe home for backyard birds.
You’ll need to select durable wood like cedar or redwood and gather essential tools before starting your construction project to ensure a successful and proper build.
Choosing The Right Wood
Wood selection makes or breaks your birdhouse project.
Redwood durability and rot resistance make it perfect for outdoor use.
Cedar alternatives like cypress offer similar benefits at lower costs.
These rot resistant materials withstand weather better than pine.
Cedar birdhouse construction provides natural preservation without chemicals.
Proper ventilation prevents condensation buildup.
Choose wood that protects your wooden bird feeder from decay and insect damage.
Essential Tools for Construction
You’ll need specific tools to build your birdhouse properly.
Start with measuring tools like a tape measure and square for accurate cuts.
Cutting tools include a saw and drill with bits.
Fastening tools cover wood screws and a screwdriver.
Don’t forget finishing tools like sandpaper for smooth edges.
Accurate measurements require a quality measuring device and having the right equipment makes birdhouse construction straightforward and enjoyable, with accurate cuts being crucial.
Safety Precautions for Power Tools
Power tools make birdhouse construction faster but demand respect.
Build with care – rushed hands create accidents, patient craftsmanship creates homes.
Always wear eye protection and dust masks when cutting wood.
Keep cords away from blades during safe operation.
Check tool maintenance regularly – dull blades cause accidents.
Secure your workspace before drilling wood screws.
Never rush birdhouse assembly, as these simple habits protect you while creating quality birdhouse materials for your feathered friends, ensuring a quality birdhouse and promoting safe operation.
Maintaining Wooden Bird Houses

You’ll need to maintain your wooden bird house regularly to keep it safe and attractive for visiting birds.
Proper care includes cleaning the interior after each nesting season and applying animal-safe sealant every two to three years to protect the wood from weather damage.
Cleaning The Bird House
Clean your bird house twice yearly for ideal bird house maintenance.
The removable roof makes birdhouse cleaning simple – just lift and detach.
Use mild soap and water as safe cleaners, avoiding harsh chemicals.
To find the best bird house cleaner, explore online options.
Remove old nests completely during nest removal to prevent pests from taking over.
This cleaning frequency keeps your feathered friends healthy and happy.
Repairing Damages
Check your bird house regularly for wood rot around joints and the entrance hole.
Look for pest damage like woodpecker holes or insect tunnels. Small cracks need wood filler while larger structural issues require board replacement.
Roof repair often involves securing loose shingles or replacing warped sections. Patch entrance holes that have enlarged beyond the intended size to maintain proper bird house functionality.
Regular cleaning with bleach prevents bacteria is also necessary for maintaining a healthy bird house environment.
Applying Animal-Safe Sealant
After fixing any damages, protect your bird house with animal-safe sealant for weather protection and longevity factors.
Choose polyurethane spray or tung oil as safe alternatives to harsh chemicals.
Apply sealant after assembly using proper application methods – spray from six inches away or brush evenly.
These sealant types enhance bird house durability while keeping feathered friends healthy and safe.
You can find a variety of options for sealants that are animal-safe.
Frequently Asked Questions (FAQs)
What kind of bird house do birds like the best?
Birds prefer houses with proper entrance hole sizes, natural materials like cedar or redwood, adequate ventilation, and easy cleaning access.
You’ll attract more feathered friends with species-specific designs that match their nesting habits perfectly.
Is it cheaper to buy or build a birdhouse?
Like blacksmiths of old forging iron, you’ll hammer out savings building your own birdhouse.
Basic materials cost $10-15 versus $30-75 for store-bought versions.
You’ll save money while creating something uniquely yours for feathered friends.
Do birds use wooden bird houses?
Absolutely, you’ll find birds love wooden houses.
They’re drawn to natural materials that mimic tree cavities.
Wrens, bluebirds, and chickadees readily nest in well-built wooden homes with proper ventilation and drainage, which can be considered a complete concept for their nesting preferences.
Will birds sleep in a birdhouse?
A cozy refuge becomes home when darkness falls.
Yes, you’ll find birds roosting in birdhouses overnight, especially during winter months.
They’ll huddle together for warmth, turning your wooden sanctuary into their nighttime shelter.
What is the best birdhouse to attract birds?
You’ll have the best luck with a house that’s got the right hole size for your target birds.
Cedar or redwood construction lasts longer.
Mount it five to six feet high in a quiet spot, which is a quiet location to attract birds.
What color birdhouse attracts birds the most?
Birds prefer natural earth tones like browns, greens, and grays that blend with their environment.
You’ll attract more feathered friends by avoiding bright colors that might startle them or signal danger to potential predators, which is why using natural tones is beneficial.
Do birds prefer unpainted birdhouses?
Most feathered friends actually prefer unpainted wooden houses because natural wood doesn’t contain harmful chemicals.
You’ll attract more birds with weathered, untreated surfaces that blend into their environment and provide safer nesting spots.
What type of birds will use this?
You’ll attract wrens, swallows, nuthatches, titmice, and sparrows to your wooden bird house.
These smaller songbirds love the cozy entrance hole and secure design that mimics their natural nesting preferences perfectly.
How to attract birds to a birdhouse?
Empty yards versus bustling bird havens – the difference lies in your approach.
Place your birdhouse near trees but away from predators.
Add fresh water nearby, and keep it clean.
Face the entrance away from prevailing winds, to create a bustling bird haven.
Is ventilation important in birdhouses?
Good ventilation is essential for birdhouses.
It keeps air flowing, prevents overheating, and reduces moisture buildup inside.
Without it, birds might face discomfort or risk health issues.
Small holes near the top guarantee proper airflow.
Conclusion
Protecting birds with a sturdy wooden bird house with roof isn’t rocket science—it’s just smart planning.
Choose durable wood like cedar, make certain the roof design sheds rain, and size the entrance hole properly.
Add ventilation holes and removable panels for simple cleaning.
Whether you buy or build one, prioritize weather resistance and bird comfort.
Remember, your yard’s feathered guests just want a safe, dry home—not luxury.
Now, get building and bring life to your backyard!