This site is supported by our readers. We may earn a commission, at no cost to you, if you purchase through links.

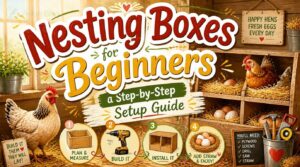
A single cedar fence board and five dollars in hardware can turn a slow Saturday afternoon into something a bluebird actually moves into.
That’s not a sales pitch—it’s what the one-board birdhouse plan delivers, and it’s been doing it for backyard builders of every skill level for years.
The trick is knowing which free plan matches the bird you want to attract, because a hole drilled a quarter-inch too wide rolls out the welcome mat for starlings instead.
Get the details right from the start, and you’ll have a weatherproof home mounted at the right height before the season shifts.
Table Of Contents
- Key Takeaways
- Free Birdhouse Plan Types
- Best Birdhouse Materials
- Top 8 Birdhouse Tools
- 1. IRWIN Quick Grip One Hand Mini Bar Clamp
- 2. DEWALT Compact Portable Table Saw
- 3. HYCHIKA Bi Metal Hole Saw Kit
- 4. DEWALT 20V Max Cordless Drill Driver
- 5. DEWALT Speed Tip Titanium Drill Bit Set
- 6. Jorgensen 24 Inch One Hand Clamp
- 7. Titebond II Premium Wood Glue
- 8. 3M General Purpose Sandpaper Assorted Grits
- Step-by-Step Birdhouse Build
- Placement and Bird Safety Tips
- Frequently Asked Questions (FAQs)
- What is a good DIY Birdhouse plan?
- How do you build a birdhouse?
- What are free Birdhouse plans?
- What are the different types of Birdhouse plans?
- What are the best bird house plans?
- How much does it cost to build a bird house?
- How much does a DIY Birdhouse cost?
- Where can I find Birdhouse plans?
- Can you make a bird house for birds?
- How to make a simple bird house step by step?
- Conclusion
Key Takeaways
- Getting the entrance hole size right is the single most important detail — even a quarter-inch too wide invites the wrong birds in.
- Cedar fence board is your best material bet: it’s cheap, rot-resistant, and easy to cut cleanly with basic tools.
- mount your box 6 to 8 feet high, facing east, and keep it 30 feet from other boxes.
- a one-board plan, five bucks in hardware, and a free afternoon is genuinely all it takes.
Free Birdhouse Plan Types

Not all birdhouse plans are built the same, and that’s actually a good thing. Depending on the birds you want to attract and your skill level, there’s a plan that fits just right.
Getting the right plan also means thinking about placement — how high to mount a birdhouse can make or break whether your target species actually moves in.
Here are six free options worth considering.
One-board DIY Birdhouse Plans
A single pine board is all it takes to build a solid, simple birdhouse. Free birdhouse plans keep the minimalist cut list short — just five panels from one 1×6 board. That means less waste and a quick assembly time under an hour.
The design uses galvanized deck screws for corrosion‑resistant assembly.
- One board DIY birdhouse fits any beginner’s budget
- Material cost breakdown runs under $5
- Eco-friendly finishes protect wood without harming birds
- Single board joinery uses basic screws and waterproof glue
Bluebird and Wren Box Plans
Bluebird House Plans and Wren Bird House designs take species-specific dimensions seriously.
A bluebird needs a 1½″ entrance hole; wrens prefer 1⅛″.
That entrance hole tolerance matters more than you’d think—too big invites sparrows.
Free birdhouse plans include roof pitch design for rain runoff and mounting pole material specs.
Simple birdhouse builds, done right, bring the right birds home.
Modern 2×4 Birdhouse Designs
Modern 2×4 birdhouse construction flips the script on cutesy cottage styles. These free birdhouse plans lean into a minimalist aesthetic—clean lines, low-profile roofs, and efficient butt joints that even beginners nail fast.
Want more birds, less space? A modular stackable design fits multiple units under 24 inches wide.
Integrated ventilation keeps things cool inside. Practical, sharp-looking, and totally buildable.
Hanging A-frame Birdhouse Plans
Hanging A-frame birdhouse plans bring a whole new look to your backyard. Two sloped sides meet at the peak, giving you A-Frame Stability that holds steady through wind and rain. Weatherproof Roofing keeps chicks dry, while a Ventilation Slot Design near the roofline moves hot air out naturally. Hang it using Rope Suspension or Cable vs Chain — your call.
These free downloadable birdhouse plans make it simple:
- Cut two angled side panels from cedar
- Drill a 1½″ entrance hole sized for bluebirds
- Attach Weatherproof Roofing with exterior screws
- Hang using weather-resistant rope or galvanized chain at 8–15 feet
Grab simple A-frame birdhouse plans and start your Step-by-step DIY birdhouse construction today.
Purple Martin Multi-unit Plans
Purple martin bird house plans take things up a notch — we’re talking 12 or more apartments in one structure. Apartment Layout Planning keeps each chamber around 6×6 inches with a 2¼″ entrance hole.
Sturdy Mast Design with Predator Guard Poles, mounted above 10 feet. Paint the Light-colored Exterior white to reflect heat.
Grab free downloadable birdhouse plans and start your step-by-step DIY birdhouse construction today.
Recycled-material Birdhouse Ideas
You don’t need to buy anything new to build a charming birdhouse. Using recycled materials in birdhouse building keeps costs near zero — try bottle cap perches, tire roof shingles, or cork insulation panels for natural warmth.
Fabric scrap lining softens the interior, while a recycled glass mosaic adds personality outside.
Explore free downloadable woodworking plans to start your reclaimed wood birdhouse projects today.
Best Birdhouse Materials

The material you build with matters more than most people realize. It affects how long your birdhouse lasts, how safe it is for nesting birds, and how easy it is to put together.
Here’s a look at the best options to work with.
Cedar Fence Board Plans
Cedar fence board is one of the best-kept secrets in DIY birdhouse building. It’s affordable, naturally rot-resistant, and easy to cut cleanly for smooth joints.
5/8-inch cedar board gives you solid structure without excess weight. Free birdhouse plans and plan PDF downloads often recommend it by default.
Stain selection and finishing options are simple, and step-by-step DIY birdhouse construction guides walk you through cutting safety and post spacing from start to finish.
Safe Pressure-treated Wood Choices
Not all pressure treated lumber is safe for birds. Older CCA-treated wood contains arsenic — skip it completely for birdhouse plans.
Modern options with ACQ or CA-B/CA-C treatment labels are far safer for wildlife. Here’s keep in mind:
- Check treatment labels before buying
- Allow curing times before assembly
- Wear gloves (handling PPE) when cutting
- Apply protective coatings on cut edges
Safe lumber for wildlife makes all the difference in DIY birdhouse building.
PVC Pipe Birdhouse Builds
PVC pipe birdhouse designs are surprisingly practical. Lightweight and rot-resistant, PVC holds up through seasons without warping.
Use non-toxic adhesives and cap seal techniques to keep joints watertight. UV resistant coatings protect color and structure longer.
Try modular stack design for a multi-unit swallow condo. Color coding each unit makes nest checks simple.
Free birdhouse plans for approved PVC bird box plans are easy to find online.
Reclaimed Wood and Log Designs
Old barn wood tells a story — and birds don’t mind one bit. Reclaimed wood birdhouse projects give your DIY birdhouse real character, with natural patina preservation built right in.
Log cabin bird house plans use Log Joint Techniques like treenails to hold everything tight. Reclaimed Structural Benefits include dense heartwood that lasts for years.
free PDF downloads with Eco-friendly Sourcing guides included.
Natural Gourd Birdhouse Projects
Nature already did the shaping for you. Using gourds as natural birdhouses skips the cutting entirely — just drill, dry, and hang. Here’s what makes gourd birdhouse plans work:
- Gourd Selection — Pick 9–12‑inch purple martin gourds with wide bottoms
- Drying Preparation — Let them dry several months, then scrape out seeds and pulp
- Ventilation Design — Drill small holes near the top for airflow
- Finishing Sealing — Coat with a non‑toxic sealant after drying
- Mounting Techniques — Hang 8–15 feet up, entrance facing away from wind
Weather-resistant Roofing and Hardware
Gourds handle themselves, but cut-wood roofs need a little more love.
A pitched roof birdhouse sheds rain fast — add self-adhesive underlayment beneath continuous metal panels and you’re set for years.
Use ring-shank fasteners and UV-stabilized sealants around joints. Stick with outdoor-appropriate wood glue and avoid Copper Azole type B. Ice dam prevention matters in colder climates too.
| Hardware | Best Option | Why It Works |
|---|---|---|
| Fasteners | Ring-shank nails | Greater uplift resistance |
| Sealant | UV-stabilized formula | Won’t crack in sun |
| Underlayment | Self-adhesive membrane | Instant waterproof barrier |
| Roofing | Continuous metal panels | Sheds water quickly |
| Screws | Coated deck screws | Corrosion-resistant hold |
Top 8 Birdhouse Tools
You don’t need a garage full of equipment to build a great birdhouse. A handful of reliable tools will handle almost every cut, hole, and joint you’ll run into.
Here are the eight that’ll get you through the job cleanly and confidently.
1. IRWIN Quick Grip One Hand Mini Bar Clamp
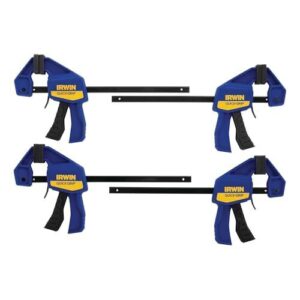
When you’re gluing two walls together, you really need a third hand — and that’s exactly what the IRWIN Quick Grip Mini Bar Clamp gives you. One squeeze of the pistol-grip trigger locks your pieces tight, up to 150 pounds of pressure, while your other hand stays free to drill or adjust.
The rubber pads won’t scratch your wood, and the compact 6-inch bar slips into tight corners without a fight. Grab a 4-pack — you’ll use every one.
| Best For | Woodworkers, hobbyists, and DIYers who need a reliable one-handed clamp for small parts, tight spaces, and finished surfaces. |
|---|---|
| Primary Material | Reinforced resin & steel |
| Primary Use | Woodworking clamping |
| Skill Level | Beginner–Intermediate |
| Surface Protection | Non-marrying rubber pads |
| Kit Contents | 4 clamps |
| Durability Rating | Medium-duty |
| Additional Features |
|
- One-handed trigger makes it easy to clamp and keep your other hand free
- Rubber pads protect finished wood, metal, and plastic from scratches
- Compact 6-inch size fits into corners and tight spots where bigger clamps can’t go
- 150 lb max force won’t cut it for heavy-duty or high-precision work
- Only works on smaller pieces — anything longer than 6 inches is out
- The resin body can flex under serious load and feels less solid than all-metal clamps
2. DEWALT Compact Portable Table Saw
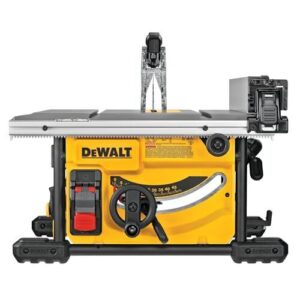
Once your pieces are clamped tight, you need clean, straight cuts — and that’s where the DEWALT Compact Portable Table Saw earns its place. Its 15-amp motor spins at 5,800 RPM, slicing through cedar fence boards like butter.
The rack-and-pinion fence adjusts fast, so you’re not wrestling with setup between cuts.
It accommodates full 4×8 sheets with a 24.5-inch rip capacity.
Compact at 54 pounds, you can move it around your garage without thinking twice.
| Best For | DIYers and contractors who need a portable, reliable saw that can handle full-sheet cuts on the job site without sacrificing accuracy. |
|---|---|
| Primary Material | Metal roll-cage & resin |
| Primary Use | Ripping sheet goods |
| Skill Level | Intermediate |
| Surface Protection | Modular blade guard |
| Kit Contents | Saw, guard, gauge, wrench |
| Durability Rating | Job-site grade |
| Additional Features |
|
- The rack-and-pinion fence adjusts smoothly and quickly, saving real time on repetitive cuts
- A 24.5-inch rip capacity means you can run full 4×8 plywood sheets without any workarounds
- On-board storage keeps your guard, wrenches, and push stick organized and ready to go
- The recessed start button is a pain when you’re wearing work gloves and trying to hold material steady
- Dust collection is weak — you’ll need a shop vac hooked up, and even then, expect some mess
- The smaller table surface makes it tricky to manage large or heavy workpieces without adding extension support
3. HYCHIKA Bi Metal Hole Saw Kit
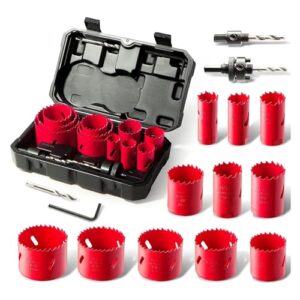
Drilling the entrance hole is where most beginners mess up — wrong size, rough edges, splintered wood. HYCHIKA Bi Metal Hole Saw Kit takes that stress away.
It comes with 11 blades ranging from ¾" to 2½", so you’ve got the right size whether you’re building for wrens or bluebirds. The bi-metal construction stays sharp through wood and PVC without burning out fast.
Two mandrels, a hex key, and a tidy storage case keep everything organized and ready to grab.
| Best For | Hobbyists and weekend DIYers who need a reliable, affordable hole saw set for light projects like birdhouse building, PVC work, or basic woodworking. |
|---|---|
| Primary Material | Bi-metal alloy steel |
| Primary Use | Hole cutting |
| Skill Level | Beginner–Intermediate |
| Surface Protection | Storage case included |
| Kit Contents | 11 saws, 2 mandrels, 3 bits |
| Durability Rating | Light–Medium duty |
| Additional Features |
|
- 11 blade sizes in one kit means you’re covered for almost any standard hole you’d need to drill
- Bi-metal construction cuts cleaner and faster than cheaper single-metal blades, so less sanding afterward
- Everything packs into a compact case — easy to grab and go
- Mandrel alignment can be hit or miss, and a wobbly fit on larger blades is a real frustration
- Not the best choice for hard metals or dense hardwood — the blades will wear out faster than premium alternatives
- Quality control isn’t perfectly consistent; some users have gotten a crooked mandrel right out of the box
4. DEWALT 20V Max Cordless Drill Driver

A good drill makes everything easier. The DEWALT 20V Max Cordless Drill Driver hits up to 300 UWO of power, so it manages pilot holes and screws without hesitation.
Two speed settings — 450 rpm low, 1,500 rpm high — let you switch between driving screws and drilling cleanly. The compact grip fits tight corners, no problem.
Two 20V XR batteries come included, giving you roughly an hour of continuous runtime. For a birdhouse build, that’s plenty.
| Best For | DIYers and hobbyists who need a reliable, lightweight drill for everyday home projects like furniture assembly, shelf mounting, or light woodworking. |
|---|---|
| Primary Material | Plastic & steel |
| Primary Use | Drilling & driving |
| Skill Level | Beginner–Intermediate |
| Surface Protection | Ergonomic contractor bag |
| Kit Contents | Drill, 2 batteries, charger, bag |
| Durability Rating | Light-duty cordless |
| Additional Features |
|
- Two speed settings give you real flexibility — slow for screws, fast for drilling through wood or plastic
- Comes with two batteries so you can keep working while one charges
- Compact and easy to maneuver in tight spots like corners or overhead
- Not built for concrete or masonry — you’ll need a hammer drill for that
- The 1.3 Ah batteries can drain fast on bigger, high-torque jobs
- Some users have noticed the motor stalling under heavier loads, so it’s not ideal for demanding tasks
5. DEWALT Speed Tip Titanium Drill Bit Set
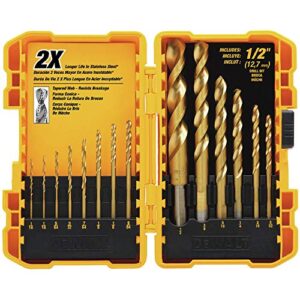
Fourteen bits. That’s all you need to handle almost every hole a birdhouse throws at you.
The DEWALT DW1341 G set runs from 1/16″ up to 1/2″, covering entrance holes for wrens, bluebirds, and everything in between.
The speed tip keeps the bit from wandering when you start your cut — no more walking across the wood.
A titanium nitride coating means the bits stay sharp longer, too.
Everything stores in a compact hard case, so nothing rolls off your workbench.
| Best For | Hobbyists and DIYers who want a reliable, versatile drill bit set for woodworking projects like birdhouses, cabinetry, or light metalwork without breaking the bank. |
|---|---|
| Primary Material | Titanium-coated steel |
| Primary Use | Precision drilling |
| Skill Level | Beginner–Intermediate |
| Surface Protection | Hard-case organizer |
| Kit Contents | 14 drill bits, case |
| Durability Rating | General purpose |
| Additional Features |
|
- Speed tip geometry stops the bit from wandering at the start — you get cleaner, more accurate holes right away.
- TiN coating keeps the bits sharper longer, so you’re not replacing them after every tough job.
- Comes in a compact hard case that keeps everything organized and easy to grab on the go.
- Smaller bits have a round shank instead of the no-spin design, so they can slip in the chuck more easily.
- The plastic case is decent but won’t hold up well if it takes a hard knock on a job site.
- If you’re ordering from outside the U.S., expect shipping to take longer than you’d like.
6. Jorgensen 24 Inch One Hand Clamp
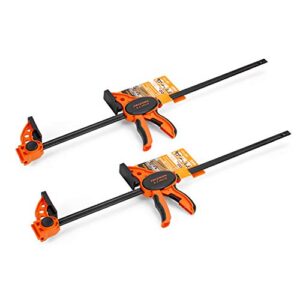
One good clamp changes everything about glue-up day.
The Jorgensen 24-inch one-hand clamp lets you hold a panel steady while your other hand places the next piece.
No fumbling, no frustration.
It opens up to 24 inches and supports up to 400 pounds of clamping force — plenty for birdhouse sides and roof panels.
The soft jaw pads protect your wood from dents.
And if you need more reach, link two clamps together for spreads beyond 48 inches.
| Best For | Woodworkers and hobbyists who need fast, one-handed clamping for panels, cabinets, and medium-duty glue-ups without sacrificing holding power. |
|---|---|
| Primary Material | Glass-filled nylon & steel |
| Primary Use | Panel clamping |
| Skill Level | Intermediate |
| Surface Protection | Soft plastic end caps |
| Kit Contents | 2 clamps |
| Durability Rating | Medium-duty |
| Additional Features |
|
- One-handed operation makes solo glue-ups way less stressful — hold your work and clamp it at the same time.
- Links with a second clamp to span beyond 48 inches, so it grows with bigger projects.
- Soft jaw pads keep finished surfaces scratch- and dent-free.
- The quick-release lever takes some getting used to before it feels natural.
- 400 lb limit won’t cut it for heavy structural work or large framing jobs.
- Jaw pads are on the firmer side, so very soft or delicate materials might still need extra protection.
7. Titebond II Premium Wood Glue
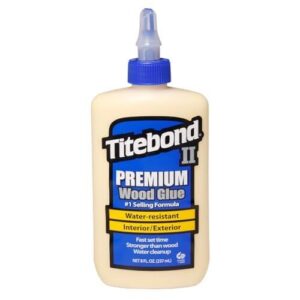
Glue holds it all together — literally.
Titebond II Premium Wood Glue is the go-to for outdoor birdhouse builds. It meets ANSI Type II water resistance, so your joints won’t fail after a rainstorm. It’s cleans up with water, and sands smooth once dry. That matters when working with kids or finishing surfaces.
At around $5.44 for 8 oz, it’s affordable and widely available. Apply it, clamp it, and you’re handling the project within the hour.
| Best For | Woodworkers and hobbyists tackling outdoor projects like birdhouses, furniture, or planters who need a reliable, water-resistant bond without breaking the bank. |
|---|---|
| Primary Material | Polyvinyl acetate |
| Primary Use | Wood bonding |
| Skill Level | Beginner |
| Surface Protection | Non-toxic, paintable |
| Kit Contents | Single 8 oz bottle |
| Durability Rating | Type II water-resistant |
| Additional Features |
|
- Meets ANSI Type II water resistance, so it holds up through rain and moisture exposure
- Cleans up with water and sands smoothly — great for kid-friendly projects or finished surfaces
- FDA-approved for indirect food contact, making it safe for things like cutting boards
- Not built for underwater use — prolonged submersion will eventually break the bond down
- Full cure can take up to 24 hours, longer if it’s cold out
- The nozzle and lid aren’t the most precise, so you may want a different container for detail work
8. 3M General Purpose Sandpaper Assorted Grits
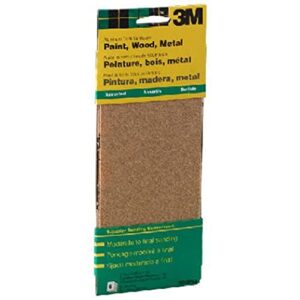
Rough edges can splinter little fingers — and ruin a clean finish. The 3M General Purpose Sandpaper set gives you three grits in one box: 60, 100, and 150.
Start coarse to knock down rough cuts, then work up to smooth. The aluminum-oxide sheets hold up well and won’t fall apart mid-stroke.
At 3⅔ × 9 inches, they fit most hand sanders, or fold easily for tight corners.
It’s a small tool that makes a big difference.
| Best For | DIYers, hobbyists, and anyone doing small furniture or woodworking projects who needs a grab-and-go sanding kit without buying multiple packs. |
|---|---|
| Primary Material | Aluminum oxide |
| Primary Use | Surface finishing |
| Skill Level | Beginner |
| Surface Protection | Flexible, foldable sheets |
| Kit Contents | 6 sandpaper sheets |
| Durability Rating | General purpose |
| Additional Features |
|
- Three grits in one box — you’re covered from rough shaping all the way to a smooth pre-finish pass
- Aluminum-oxide construction holds up well and works on wood, metal, and painted surfaces
- Fits hand sanders and folds easily for tight corners, so it’s flexible for whatever you’re working on
- Only six sheets total, which runs out fast on bigger or multi-stage projects
- Stops at 150 grit, so you’ll need to buy more if you want a finer finish (220)
- Thinner sheets can wear or tear quickly on heavier sanding jobs
Step-by-Step Birdhouse Build
Building a birdhouse is easier than you might think, especially when you follow a clear plan from start to finish. Each step below walks you through the process in order, so nothing gets skipped or out of sequence.
Here’s exactly what to do.
Choosing The Right Free Plan

Before you grab a single tool, pick the plan that fits your world.
Think about your climate, your target species, and your budget constraints.
Free birdhouse plans exist for every skill level — from a DIY simple bird house cut from one board to full birdhouse construction guidelines for multi-unit builds.
Local regulations sometimes limit pole heights, so check first.
Measuring and Cutting Board Pieces

Once your plan is chosen, it’s time to cut. Use a sharp pencil for baseline marking techniques — faint lines get lost fast.
Mark both sides of each cut line, then confirm with a square for square-cut alignment. Account for kerf accounting by subtracting your blade’s thickness from measurements.
Run incremental saw passes on your miter saw, and always use clamp guide usage to keep boards steady.
Drilling The Entrance Hole

Now that your pieces are cut, it’s time to drill. Precise hole sizing matters more than most beginners expect — a 1¼″ opening works for wrens, while bluebirds need 1½″.
center punch marking before you start your drill. small dent keeps the bit from wandering.
perpendicular drilling technique, then finish with burr-free edge finishing so no sharp wood splinters catch a bird mid-entry.
Assembling Sides, Roof, and Base

With your holes drilled, assembly goes fast if you stay organized.
- Side Alignment — flush all edges before gluing, so the roof sits flat
- Clamp While Gluing — hold joints tight until the exterior glue sets
- Roof Overhang — center it, so rain sheds evenly on both sides
- Base Drilling — predrill holes, then use stainless fasteners for a removable, rust-free bottom
Smoothing Edges and Finishing Surfaces

Once your birdhouse is assembled, a little finishing work goes a long way.
Start with 120-grit sandpaper to round sharp edges — Edge Rounding Techniques like this protect birds from snags.
Work up to 220-grit, then seal end grain using Sealant Application Methods with a penetrating water-based primer.
Finish with UV-Resistant Coatings for weatherproof construction that lasts season after season.
Printing and Following Cut Lists

Before you make a single cut, print your plan PDFs with cutting and shopping lists and keep them at arm’s reach. Good Cut List Accuracy means every part has a label — Labeling Parts prevents mix-ups at the bench.
Use Digital Export Formats like PDF or CSV for easy reprinting.
Version Control and Material Waste Tracking help you catch changes before they cost you wood.
Placement and Bird Safety Tips

Building a birdhouse is only half the job — where and how you put it up matters just as much. A few simple decisions can mean the difference between a busy nest and a box that sits empty all season.
Building a birdhouse is only half the job — placement decides whether birds actually move in
Here’s what to keep in mind before you pound in that first mounting screw.
Best Mounting Height and Direction
Where you mount your birdhouse matters more than most beginners expect. Follow these birdhouse mounting and placement guidelines to get it right:
- Ideal Height Range – Mount 6 to 8 feet high for predator avoidance elevation and easy seasonal height adjustment.
- Sun-Facing Orientation – Use an east-facing, wind shielding direction so birds stay warm without overheating.
- Nest box placement and monitoring – Check positioning each spring.
Correct Entrance Hole Sizing
The entrance hole is basically the front door — get it wrong, and the wrong guests move in.
Diameter standards vary by species: wrens use 1¼″, bluebirds need 1½″, and purple martins require 2¼″. These species-specific openings keep starlings and sparrows out.
Always center the hole and sand edges smooth. Rough edges invite moisture and pests quickly.
Ventilation and Drainage Details
Think of your birdhouse as a tiny home — birds need fresh air and dry floors just like you do.
Vent Positioning matters: drill small holes near the top for heat management in birdhouses, letting warm air escape without letting rain in. Add a Vent Screen Mesh to keep insects out.
For drainage, a slight Floor Pitch toward a quarter‑inch drain hole manages moisture automatically.
Drain Channeling grooves and a Moisture Barrier under the roof round out your ventilation improvements for nest boxes, making birdhouse ventilation and birdhouse placement and monitoring much simpler long‑term.
Predator Protection and Spacing
Protecting your birds starts before the first egg is laid.
- Add Guard Rails and smooth Pole Smoothness barriers to stop climbing predators.
- Use Predator Deterrents like metal hardware cloth below the base.
- Apply Spacing Strategies — keep boxes 30 feet apart.
- Create Buffer Zones of 15–20 feet from brushy cover.
- Face entrances away from dense brush for safer birdhouse placement and monitoring.
Seasonal Cleaning and Upkeep
Keeping predators out is just the start — you also need to keep the house itself clean. After each nesting season, remove old nesting material and wipe the interior.
Think of it like your fall checklist: Gutter Clearing, Roof Shingles Inspection, Attic Insulation Check.
Seasonal birdhouse maintenance and cleaning work the same way. A clean box means healthier birds next spring.
Avoiding Unsafe Wood and Finishes
Clean house, safe birds — it starts with what you build with.
Skip anything labeled Chromated Copper Arsenate or old CCA-treated wood. Both leach arsenic.
If you use pressure treated lumber safely, look for Alkaline Copper Quaternary or Copper Azole Type B instead.
Seal with Non-Toxic Sealants and Low-VOC Finishes. Practice Dust Control and Respirator Use when cutting. Store products following Wood Storage Safety guidelines.
Frequently Asked Questions (FAQs)
What is a good DIY Birdhouse plan?
Want something you can finish in an afternoon?
A good DIY birdhouse plan fits your skill level, uses cedar or untreated pine, and includes custom dimensions with an entrance hole size guide for your target species.
How do you build a birdhouse?
Cut your board, drill the entrance hole, glue and screw the sides together, then attach the roof for rain runoff.
Follow step‑by‑step instructions and your DIY birdhouse construction projects come together fast.
What are free Birdhouse plans?
Free birdhouse plans are like a recipe handed down from a neighbor — they give you open source designs, DIY plan templates, and birdhouse construction guidelines to follow without spending a dime.
What are the different types of Birdhouse plans?
There are several types to choose from.
One-board builds, Bluebird and Wren boxes, 2×4 designs, hanging A-frames, and Purple Martin multi-unit plans each suits different Species Preference Guides and skill levels.
What are the best bird house plans?
The best bird house plans match your skill level, target species, and maintenance routine.
Look for designs with clear cut lists, habitat compatibility, and low maintenance frequency to keep DIY birdhouse building projects simple and cost efficient.
How much does it cost to build a bird house?
Building a birdhouse is one of the most cost-effective woodworking projects you can tackle. A basic one-board design runs just $3 to $8 in materials — cedar, glue, and a few nails.
How much does a DIY Birdhouse cost?
Nail the budget before you nail the boards.
A DIY birdhouse usually costs under $5 CAD using cedar fence boards or basic plywood — making it one of the most budget-friendly crafts you can tackle.
Where can I find Birdhouse plans?
You can find bird house plans on woodworking blogs, birdwatching forums, and municipal extension services.
Online DIY libraries and open-source repositories offer free plan PDFs with cutting lists and shopping lists included.
Can you make a bird house for birds?
Yes, you can. With the right DIY birdhouse plans, low-cost materials, and basic tools, anyone can build a cozy home for birds.
It’s a rewarding, budget-friendly craft that welcomes nature to your backyard.
How to make a simple bird house step by step?
Like snapping together a puzzle, step‑by‑step DIY birdhouse construction takes about an hour. Grab cedar, cut your pieces, drill the entrance hole, glue, nail, seal — done.
Simple wooden bird shelter designs don’t get easier.
Conclusion
Picture a bluebird perching at the entrance of something you built with your own hands—that’s the reward waiting at the end of your DIY bird house plans‘ free journey. Every cut, drilled hole, and sanded edge brought you here.
You chose the right plan, matched the species, and got the details right.
Now mount it at the correct height, face it the right direction, and let the neighborhood know there’s a new landlord in town.