This site is supported by our readers. We may earn a commission, at no cost to you, if you purchase through links.

A British study tracking garden bird populations documented a 35 percent decline in greenfinches between 2005 and 2009, tracing the collapse directly to Trichomonosis outbreaks at contaminated feeding stations.
When birds gather at feeders day after day, any uncleaned surface becomes a transmission point for salmonellosis, avian pox, and fungal infections that spread through entire flocks. The damp seeds clinging to feeder ports, the mold creeping across nectar reservoirs, the bacterial colonies multiplying in spilled hulls beneath your yard’s feeding area—each creates conditions that turn your well-intentioned hospitality into a health hazard.
Learning how to clean bird feeders properly protects the species you’re trying to help, transforming your feeding station from a potential disease reservoir into the safe refueling stop your backyard visitors need.
Table Of Contents
- Key Takeaways
- Why Cleaning Bird Feeders Matters
- How Often to Clean Bird Feeders
- Step-by-Step Guide to Cleaning Bird Feeders
- Maintaining a Healthy Feeding Environment
- Top 4 Tools and Products for Cleaning Bird Feeders
- Frequently Asked Questions (FAQs)
- What cleaning products are safe for birds?
- Can I use my dishwasher for feeders?
- How do I clean wooden bird feeders?
- What signs indicate my feeder needs cleaning?
- Should I remove feeders during disease outbreaks?
- Can I use vinegar instead of bleach?
- How do I clean suet feeders properly?
- Should I wear gloves when cleaning feeders?
- Whats the best way to clean squirrel baffles?
- How do I remove tough stains and buildup?
- Conclusion
Key Takeaways
- You should clean seed feeders every two weeks with hot soapy water and a 10% bleach solution, but increase this to weekly during wet weather, heat waves, or heavy bird traffic when mold and bacteria spread faster.
- Uncleaned feeders become disease reservoirs where salmonella, avian pox, and Trichomonosis thrive—a British study documented a 35% decline in greenfinches between 2005 and 2009 directly traced to contaminated feeding stations.
- After scrubbing away visible debris, soak all feeder parts in a bleach solution (one part bleach to nine parts water) for ten minutes, then rinse thoroughly under running water for ten minutes to eliminate every trace of disinfectant before air-drying completely.
- Remove feeders immediately for one to two weeks if you spot sick birds showing lethargy, eye discharge, labored breathing, or difficulty flying near your station, and report multiple dead songbirds to your state wildlife agency to help track outbreak patterns.
Why Cleaning Bird Feeders Matters
Your backyard bird feeder can become a health hazard when seed hulls, droppings, and moisture create the perfect breeding ground for bacteria, fungi, and parasites that spread diseases like salmonellosis and Trichomonosis among visiting birds.
Regular cleaning backyard bird feeders with hot soapy water every two weeks helps prevent disease outbreaks and keeps your feathered visitors healthy.
Wildlife health studies confirm that uncleaned feeding stations act as reservoirs for infectious agents, contributing to population declines in species like greenfinches and chaffinches.
Understanding the specific risks will help you protect the birds you’re caring for while keeping your yard inviting and safe.
Regular cleaning and maintenance of your bird feeders prevents the spread of diseases like salmonella and aspergillosis among visiting birds.
Protecting Bird Health and Preventing Disease
Your feeder’s convenience can quickly become a danger zone when contamination transforms what should be a lifeline into a breeding ground for salmonella, avian pox, and other infectious diseases that spread rapidly through congregating flocks.
Regular cleaning with a diluted bleach solution prevents these outbreaks, and you’ll find proven bird feeding safety practices that protect both feeders and the birds they attract.
Regular cleaning using a disease prevention method is essential to maintain a safe environment for the birds.
Wildlife health studies document that unsanitary feeders become reservoirs for bacteria, fungi, and protozoa, with infected birds displaying lethargy near feeding stations before succumbing to disease—making feeder sanitation a cornerstone of responsible avian wellness and backyard wildlife conservation.
Dirty feeders become disease reservoirs where bacteria and fungi kill birds, making regular sanitation essential to backyard conservation
Avoiding Mold, Bacteria, and Pests
Beyond the threat of disease, mold and bacteria flourish when seeds stay damp beyond 48 hours, especially above 21 degrees Celsius. To combat this, you’ll want to:
Choosing bird feeders that attract hummingbirds with wide openings and removable parts makes thorough cleaning far easier in hot, humid conditions.
- Replace nectar every three to four days in warm weather
- Use a dilute bleach solution (one part bleach to nine parts water) for feeder sanitation
- Clean seed feeders monthly—weekly during heavy use
- Remove spilled seed beneath feeders to deter rodents
Regular feeder maintenance involves checking for feeder hygiene issues.
Attracting More Birds to Your Yard
Clean feeders don’t just protect bird health—they draw more species into your space. Studies show that birds avoid contaminated feeding stations, so regular feeder maintenance keeps visitation high.
Combine this with native habitat creation, water feature ideas like drippers, and bird-friendly plants that provide natural food.
Smart yard layout tips—placing feeders near cover but away from windows—plus seasonal birding awareness create an environment backyard birds can’t resist.
How Often to Clean Bird Feeders

You can’t set your watch by a single cleaning schedule, because different feeders need different levels of attention based on their design and the food they hold. Seed feeders, hummingbird feeders, and suet stations each come with their own timelines, and weather conditions or heavy bird traffic can shift those recommendations considerably.
Here’s how to determine the right cleaning frequency for each type of feeder in your yard.
Recommended Cleaning Frequency for Seed Feeders
Most experts agree you should clean seed feeders about every two weeks to keep birds healthy and prevent disease spread. The Cornell Lab of Ornithology and Birds Canada both recommend this biweekly schedule for routine feeder maintenance, using hot soapy water followed by a dilute bleach solution.
Beyond cleaning schedules, selecting high-quality birdseed for your backyard helps minimize waste and keeps feeders fresher between maintenance sessions.
However, you’ll want to increase your cleaning frequency to weekly during wet weather, heavy bird activity, or if you spot any sick birds at your feeding station.
Cleaning Schedule for Hummingbird Feeders
Unlike cleaning seed feeders every two weeks, hummingbird feeders demand much more attention because sugar water ferments quickly and harbors harmful bacteria.
You should replace nectar and sanitize your hummingbird feeders every three to five days in temperate weather, but daily cleaning becomes essential when temperatures climb above 80 degrees Fahrenheit.
Always use hot water or a dilute bleach solution to protect hummingbird health.
Adjusting Frequency Based on Weather and Bird Activity
When humidity climbs or bird traffic doubles, your cleaning schedule must shift to match the risk. Regional variations matter too—warmer climates demand more aggressive outdoor cleaning and sanitation.
You should clean seed feeders weekly during rainy weather or heat waves, because moisture accelerates mold growth and bacterial spread that trigger bird diseases. Watch for cloudy nectar or clumped seed as visual cues to increase bird feeder maintenance immediately.
Step-by-Step Guide to Cleaning Bird Feeders
Cleaning your bird feeders doesn’t have to feel overwhelming once you know the right approach. The process involves four essential stages that work together to eliminate harmful bacteria, mold, and disease-causing pathogens while protecting both you and your feathered visitors.
Let’s walk through each step so you can maintain a safe, welcoming feeding station in your yard.
Safety Precautions and Preparation

Before you touch any feeder, slip on rubber gloves to shield yourself from pathogens like Salmonella—think of them as your first line of defense in disease prevention. Check each unit for cracks or sharp edges that could harbor bacteria.
Then, gather your cleaning solutions: a 10 percent bleach mix (one part bleach to nine parts water) or hot vinegar diluted four-to-one. Safe handling starts here.
Soaking and Scrubbing Techniques

After you’ve disassembled all feeder parts, submerge them in warm, soapy water for ten to fifteen minutes—this soaking time softens dried seed oils and lets you scrub more effectively. Next, grab a stiff bottle brush to reach every corner, perch, and port where bacteria hide.
For nectar feeders, switch to a narrow brush designed for small openings; vinegar works beautifully here, dissolving mold without harsh fumes.
Disinfecting With Bleach Solutions

Once you’ve scrubbed away visible grime, you need a bleach solution to kill lingering pathogens like Salmonella and avian pox viruses. Mix one part household bleach with nine parts water—this 10% concentration disinfects effectively without leaving toxic residue.
- Wear rubber gloves during solution preparation.
- Soak feeder parts for ten minutes.
- Don’t combine bleach with soap to avoid harmful fumes.
- Use fresh bleach solution each cleaning session.
- Verify complete submersion of all surfaces.
Proper Rinsing and Drying Methods

Bleach removal demands more attention than most people realize—trace chemicals harm birds if you skip this step. Rinse each disassembled part under running tap water for ten minutes, then repeat with fresh water to eliminate every drop of disinfectant from crevices and feeding ports.
Let feeders air dry completely on a clean towel before you refill them—moisture fosters mold growth and undoes your sanitation practices.
| Rinse Techniques | Drying Methods | Safety Check |
|---|---|---|
| Submerge in clean water tub | Air dry on towel or rack | No chemical smell remains |
| Run under shower head continuously | Wait until completely moisture-free | All surfaces bone-dry |
| Repeat rinse cycle twice minimum | Avoid rehanging while damp | Prevents mold and bacteria return |
Maintaining a Healthy Feeding Environment

Keeping your feeder clean is only part of the equation—you also need to pay attention to the area around it, the food you’re offering, and the birds themselves.
A healthy feeding station requires monitoring the ground beneath your feeders, preventing spoilage that can harbor pathogens, and watching for behavioral signs that indicate disease.
These three practices work together to create a safe environment where birds can feed without increased risk of infection.
Cleaning The Ground Below Feeders
Beyond the feeder itself, you’ll need to tackle the ground below—where fallen seed hulls, droppings, and decomposing debris create a dangerous breeding ground for bacteria and fungi.
Rake up this waste at least twice weekly, sealing it in plastic bags for disposal, which aids both sanitation practices and rodent control while protecting the birds that depend on your garden hygiene and thoughtful feeder placement.
Preventing Food Spoilage and Rodent Attraction
Keep birdseed fresh by storing it in airtight, rodent-proof containers in cool, dry spaces, which preserves quality for months while deterring pest control headaches.
Fill feeders only two-thirds full with quantities birds consume within two to three days, preventing mold and contamination from moisture exposure. Discard wet, clumpy seed immediately—aflatoxins from moldy food can kill backyard visitors—and rotate feeder locations every few weeks to avoid chronic waste buildup that attracts rodents.
Monitoring for Signs of Sick Birds
Even clean feeders won’t protect flocks if sick birds arrive, so watch for warning signs that demand immediate action. Lethargy, difficulty breathing, swollen eyelids, and wet plumage around the beak signal serious avian health risks including salmonella, avian flu, and trichomonosis—diseases that spread rapidly at feeding stations.
- Fluffed-up birds sitting motionless near feeders often show late infection stages
- Eye discharge, crusted eyelids, or constant eye-rubbing indicate conjunctivitis spreading through your flock
- Labored breathing with gaping beaks suggests aspergillosis or other respiratory infections
- Wart-like growths on feet, legs, or beak margins reveal avian pox transmission
Remove all feeders immediately for one to two weeks when you spot these sick bird behavior patterns, preventing dozens of healthy visitors from contracting illness. Report multiple dead songbirds to your state wildlife agency at 1-877-463-6497—wildlife health laboratories track outbreak patterns to protect regional bird populations and guide public response during disease emergencies.
Top 4 Tools and Products for Cleaning Bird Feeders
Having the right tools makes feeder maintenance faster, more thorough, and less of a hassle, especially when you’re working with hard-to-reach tube feeders or stubborn biofilm buildup. You don’t need a massive arsenal of specialized equipment, but a few well-chosen brushes, cleaning solutions, and feeder designs can transform a tedious chore into a straightforward routine that protects your visiting songbirds, finches, and hummingbirds from preventable disease.
Here are four products that make regular sanitation easier and more effective for backyard bird enthusiasts.
1. Aspects Quick Clean Seed Tube Feeder
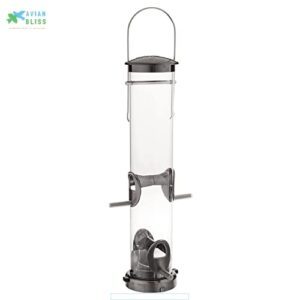
You’ll find the Aspects Quick Clean Seed Tube Feeder simplifies feeder maintenance considerably, letting you focus more on watching cardinals and chickadees than scrubbing. The design features spring-loaded tabs on the base—squeeze them gently, and the entire base detaches in one motion without tools, giving you complete access to the 1.25-quart polycarbonate tube for thorough scrubbing with hot soapy water or dilute bleach solution.
The UV-stabilized clear tube and die-cast metal ports resist weathering for years, while the built-in seed deflector ensures birds consume nearly all seed before you refill.
| Best For | Backyard birders who want a durable, easy-to-clean feeder that attracts finches, cardinals, chickadees, and other small songbirds without spending hours on maintenance. |
|---|---|
| Brand | Aspects |
| Material | Plastic and metal |
| Primary Use | Bird feeding |
| Color | Brushed Nickel |
| Easy to Clean | Removable base |
| Durability | UV resistant polycarbonate |
| Additional Features |
|
- Tool-free base removal with spring-loaded tabs makes cleaning fast and thorough—just squeeze, detach, and scrub
- Heavy die-cast metal parts and UV-resistant polycarbonate tube hold up for years outdoors without cracking or yellowing
- Built-in seed deflector and raised port ridges keep seed flowing smoothly and help birds empty the feeder completely
- Higher price point compared to basic plastic tube feeders on the market
- Larger birds like grackles may still access the feeder despite the design
- Optional rain dome doesn’t always provide full protection from wet weather
2. Oxo Bottle And Carafe Cleaning Brush
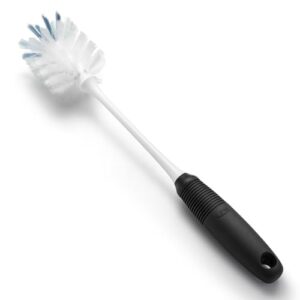
The OXO Bottle and Carafe Cleaning Brush reaches deep into tube-style bird feeders, where mold and decomposing seed hulls tend to concentrate in corners beyond your fingertips. Its flexible 13-inch neck bends to follow interior contours, while dual nylon bristles—stiff at the tip, softer along the sides—scrub compacted residue without scratching polycarbonate or glass tubes.
The non-slip grip stays secure even when you’re working with hot soapy water or dilute bleach solution, and the hanging hole allows vertical drying between weekly sanitation cycles.
| Best For | Bird owners who need to deep-clean tube-style feeders with narrow openings and hard-to-reach corners where mold and seed residue accumulate. |
|---|---|
| Brand | OXO |
| Material | Plastic |
| Primary Use | Bottle cleaning |
| Color | Black |
| Easy to Clean | Dishwasher safe |
| Durability | Durable nylon bristles |
| Additional Features |
|
- Long flexible neck reaches deep into tall feeders while dual-action bristles scrub tough buildup without scratching glass or plastic surfaces
- Non-slip grip stays secure when handling wet or soapy equipment during weekly cleaning routines
- Durable nylon bristles hold up through repeated use and the brush can hang vertically to air-dry between sanitation cycles
- May require extra force to insert into very narrow feeder tube openings
- Bristles can lose stiffness over time with frequent scrubbing of compacted debris
- The 2-inch brush head might not fit easily into exceptionally slim feeder designs
3. OXO Deep Clean Brush Set
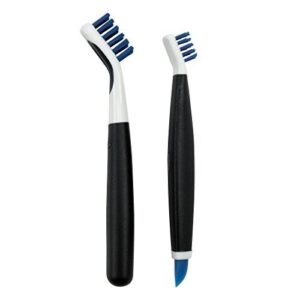
Grooves along feeding ports and seams at the base of platform feeders trap seed fragments, creating microhabitats where salmonella bacteria and fungal spores thrive.
The OXO Deep Clean Brush Set includes a large brush for scrubbing grout-width feeding channels and a smaller brush with a molded wiper blade that clears compacted hulls from drain-style openings.
Durable nylon bristles paired with non-slip grips give you precise control during wet sanitation cycles, while the stiff construction withstands repeated exposure to hot soapy water and dilute bleach disinfectant protocols recommended for preventing avian pox transmission.
| Best For | Bird enthusiasts who need to deep-clean tube feeders, platform feeder seams, and narrow feeding ports where seed debris and bacteria accumulate. |
|---|---|
| Brand | OXO |
| Material | Plastic and stainless steel |
| Primary Use | Deep cleaning |
| Color | Blue |
| Easy to Clean | Rinse after use |
| Durability | Durable scrubbing bristles |
| Additional Features |
|
- Small brush includes a wiper blade that scrapes compacted seed hulls from tight drain openings and crevices
- Durable nylon bristles hold up well against hot water and bleach disinfectant without breaking down
- Non-slip grips give you solid control when scrubbing wet, soapy feeder surfaces
- At $9.99, it’s pricier than generic cleaning brushes you might already have at home
- Won’t tackle extremely baked-on grime or weathered residue without serious elbow grease
- Designed for general household cleaning, so you’re adapting it for bird feeder use rather than buying a purpose-built tool
4. Clorox Splash Less Bleach Cleaner
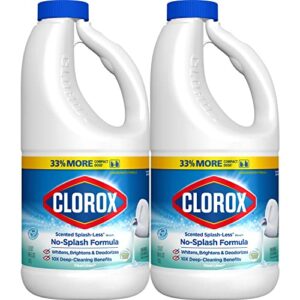
After you scrub away visible debris, a dilute bleach solution eliminates pathogens that hot water and soap alone can’t reach. Clorox Splash Less Bleach Cleaner’s thickened formula clings to vertical feeder surfaces during the six-minute contact time required for disinfecting bird feeder sanitation against salmonella and avian influenza.
Mix one part disinfecting-labeled bleach to nine parts water, apply to hard non-porous feeders, then rinse exhaustively until no chlorine odor remains—residual bleach safety depends on complete removal before refilling with seed.
| Best For | Bird owners who need a reliable disinfectant that stays put on vertical feeder surfaces during the six-minute contact time required to kill salmonella and avian flu. |
|---|---|
| Brand | Clorox |
| Material | Liquid |
| Primary Use | Stain removal and disinfecting |
| Color | Clean Linen |
| Easy to Clean | Ready to use |
| Durability | Concentrated formula |
| Additional Features |
|
- Thickened formula clings to surfaces instead of running off, making it easier to maintain proper contact time for effective disinfection
- EPA-registered disinfecting version kills pathogens like salmonella and influenza A when diluted and used correctly on hard, non-porous feeders
- Splash-less design reduces spills and makes handling safer when mixing your 1:9 bleach-to-water solution
- Requires thorough rinsing until absolutely no chlorine smell remains, or residual bleach can harm birds
- Only the EPA-registered disinfecting version works for sanitation—older cleaning-only formulas are too weak
- Smaller bottle sizes mean you’ll need to reorder more often if you’re cleaning multiple feeders regularly
Frequently Asked Questions (FAQs)
What cleaning products are safe for birds?
Keeping things squeaky clean without ruffling feathers means choosing the right arsenal.
You can safely use diluted bleach solutions, white vinegar, unscented dish soap, or hydrogen peroxide—but always avoid ammonia, phenolics, and fragranced cleaners.
Can I use my dishwasher for feeders?
You can safely use your dishwasher for glass or stainless steel feeders on a hot cycle, but avoid washing wooden or plastic models that may warp, crack, or harbor bacteria in heat-damaged surfaces.
How do I clean wooden bird feeders?
You’ll need hot soapy water and dilute vinegar or bleach (one capful per gallon), scrubbing thoroughly before soaking for ten minutes, then rinsing completely and air-drying to prevent wood damage and disease transmission.
What signs indicate my feeder needs cleaning?
You might think feeders only need attention when visibly filthy, but subtle warnings appear first. Watch for mold growth, seed clumping, unpleasant odors, excess moisture, and droppings buildup—all signal bacteria and disease risks demanding immediate sanitation.
Should I remove feeders during disease outbreaks?
Yes, you should take down feeders for two weeks if you spot sick birds nearby or when local wildlife agencies report salmonellosis outbreaks, reducing disease transmission at crowded feeding stations.
Can I use vinegar instead of bleach?
White vinegar works as a natural disinfectant for routine cleaning, but bleach proves more effective against resilient pathogens.
Use one part vinegar to nine parts water, ensuring you never mix these solutions together.
How do I clean suet feeders properly?
Scrub your suet feeder with hot, soapy water using a bristle brush to remove residue from all surfaces.
Then, sanitize with a dilute bleach solution for five minutes before rinsing and air-drying completely.
Should I wear gloves when cleaning feeders?
Wearing gloves protects you from droppings, mold spores, and harmful bacteria during feeder sanitizing. Use disposable nitrile gloves for barrier protection against contamination risks, then wash your hands thoroughly to maintain proper hand hygiene and support wildlife health.
Whats the best way to clean squirrel baffles?
Ironically, squirrel deterrents need their own cleaning. Remove baffles completely, scrub surfaces with warm soapy water to eliminate debris, rinse thoroughly for wildlife safety, then dry before reinstalling—essential baffle maintenance for effective pest control.
How do I remove tough stains and buildup?
For stubborn stains, soak your feeder in a diluted vinegar solution—about one part vinegar to nine parts water—for an hour, then scrub with a bottle brush before applying bleach solutions for thorough sanitation.
Conclusion
Spending ten minutes every two weeks might feel like one more household chore, but understanding how to clean bird feeders transforms that routine into active conservation—your scrub brush becomes the barrier between thriving populations and preventable outbreaks.
The chickadees investigating your newly disinfected ports, the finches landing without risk of infection, the hummingbirds returning season after season—they’re the evidence that your maintenance matters, that small consistent actions create the safe havens wild birds desperately need.