This site is supported by our readers. We may earn a commission, at no cost to you, if you purchase through links.

A cardinal landing six inches from your child’s face changes something. The textbook closes, the wiggles stop, and suddenly they’re asking why its beak is shaped that way and what it’s eating. That moment doesn’t happen by accident — it happens because you put a feeder where birds actually come.
Hanging bird feeders for homeschool activities give you a living classroom that runs itself between lessons, attracting real species your kids can track, sketch, and learn from every single day.
The builds are simple, the materials cost next to nothing, and the science connections run deeper than you’d expect.
Table Of Contents
- Key Takeaways
- Hanging Feeders for Homeschool Learning
- Easy DIY Feeder Materials
- Simple Hanging Feeder Projects
- Step-by-Step Feeder Building
- Best Bird Foods for Feeders
- Safe Feeder Hanging Locations
- Birdwatching Lessons and Activities
- Cleaning and Maintenance Routines
- Top 4 Homeschool Bird Items
- Frequently Asked Questions (FAQs)
- How to make a bird feeder for school project easy?
- Why should you sprinkle coffee grounds around your bird feeder?
- Which birds visit feeders in winter months?
- Can squirrels damage homemade hanging feeders?
- How do I attract specific bird species?
- What weather conditions affect bird feeding habits?
- How long do DIY feeders typically last?
- Conclusion
Key Takeaways
- A bird feeder built from recycled household materials like toilet paper rolls, pinecones, or plastic bottles can turn your backyard into a hands-on science lab where kids track species, log behavior, and study seasonal patterns every single day.
- Matching the right project to your child’s age — simple pinecone feeders for little ones, full popsicle-stick trays for older kids, data logs for teens — keeps the activity challenging without being frustrating.
- Where you hang the feeder matters as much as what you put in it: aim for 5–6 feet off the ground, at least 10 feet from shrubs, and either within 3 feet or more than 10 feet from windows to protect birds from strikes.
- Regular maintenance — weekly seed checks, a 9:1 bleach rinse, and full 24-hour drying before refilling — isn’t just upkeep; it’s one of the most natural ways to teach kids that caring for wildlife is an ongoing habit, not a one-time craft.
Hanging Feeders for Homeschool Learning

Hanging bird feeders are one of those homeschool tools that punch way above their weight. Building and watching them teaches everything from fine motor skills to real science observation — without feeling like a lesson.
From counting species to tracking seasonal patterns, bird feeders make surprisingly powerful homeschool science tools that turn backyard observations into real math and biology lessons.
Here’s a look at why they work so well and how to match the right activities to your kids.
Why Hanging Bird Feeders Work Well for Outdoor Lessons
Hanging bird feeders turn any backyard into a live outdoor classroom. predictable food source draws local birds right into your line of sight, day after day. elevated observation point keeps the feeding area drier and cleaner, too.
You can even shift feeders between sun and shade spots for flexible habitat contrast and real-time behavior watching during lessons.
morning sunlight exposure helps keep seed dry and improves visibility for students.
Skills Children Practice Through Feeder Building
Building a feeder isn’t just a fun afternoon — it quietly checks off real skills. Fine Motor Development happens naturally as kids cut, glue, thread string, and handle seeds. Creative Design kicks in when they choose shapes and materials. And Project Planning builds when they sequence steps and manage drying time.
- Fine motor skills through hands-on assembly
- Safety Responsibility with scissors and coatings
- Observation Skills during every refill check
How Feeders Support Science, Nature Study, and Observation
Those hands-on skills naturally spill right into real science. A feeder becomes your outdoor lab — supporting homeschool science through bird species identification, behavioral ecology insights, and seasonal migration patterns. Kids practice data collection methods by logging visits daily.
| What Kids Observe | Science Connection |
|---|---|
| Feeding order | Behavioral ecology insights |
| Species variety | Habitat preference studies |
| Seed consumption | Energy budget analysis |
| Seasonal visitors | Seasonal migration patterns |
| Beak shapes | Nature-based hands-on learning |
Birdwatching with kids and outdoor education don’t get more real than this.
Best Ages for Different Bird Feeder Activities
Not every feeder activity suits every age, and that’s actually good news.
Younger kids, around 4 to 6, do best with simple assembly and short 15-minute builds — think pre-cut parts and safe spreads. By 10 to 12, they’re ready for moderate gluing and routine cleaning.
Teens can handle DIY hanging bird feeders, data recording complexity, and real homeschool science observation logs.
Easy DIY Feeder Materials

You don’t need a craft store haul or a big budget to build a feeder your kids will actually be proud of. Most of the best materials are already sitting in your kitchen or recycling bin.
Here’s a look at what works well and why each one earns its spot on the list.
Popsicle Sticks, String, and Craft Glue
You probably already have everything you need for a popsicle stick birdfeeder sitting in your craft bin.
Standard birch sticks glue together cleanly — white school glue works fine for most DIY bird feeder projects for kids, though tacky glue cuts drying time considerably.
For string strength options, braided cord holds weight better than jute.
Always tie a double knot — feeder knot types matter more than you’d think.
Pinecones, Seed, and Nut-free Spreads
Pinecones might be the most underrated supply in your craft basket.
Coat one with sunflower seed butter or coconut oil — both are allergy safe coatings that work beautifully — then roll it through birdseed for instant texture sorting and weight balance practice.
Your pinecone birdfeeder becomes a science observation tool and seasonal seed variations study all in one simple homeschool outdoor activity idea.
Toilet-paper Rolls and Recycled Cardboard
Saving toilet paper rolls is one of those small habits that pays off big in your homeschool.
Each roll has surprising core strength, and the recycled paper design holds seed coating well when you apply a thin, even spread. They’re a perfect fit for homeschool bird study activities.
Here’s what makes them great:
- Free and ready from your own home
- Lightweight enough for small hands to handle
- Eco glue keeps edges tidy without mess
- Fiber sustainability makes them a natural recycled materials lesson
- Easy to prep as a toilet paper roll birdfeeder or hanging bird feeder
Plastic Bottles, Dowels, and Safe Cutting Tools
A recycled bottle feeder might be the most durable option in your homeschool projects lineup. Clear PET bottles let kids monitor seed levels at a glance.
Thread sanded wooden dowels through small holes for Dowel Stabilization, and use Cutting Guide Templates with craft scissors for clean cuts.
Follow a simple Tool Safety Checklist, sand for Edge Smoothing, and add Bottle Reinforcement with non-toxic glue — your hanging bird feeder is ready.
Cookie Cutters for Shaped Seed Ornaments
Cookie cutter birdseed ornaments might be the most satisfying homeschool projects you’ll try this season. Shape Selection matters — stars, hearts, and trees work best at 2–4 inches.
Here’s what makes them so useful for kids’ crafting:
- Binder Alternatives, like gelatin or corn syrup, hold seeds firmly.
- String Attachment Techniques — poke a centered hole before drying.
- Seasonal Color Variations using different seed blends for visual variety.
- Decorative Themes tie educational nature activities for children to holidays naturally.
Simple Hanging Feeder Projects

These projects are a great starting point if you want something hands-on and low-cost. Each one uses simple materials you probably already have at home, and most kids can finish one in under an hour.
Here are five easy feeders worth trying.
Pinecone Bird Feeder Craft
This classic DIY bird feeder is a homeschool curriculum favorite for good reason.
For cone size selection, grab cones between 2 and 4 inches — they hold more coating and give little hands a good grip.
Roll them in a seasonal seed mix after applying natural coating alternatives like sunflower seed butter. Use eco-friendly string choices like hemp twine, double‑knotted, for durability testing tips that actually hold.
Toilet-paper Roll Seed Feeder
If pinecones aren’t handy, a toilet paper roll birdfeeder works just as well — and your kids probably made one in preschool.
Here’s a quick refresh:
- Spread allergy-safe spreads like sunflower butter evenly for seed coating that actually sticks.
- Thread a string loop through punched holes at the top for secure hanging.
- Press seeds firmly onto the roll for better roll stability.
Great for classroom and homeschool bird study activities using recycled household items.
Popsicle-stick Tray Feeder
Popsicle sticks are a step up from the toilet-paper roll — and honestly, a great introduction to real building skills.
Lay 6–8 wooden craft sticks side by side for your base, then glue a second layer on top at right angles. That cross-pattern is what gives it structural stability. Let the glue cure fully — 24 hours is the sweet spot for glue curing time.
| Build Step | Detail | Why It Matters |
|---|---|---|
| Base layer | 6–8 sticks side by side | Creates a solid, gap-free surface for seed retention design |
| Top frame layer | Sticks glued perpendicular | Locks the tray and adds eco friendly materials strength |
| Wall height | 4–6 sticks tall | Keeps loose seed from spilling |
| String holes | Near each corner | Allows string tension adjustment when hanging |
| Hang length | 12–24 inches | Keeps feeder swinging freely on the branch |
This DIY bird feeder holds up to 1 cup of mixed seed and works beautifully for homeschool bird study activities. Kids crafting this tray feeder also get a quiet lesson in patience — because rushing the glue is how you end up with a lopsided mess.
Recycled Bottle Hanging Feeder
Ready to take things up a notch? A recycled bottle makes a surprisingly durable, eco-friendly bird feeder — and bottle cut customization lets you control exactly how the seed dispensing mechanics work.
Cut two to four small ports along the sides, add a wooden dowel perch, and attach a hanging loop near the neck.
A simple rain shield addition keeps seed dry.
Adult supervision guidelines apply for all cutting steps.
Birdseed Cookie-cutter Ornaments
Cookie-cutter ornaments might be the most crowd-pleasing DIY bird feeder project in your homeschool lineup. Kids mix birdseed with dissolved gelatin, press it into Holiday Shape Designs like stars or hearts, and hang them with twine. It doubles as a Classroom Measurement Activities win.
- Use gelatin for reliable Gelatin Binding Tips
- Follow Sweetener Safety Guidelines — skip honey for younger kids
- Allow 24–48 hours for Drying Time Optimization
- Thread twine before the mixture before the mixture sets
- Choose nut-free seeds for safer educational bird projects
Step-by-Step Feeder Building
Once you’ve gathered your materials, the building part is actually pretty simple. Each feeder type follows a short set of steps — and most kids can handle more of it than you’d expect.
Here’s how to walk through the process from start to finish.
Preparing Child-safe Materials Before Starting

Before you hand anyone a glue stick, take a quick look at what’s on the table. Stick to non-toxic adhesives and food-grade paints, and swap regular peanut butter for allergy-safe spreads when needed.
Set out child-sized safety gear, keep materials in organized storage bins, and make sure an adult stays close.
A tidy, well-supervised space sets every project up for success.
Adding Seed Mixtures or Spreads

Once your workspace is set, it’s time to load up your feeder with something birds will actually want.
- Use allergy-safe spreads like Crisco as your seed mixture binder — it holds seeds in place without nut allergy worries.
- Try layering strategies: press a base coat of spread first, then roll in your seed blend for better coverage.
- Adjust seasonal blend choices by adding suet-style mixes in winter for extra bird energy.
Creating Holes for String or Wire

Before you grab any tools, think about what your feeder is made of — that changes everything.
For cardboard and toilet-paper rolls, a single hole punch or sharp skewer works great. Wood pieces need a 1/8-inch drill bit and a pilot hole first.
Always wear safety glasses, work on a stable surface, and make the hole just slightly larger than your string or wire.
Tying Secure Hanging Loops

knot you choose matters more than you’d think.
For most hanging bird feeders, a simple bowline gives you a fixed loop that holds under load without jamming. Knot selection and load distribution go hand in hand — paracord supports heavier popsicle-stick feeders, while jute suits lighter pinecone versions.
Add redundant loops for safety checks, and always confirm material compatibility before heading outside.
Letting Glue, Oil, or Seed Mixtures Set Fully

Rushing this step is the one mistake that unravels everything.
Glue needs 6 to 24 hours to cure fully, and seed mixtures need 12 to 24 — longer if your humidity sits above 60 percent.
Temperature matters too; aim for 70–75°F.
Press lightly with one finger — no indent means it’s ready.
Good glue control and patience here are your best DIY bird feeder safety tips.
Best Bird Foods for Feeders

Once your feeder is built and hanging, the next question is always: what do you actually put in it? Not all birds eat the same things, and the right food can make a big difference in who shows up.
Here are the best options to stock your homeschool feeders.
Black Oil Sunflower Seeds for Common Backyard Birds
If you could stock just one seed in your hanging bird feeders, black oil sunflower seeds win every time. They’re energy dense seeds packed with 40–50% oil — perfect fuel for backyard birds year‑round.
Birds these seeds attract to your educational backyard projects:
- Northern cardinals – love the high fat content
- Black-capped chickadees – daily regulars at homeschool feeders
- Nuthatches and woodpeckers – drawn by thin, easy‑crack shells
- American goldfinches – seasonal bird preferences peak during migration
Nyjer Seed for Small Finches
Nyjer seeds are a great next step for your educational backyard projects. These tiny seeds — about 1mm wide — are built for house finch and goldfinch beaks. That’s the Seed Size Benefits in action.
Use a tube feeder with small ports to keep waste low.
The high oil content gives birds a real Seasonal Energy Boost, especially during migration.
Suet-style Foods for Cold-weather Feeding
Once temperatures drop, suet becomes one of the best winter bird feeding ideas you can add to your setup. High-energy Suet keeps birds warm when they need it most — think woodpeckers, chickadees, and nuthatches fueling up on cold mornings.
Try these Seasonal Suet Flavors for your DIY bird feeder or suet feeder:
- Fruit-infused Suet with dried cranberries or raisins
- Mealworm Boost blends for insect-eating species
- Peanut butter and sunflower seed mixes
- Rendered beef tallow pressed into molds
Follow basic Suet Storage Tips: freeze unused blocks and replace melted or moldy cakes right away.
Nut-free Options for Safer Homeschool Crafts
If anyone in your group has nut allergies, you can still build DIY hanging bird feeders safely. Swap peanut butter for Flour Paste Glue or a Starch Binder to hold your seed mix together.
Check Seed Mix Labels to confirm sunflower seed and millet come from nut‑free facilities. Keep Allergen‑Free Tools at the workstation, and these Nut‑Free Substitutes make homeschool outdoor activity ideas accessible for every child.
Foods to Avoid in Children’s Feeder Projects
Beyond nut-free swaps, knowing what to skip matters just as much. Some foods look harmless but can cause real problems in a feeder craft setting.
- Whole grapes and raw apple chunks are choking risks — cut them small or skip them entirely.
- Hard candies and sugar syrup attract pests and spoil fast.
- Raw nuts and peanut butter need adult supervision and allergen checks.
- Honey danger is real for toddlers — botulism risk makes it a hard no.
- Grapes, apples, and oranges left out in heat mold quickly.
Craft safety starts with knowing the no-list.
Safe Feeder Hanging Locations

Where you hang your feeder matters just as much as what you put in it.
A good spot keeps birds safe, makes cleanup easier, and gives your kids a clear view without scaring the birds away.
Here are a few simple guidelines to help you pick the right location.
Choosing Branches That Support Feeder Weight
Not every tree branch is up to the job. Before you hang anything, check these Branch Diameter Guidelines and Wood Type Strength basics so nothing comes crashing down mid‑lesson.
| Branch Feature | What to Look For |
|---|---|
| Diameter | At least 3 inches across |
| Wood type | Hardwoods like oak or maple |
| Surface condition | No cracks, rot, or dry bark |
| Orientation | Horizontal, close to the trunk |
| Hardware | Steel hooks rated above feeder weight |
Load Distribution Tips and Attachment Hardware Selection matter too — spread multiple feeders evenly and use UV-resistant rope so weather‑impact branches don’t become your problem mid‑winter.
Hanging Feeders High Enough to Reduce Predator Access
Elevated feeder height is your first line of defense. Aim for 5 to 6 feet off the ground on a pole mount design with a smooth surface — cats and raccoons can’t grip what they can’t hold.
Add a predator baffle placement about 12 inches wide beneath the feeder, and maintain clearance from shrubs of at least 10 feet. Squirrel-proofing hanging feeders gets easier when there’s simply nothing nearby to leap from.
Keeping Feeders Away From Unsafe Windows
Windows are a real hazard for backyard birds — strikes happen fast and often go unnoticed. Keep feeders either within 3 feet of glass or more than 10 feet away, so birds can’t build dangerous momentum. Planting autumn fruit trees close to your home gives birds a natural reason to slow down near the house, reducing the frantic flight speeds that make window strikes so deadly.
Window Decal Placement in a grid pattern cuts collision risk dramatically.
Vegetation Barriers between feeders and glass, use Contrast Cords on hanging lines, and choose Glare-Reducing Textures on nearby surfaces.
Placing Feeders Where Children Can Observe Quietly
Good feeder placement turns a simple backyard into a Quiet Observation Zone for your kids.
Aim for Glare-Free Positioning by choosing a shaded or partly shaded spot — Shade Lighting keeps both seed fresh and sightlines clear.
Natural Cover Placement near shrubs within 6–10 feet gives birds confidence to linger.
A Safe Viewing Distance of 3–10 feet from your observation seat keeps classroom and homeschool bird study activities calm and focused.
Avoiding Busy Walkways and Pet Areas
Feeders tucked away from busy doors and pet zones make a real difference. Visual Barriers like low hedges or lattice panels to create Quiet Observation Paths with Low Traffic Placement.
Keep at least 6 feet from main walkways. Simple Boundary Markers — an outdoor rug or short fence — define Pet-Free Zones and help kids know exactly where to stand and watch.
Birdwatching Lessons and Activities

Once your feeder is up and the birds start showing up, the real learning begins. Turning those visits into a homeschool lesson is easier than you’d think, and kids tend to get genuinely hooked on it.
Here are a few ways to build birdwatching into your regular routine.
Keeping a Homeschool Bird Observation Journal
simple notebook can turn your backyard feeder into a full-on outdoor classroom.
Give each session its own page with the date, time, and a quick weather notation — cloudy, windy, 55°F. Use a color-coded index by bird family to make data review sessions easy.
End every entry with a reflection prompt like "What surprised me today?" It keeps the nature lesson plans going long after you’ve come inside.
Recording Species, Numbers, and Behaviors
Once your journal pages are set up, the real fun starts — actually recording what you see.
For each session, jot down:
- The species name and any Species Identification Tips like beak shape or color pattern
- individuals per species
- Behaviors using a simple Behavioral Coding System (F = feeding, C = chasing, P = perching)
- Weather conditions
- Time of visit
Observation Log Templates keep everyone consistent, which makes Temporal Trend Analysis easy later.
Graphing Daily Seed Use and Bird Visits
Once you’ve got a week of data in your journal, put it to work. A simple Visit Frequency Graph — date on one axis, bird counts on the other — turns raw notes into Seed Use Trends, your kids can actually see. Add weather as a note beside each entry, and you’ve got a natural Weather Impact Plot for discussion.
| Day | Seeds Used (g) | Bird Visits |
|---|---|---|
| Mon | 45 | 12 |
| Wed | 30 | 7 |
| Fri | 60 | 18 |
Weekly Average Chart smooths out the daily noise and makes Correlation Analysis easy — great for kids’ science experiments, family nature education, and bonding through bird watching.
Comparing Bird Beaks and Food Preferences
Your graphs already show which birds visit most — now ask why. bird’s beak tells the whole story.
Sparrows have that short, thick conical beak diet built for cracking sunflower seeds. Nuthatches work a needle-like beak feeding style, probing bark for insects. Woodpeckers? Classic hooked beak preferences for suet.
Matching what lands at your DIY hanging bird feeders to beak shape makes educational activities about birds genuinely click for kids.
Using Feeder Visits for Seasonal Nature Study
Your feeder becomes a front-row seat to seasonal migration patterns all year long. Spring and fall bring the biggest species diversity shifts — new faces show up as birds move through.
Weather impact is real too: mild mornings spark feeder visit peaks, while rainy days go quiet.
Tracking these patterns turns your DIY bird feeders into nature-based hands-on learning that kids actually remember.
Cleaning and Maintenance Routines

Once the feeder goes up, the real work begins — keeping it clean and safe for your backyard visitors. A little regular maintenance goes a long way toward protecting the birds your kids have worked so hard to attract.
Here’s what you and your children can do to stay on top of it.
Checking Feeders for Mold or Spoiled Seed
Check your feeders at least once a week — more often in warm or rainy weather.
Mold Detection Signs include seed clumping, musty odors, and visible fuzzy growth. These Spoiled Seed Symptoms mean it’s time to act fast.
Good feeder maintenance routine starts with inspection. Keep a simple log to Record-Keeping Mold Incidents and track patterns, so fresh seed and bird health monitoring stay on track.
Cleaning Reusable Feeders Regularly
Once mold shows up, a good feeder maintenance routine is your best defense going forward.
Stick to these Disinfection Timing and Moisture Control basics:
- Rinse with warm water and mild soap weekly
- Soak in a 9:1 water-bleach solution for 10 minutes
- Do a thorough Soap-Free Rinse before refilling
- Log cleanings in a simple Sanitation Log
- Increase Temperature-Based Cleaning frequency in summer heat
Drying Feeders Completely Before Refilling
After cleaning, don’t rush to refill — drying feeders completely is one of the most important bird feeder safety steps you can take. Aim for at least 24 hours of air drying, longer if humidity is high.
Airflow optimization matters here: raise feeders off surfaces and keep openings clear.
Material-specific drying times vary, so track them as part of your regular feeder maintenance and cleaning practices.
Replacing Damaged Cardboard or Biodegradable Feeders
Cardboard tube and biodegradable feeders don’t last forever — and that’s okay. When you spot sagging, mold, or crushed panels, it’s time to swap them out.
- Look for moisture-resistant coatings on replacements to squeeze out an extra week or two in rainy weather
- Use non-toxic adhesive to reinforce seams before damage spreads
- Choose patch material from similar recycled material feeders for a clean fix
- Check edge finishing so no rough cardboard scrapes small beaks
- Toss worn pieces using compostable disposal methods — they break down naturally
Teaching Children Responsible Wildlife Care
Feeders teach more than bird names — they’re a doorway into genuine habitat stewardship.
Feeders don’t just attract birds — they teach children to care for the living world around them
Show kids how ethical feeding guidelines shape every choice, from seed selection to cleanup. Pair gentle observation with species identification skills, and you’ve got the foundation for citizen science participation right in your backyard.
| Responsible Habit | Why It Matters |
|---|---|
| Clean up dropped seed | Prevents pests and disease |
| Stay three body lengths back | Keeps bird behavior natural |
Top 4 Homeschool Bird Items
Once you’ve got feeders up and running, a few good tools make the whole experience even better.
These four items pair well with everything you’ve already built and learned.
Here’s what’s worth adding to your homeschool bird setup.
1. Beetle Bee Birdhouse Painting Kit
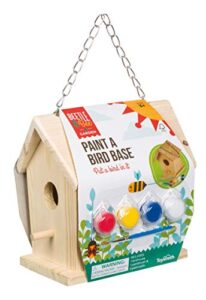
The Beetle Bee Birdhouse Painting Kit is one of those rare finds that checks two boxes at once — art project and outdoor habitat, done.
It comes fully assembled from FSC-certified wood, so your kids can skip straight to painting. The kit includes four non-toxic paints, a brush, and a hanging chain, all ready to go.
It’s sized for small birds like chickadees and nuthatches, and it’s suitable for ages three and up with light adult guidance.
| Best For | Parents, teachers, and homeschool families looking for a simple, mess-free craft that doubles as a backyard bird habitat for kids ages 3 and up. |
|---|---|
| Material | FSC-certified wood |
| Outdoor Use | Yes |
| Weight | 1.1 lb |
| Assembly Required | Yes |
| Mounting Style | Hanging chain |
| Hardware Included | Nails included |
| Additional Features |
|
- Comes fully assembled with everything included — paints, brush, nails, and hanging chain, so you can get started right away.
- Made from FSC-certified wood with non-toxic, water-based paints, so it’s safe for little hands.
- Works as both a creative activity and a functional outdoor birdhouse once it’s done.
- The small size only works for the tiniest bird species and can attract wasps instead.
- Lining up the pre-drilled nail holes can be tricky, so adults will likely need to step in.
- Only four basic paint colors and a very small brush are included, which might feel limiting for kids who want to get more creative.
2. Beetle Bee DIY Birdhouse Kit
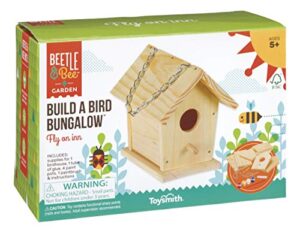
If your kids want more than just painting, this kit gives them the full build. The Beetle Bee DIY Birdhouse Kit includes seven FSC-certified wood pieces, nails, glue, a hanging chain, four paint pots, and a brush — everything in one box.
Assembly takes about 30 to 45 minutes, no power tools needed. Kids aged 5 and up can hammer, glue, and paint their way to a finished 6‑inch birdhouse that actually works outdoors for chickadees and nuthatches.
| Best For | Kids ages 5 and up who want a hands-on craft project that goes beyond just painting — great for classrooms, homeschool days, or family craft nights. |
|---|---|
| Material | FSC-certified wood |
| Outdoor Use | Yes |
| Weight | 0.75 lb |
| Assembly Required | Yes |
| Mounting Style | Hanging chain |
| Hardware Included | Nails and glue |
| Additional Features |
|
- Comes with everything you need — wood, nails, glue, paint, brush, and a hanging chain, all in one box
- Builds real skills: hammering, problem-solving, and painting all in one project
- Makes a functional outdoor birdhouse that can actually attract small birds like chickadees and finches
- The nails can be tricky to align and may bend, so adults will likely need to step in
- The included brush is tiny and four paint colors won’t go far if your kid has big decorating ideas
- The small size limits which birds will move in — and wasps might claim it first
3. Natures Way Cedar Bluebird House

Once your kids have built their own birdhouse, it’s worth having a real one nearby to show them what durability looks like.
The Natures Way Cedar Bluebird House is made from rot-resistant cedar with stainless-steel hardware, so it holds up season after season.
The 1.5-inch entrance hole fits bluebirds perfectly, and the clean-out door makes maintenance simple — great for teaching kids that caring for wildlife is an ongoing responsibility, not a one-time project.
| Best For | Families and backyard birders who want a long-lasting, low-maintenance home for bluebirds and small songbirds. |
|---|---|
| Material | Premium cedar wood |
| Outdoor Use | Yes |
| Weight | 2.6 lb |
| Assembly Required | No |
| Mounting Style | Pole or flush-mount |
| Hardware Included | No mounting hardware |
| Additional Features |
|
- Built from rot-resistant cedar with stainless-steel hardware, so it holds up through years of rain, heat, and cold without falling apart.
- The front clean-out door and removable mesh floor make seasonal cleaning quick and easy — no tools, no hassle.
- The predator guard and ventilation vents give nesting birds a safer, healthier environment right out of the box.
- No mounting hardware included, so you’ll need to drill your own holes and source brackets or a pole separately.
- The wire mesh floor can arrive tacky and needs a good cleaning before birds move in.
- It costs more than basic plastic options, which can add up if you’re looking to buy several at once.
4. Birds Choice Bluebird House Pole
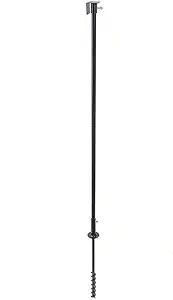
A good birdhouse needs a solid foundation, and that’s exactly what the Birds Choice Bluebird House Pole delivers. Made from 16-gauge black steel, it anchors 20 inches into the ground and stands 54 inches tall — high enough to keep curious cats and squirrels at bay.
The included flange plate mounts top or side, so it works with most standard bluebird houses.
Assembly is straightforward, and the two 28-inch pole sections give you some flexibility on height.
| Best For | Backyard birders who want a sturdy, no-fuss pole that keeps bluebird houses stable and predator-proof. |
|---|---|
| Material | 16 ga steel tubing |
| Outdoor Use | Yes |
| Weight | 6 lb |
| Assembly Required | Yes |
| Mounting Style | Ground socket pole |
| Hardware Included | Twister tool included |
| Additional Features |
|
- Built from heavy-duty 16-gauge steel, so it holds up in wind without wobbling
- The 20-inch ground socket locks in tight, giving your birdhouse a solid, lasting base
- Made in the USA, and the adjustable height works well for different house sizes
- Pricier than DIY options, which might be a dealbreaker if you’re watching your budget
- The mounting flange runs small, so it won’t fit every birdhouse style
- Hard or dry soil can make installation a pain — you may need to soak the ground overnight first
Frequently Asked Questions (FAQs)
How to make a bird feeder for school project easy?
The easiest option is a pinecone feeder — just coat it with peanut butter, roll it in birdseed, tie a string, and hang it up. Simple, mess-friendly, and done in minutes.
Why should you sprinkle coffee grounds around your bird feeder?
It sounds counterintuitive, but spent coffee grounds actually help your feeder thrive.
A light sprinkle deters ants, slugs, and small mammals — keeping the feeding area cleaner and letting birds eat undisturbed.
Which birds visit feeders in winter months?
Chickadees, cardinals, and goldfinches are your most reliable winter visitors. Downy woodpeckers will come for suet, and house sparrows tend to show up in flocks around mixed seed blends.
Can squirrels damage homemade hanging feeders?
Yes — squirrels are relentless little wrecking crews. They’ll chew through plastic, pry open seams, and tilt feeders to spill seed. Homemade feeders are especially vulnerable, so expect repairs.
How do I attract specific bird species?
Match the food to the bird. Goldfinches love thistle, titmice want sunflower seeds and peanuts, and bluebirds go straight for mealworms. Swap foods and watch who shows up.
What weather conditions affect bird feeding habits?
Cold snaps, snow cover, and heavy rain all push birds to visit feeders more often. When temperatures drop below freezing, feeder visits can jump up to 40 percent.
How long do DIY feeders typically last?
Let’s be honest — DIY feeders don’t last forever.
Simple ones like pinecone or toilet-paper roll feeders usually hold up for six months to a year, while sturdier wood or bottle versions can last one to three years.
Conclusion
Old naturalists called it "reading the land", and hanging bird feeders for homeschool activities gives your family that same quiet skill. You’re not just filling a feeder — you’re teaching your kids to notice the world outside the window, ask real questions, and track real answers.
That cardinal didn’t care about your lesson plan. But your child did, and that’s the whole point.
Keep the feeders full, and let the birds do the rest.
- https://www.allaboutbirds.org/news/how-to-choose-the-right-kind-of-bird-feeder/
- https://www.birds.cornell.edu/k12/maintaining-your-classroom-feeder/
- https://feederwatch.org/about/how-to-participate/?utm_source=openai
- https://www.audubon.org/magazine/how-feed-birds-safely-winter
- https://alittlepinchofperfect.com/homemade-winter-bird-feeders/